FORM WORKFLOWS
Purpose: Form Workflows is a module that allows you to create and manage multi-stage form workflows with custom menu configurations. It enables you to define how leads/records move through different stages, which forms are shown at each stage, who can see what data, and how records are auto-allocated.
Key Features:
- Workflow: A multi-stage pipeline that records/leads move through
- Stage: A single step within a workflow (e.g., "Followup", "Sales")
- SimpleFlow: A simpler, single-form, status-driven flow (lighter alternative)
- Menu Display Mode: Controls how the workflow appears in the left sidebar
- Allocation Rules: Rules that auto-route records to stages when a form is submitted
Accessing Form Workflows
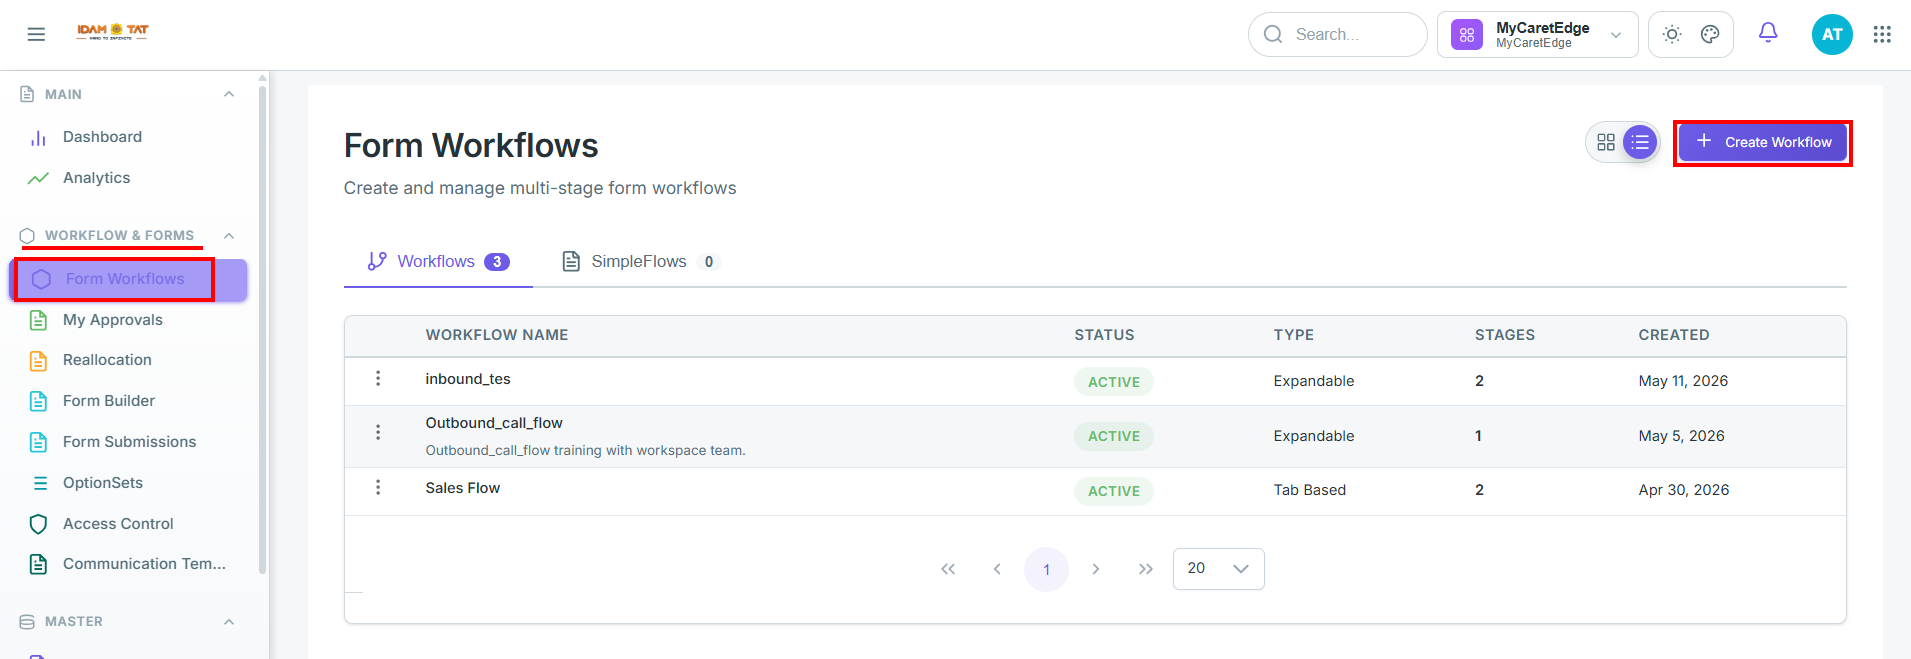
Navigation: Left Sidebar → WORKFLOW & FORMS → Form Workflows
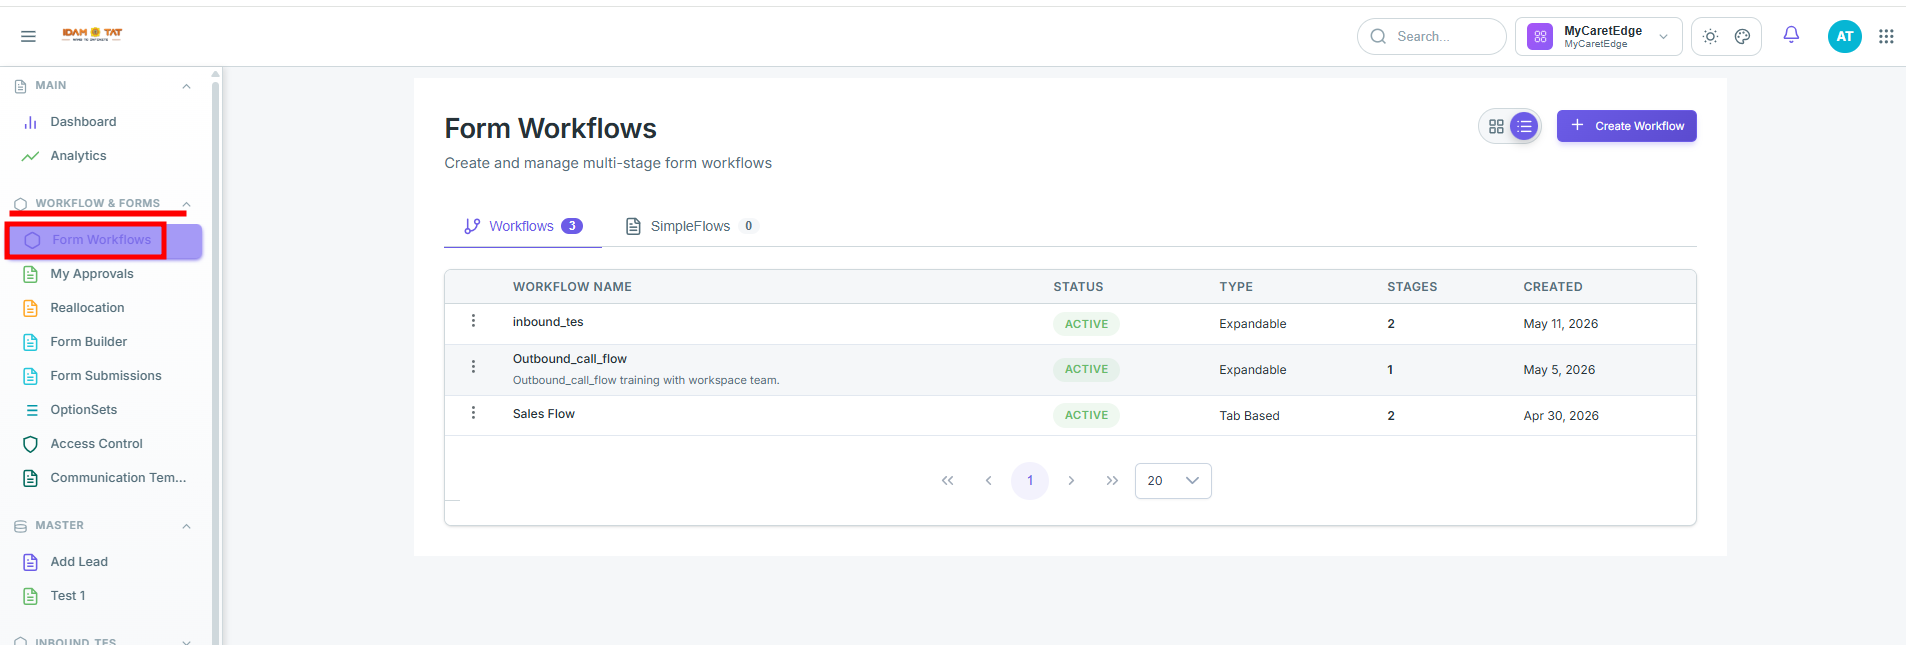
Form Workflows Landing Page
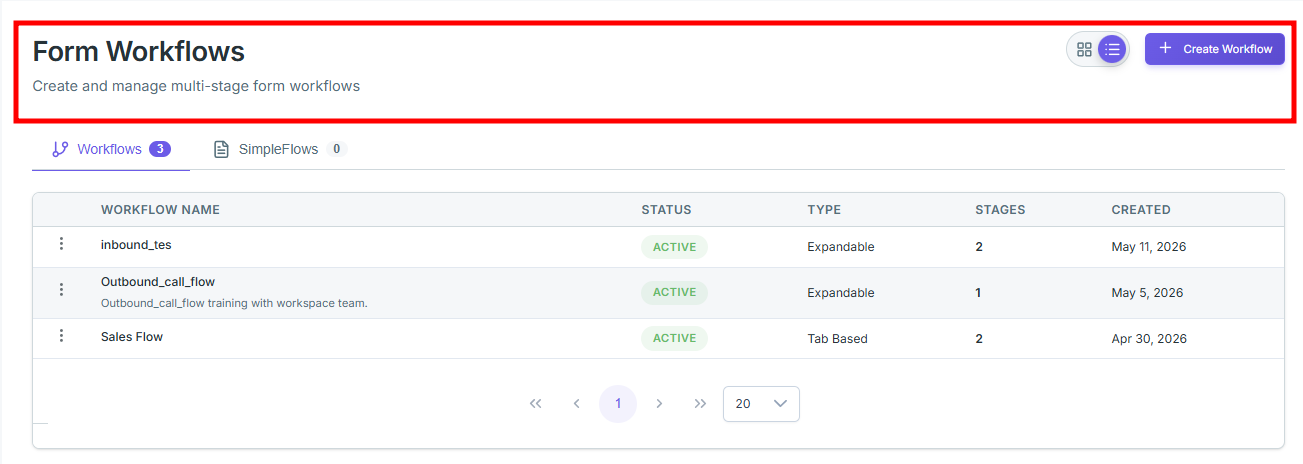
Page Header
- Title: "Form Workflows"
- Subtitle: "Create and manage multi-stage form workflows"
- Top-right buttons:
- Grid View icon (⊞)— Switches to Card/Grid layout
- List View icon (☰) — Switches to tabular List layout
- + Create Workflow (purple button) — Opens the workflow creation wizard
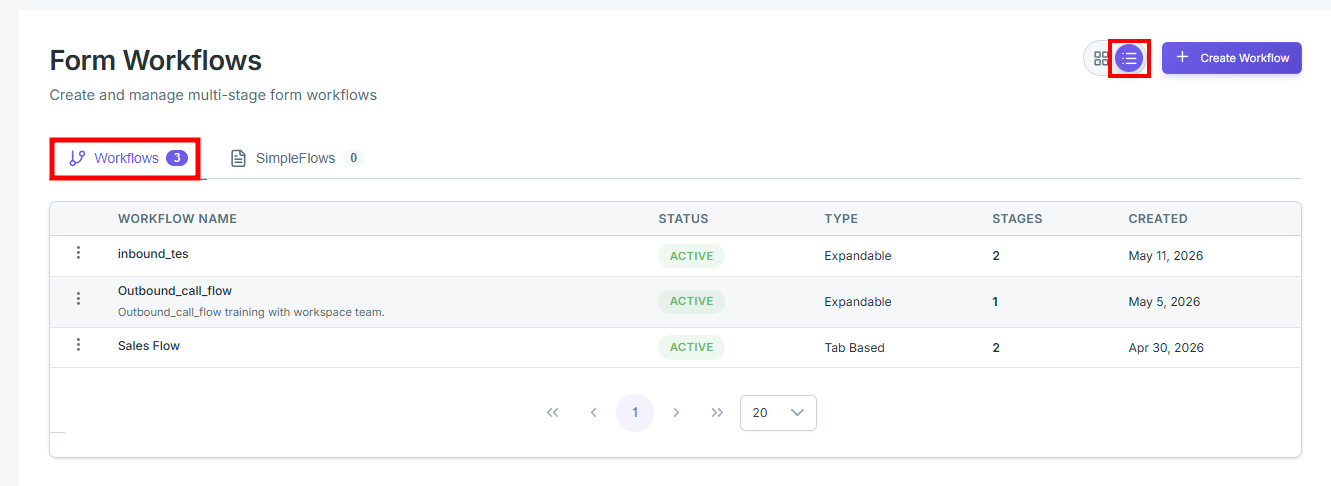
Sub-Tabs
1. Workflows (shows count badge)
"Displays all multi-stage form workflows."
List View
| Column | Description |
|---|---|
| Workflow Name | Name of the workflow (+ description if added) |
| Status | ACTIVE (green badge) or INACTIVE |
| Type | Expandable / Tab Based / Direct |
| Stages | Number of stages configured |
| Created | Date of creation |
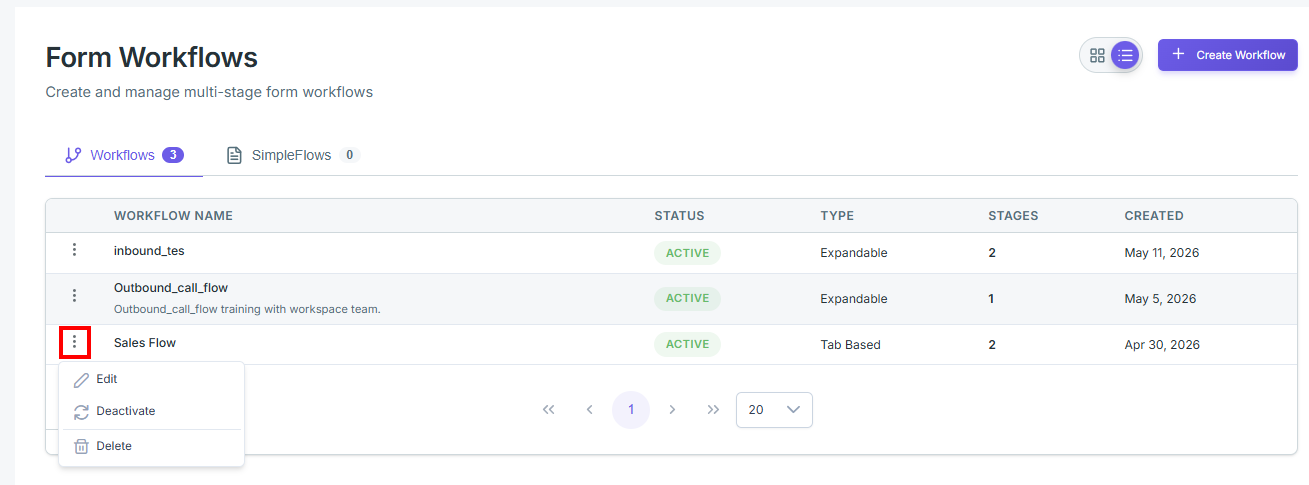
Three-Dot (⋮) Context Menu Options
Clicking the ⋮ icon beside any workflow row opens a context menu containing the following quick actions:
| Option | Action | Description & Impact |
|---|---|---|
| Edit | Opens the Workflow Editor | Redirects to the designer canvas to modify stages, steps, or allocation rules (same behavior as clicking the workflow name). |
| Deactivate | Suspends Workflow execution | Changes the status from ACTIVE to INACTIVE, preventing new records from entering this workflow. |
| Delete | Permanently removes Workflow | Completely and irreversibly deletes the workflow configuration from the CRM system. |
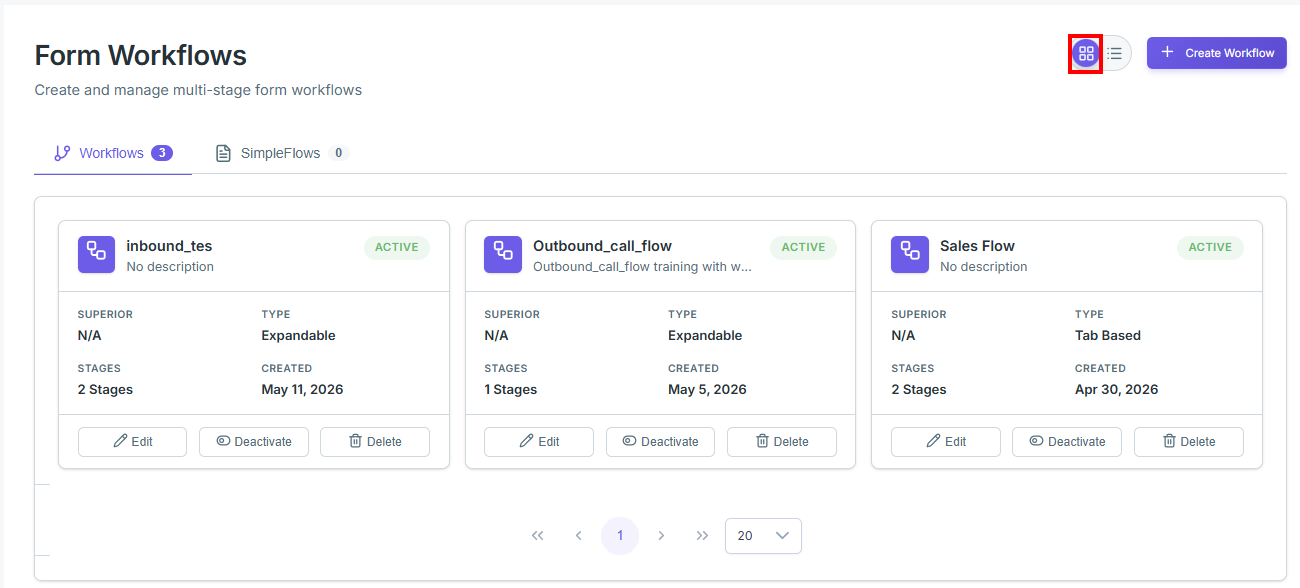
Gird/card
Grid/Card View displays each workflow as a card showing:
- Workflow icon + Name + Status badge
- Description (or "No descrip...")
- SUPERIOR (N/A if none)
- TYPE (Expandable / Tab Based)
- STAGES count
- CREATED date
- Action buttons: Edit | Deactivate | Delete
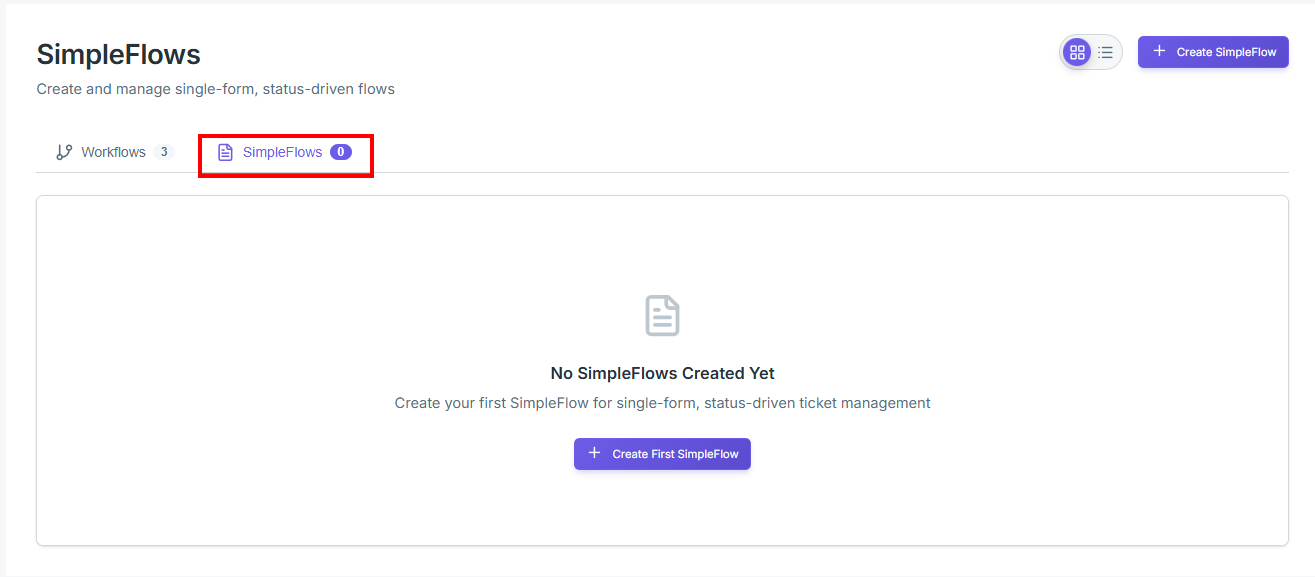
2. SimpleFlows (shows count badge)
"Create and manage single-form, status-driven flows"
- Used for single-form, ticket-style use cases (lighter than full workflows)
- When empty: shows "No SimpleFlows Created Yet" with a + Create First SimpleFlow button
- Has the same + Create SimpleFlow button in the top right
Creating a New Workflow
Step 1: Launch the Creation Wizard
Navigate → Left Sidebar → Workflow & Forms → Form Workflows
Click the purple "+ Create Workflow" button (top right)
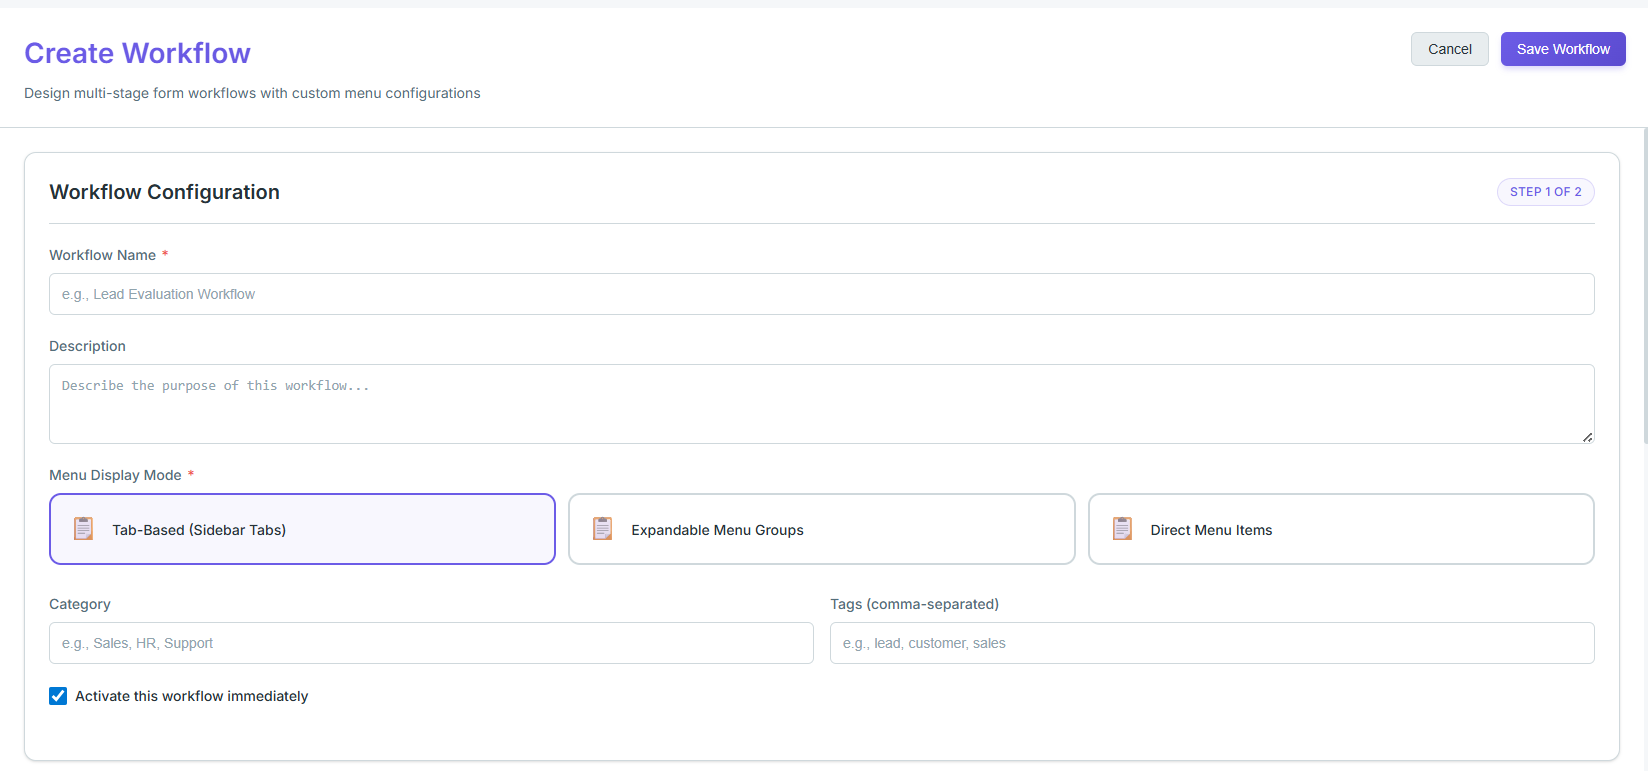
The Create Workflow page opens with the subtitle: "Design multi-stage form workflows with custom menu configurations"
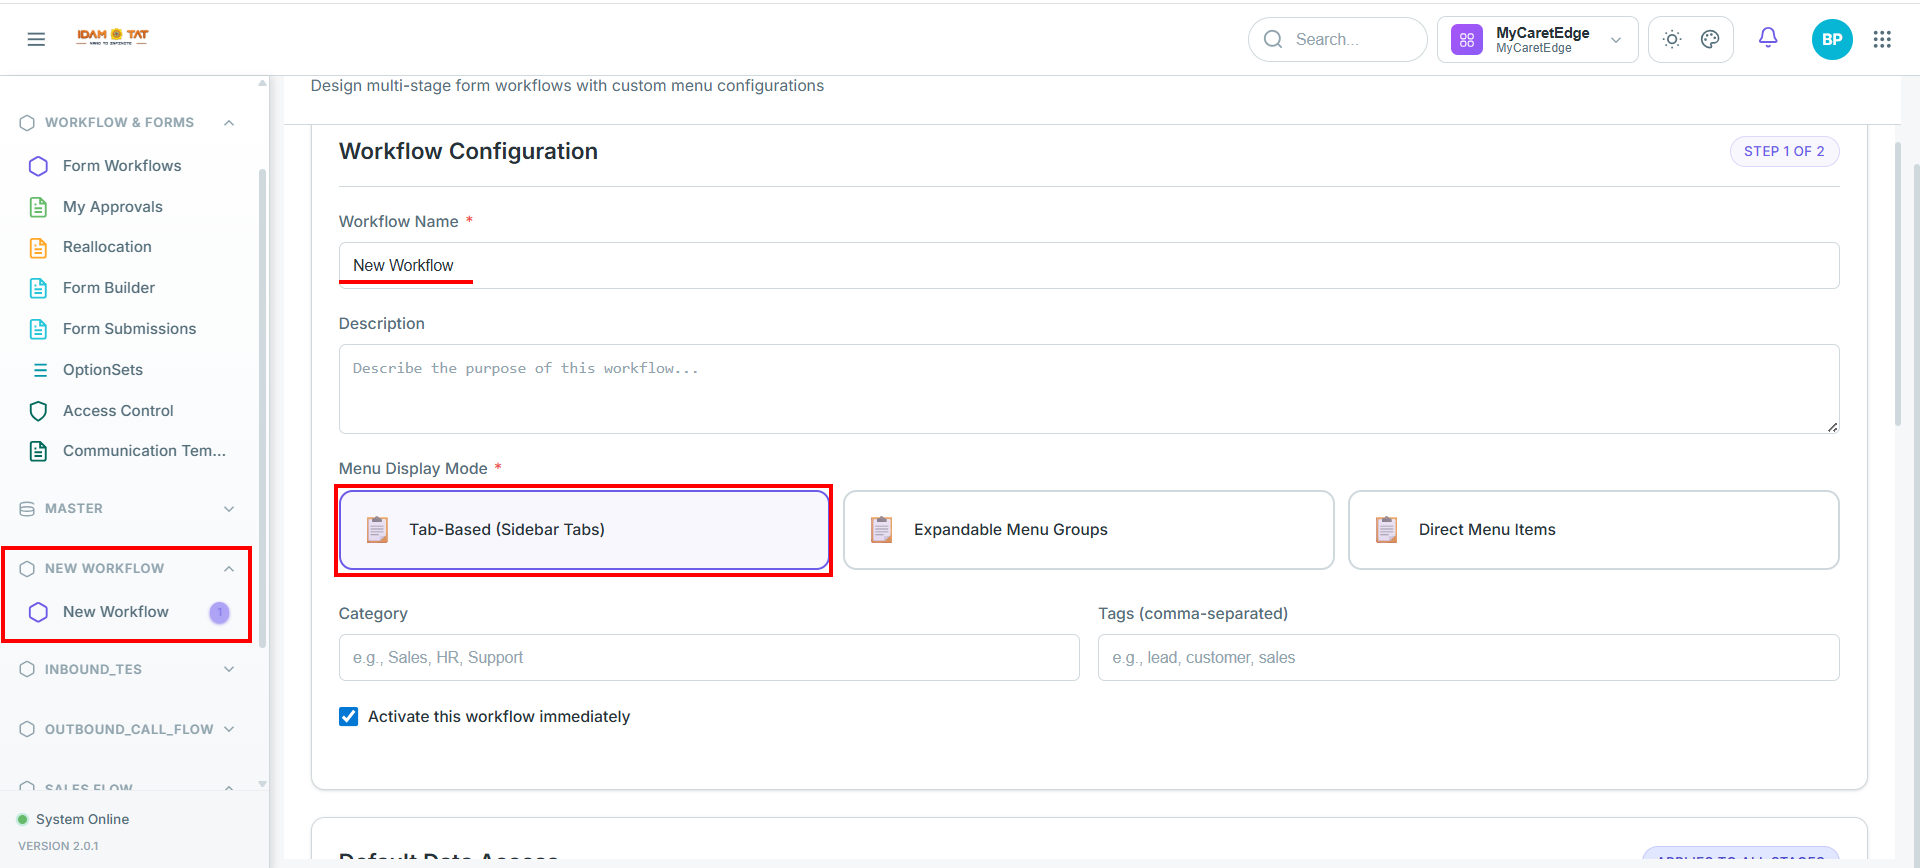
Step 2: Workflow Configuration(STEP 1 OF 2)
Fill in the general settings and options for the new workflow in the configuration wizard:
2A. Workflow Name (Required)
The primary identifier for the workflow throughout the CRM system.
* Configuration: Enter a unique, highly descriptive name.
- Example: Lead Evaluation Workflow
Naming Best Practice: Use standard naming conventions like CamelCase, spaces, or underscores (e.g.,
Inbound_Lead_FloworOutboundSalesProcess) to keep workflow identifiers consistent and easy to locate in database logs or filter forms.
2B. Description (Optional)
- Free-text field: "Describe the purpose of this workflow..."
- Describe the business use case, team responsible, and trigger condition
Recommended Usage: Clearly document: 1. The target business use case (e.g., high-tier client onboarding). 2. The specific business team responsible for executing the stages (e.g., Outbound Sales SDRs). 3. The core trigger conditions (e.g., when a lead submits the web contact form).
2C. Menu Display Mode (Required)
Controls how the workflow stages are visually structured and navigated in the agent's left-hand sidebar layout.
| Option | Display Icon | Sidebar Behavior & Best Use Cases |
|---|---|---|
| Tab-Based (Sidebar Tabs) | 📋 | Each workflow stage is displayed as a distinct horizontal tab at the top of the sidebar page. |
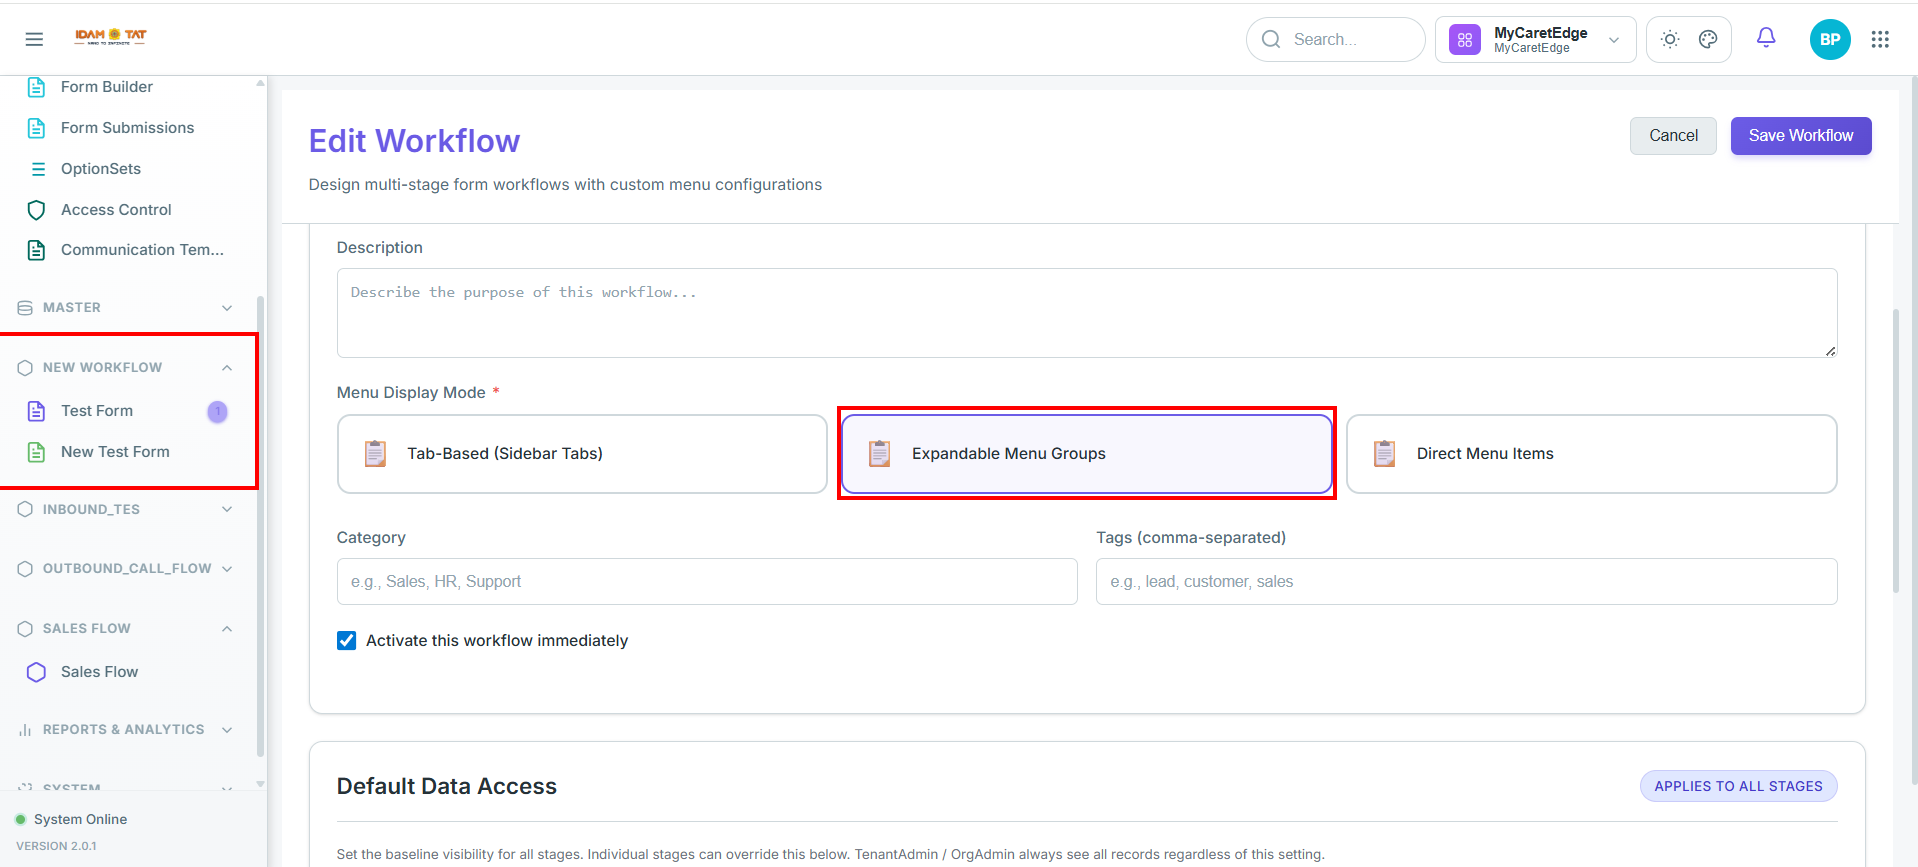
| Expandable Menu Groups | 📋 | Stages are grouped under a single, collapsible sidebar folder/header. |
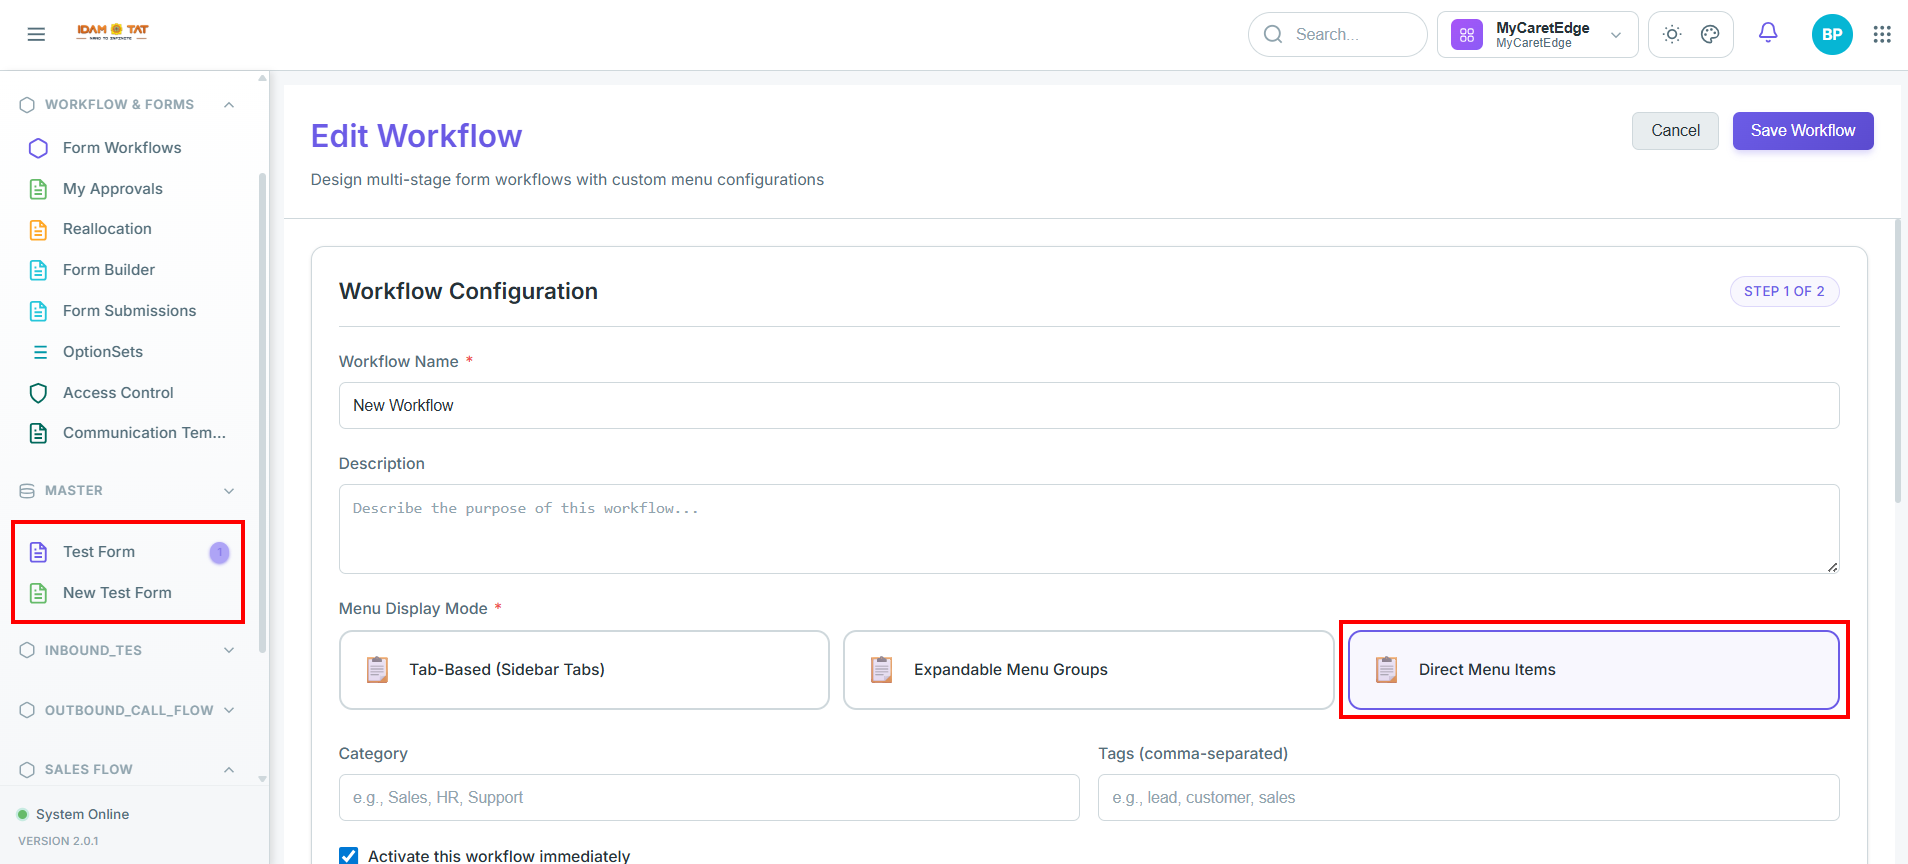
| Direct Menu Items | 📋 | Each stage is rendered flat as a standalone, direct menu link in the main navigation sidebar. |
Tip: "Sales Flow" type = Tab Based; "inbound_tes" and "Outbound_call_flow" = Expandable
Based on the Menu Display Mode the stage will get visible in the left sidebar with work flow name and the stages as the sub options under the workflow name.
-
Tab-Based
-
Expandable Menu Groups
-
Direct Menu Items
2D. Category (Optional)
- Input a text label. (e.g.,
Inbound,Sales,HR,Support,Operations.)
Benefit: Helps organize multiple workflows into clean administrative folders, dramatically speeding up filtering on landing pages and reporting dashboards.
2E. Tags (Optional)
- Input comma-separated metadata keywords used for indexing. (e.g.,
lead,customer,sales,high-value,retention.)
Benefit: Enables precise search indexing, dynamic classification, and advanced database querying.
2F. Activate this workflow immediately (Checkbox)
Determines the publishing state of the workflow upon saving.
- Checked (default): Workflow goes ACTIVE as soon as saved
- Unchecked: Workflow is saved as INACTIVE (can be activated later)
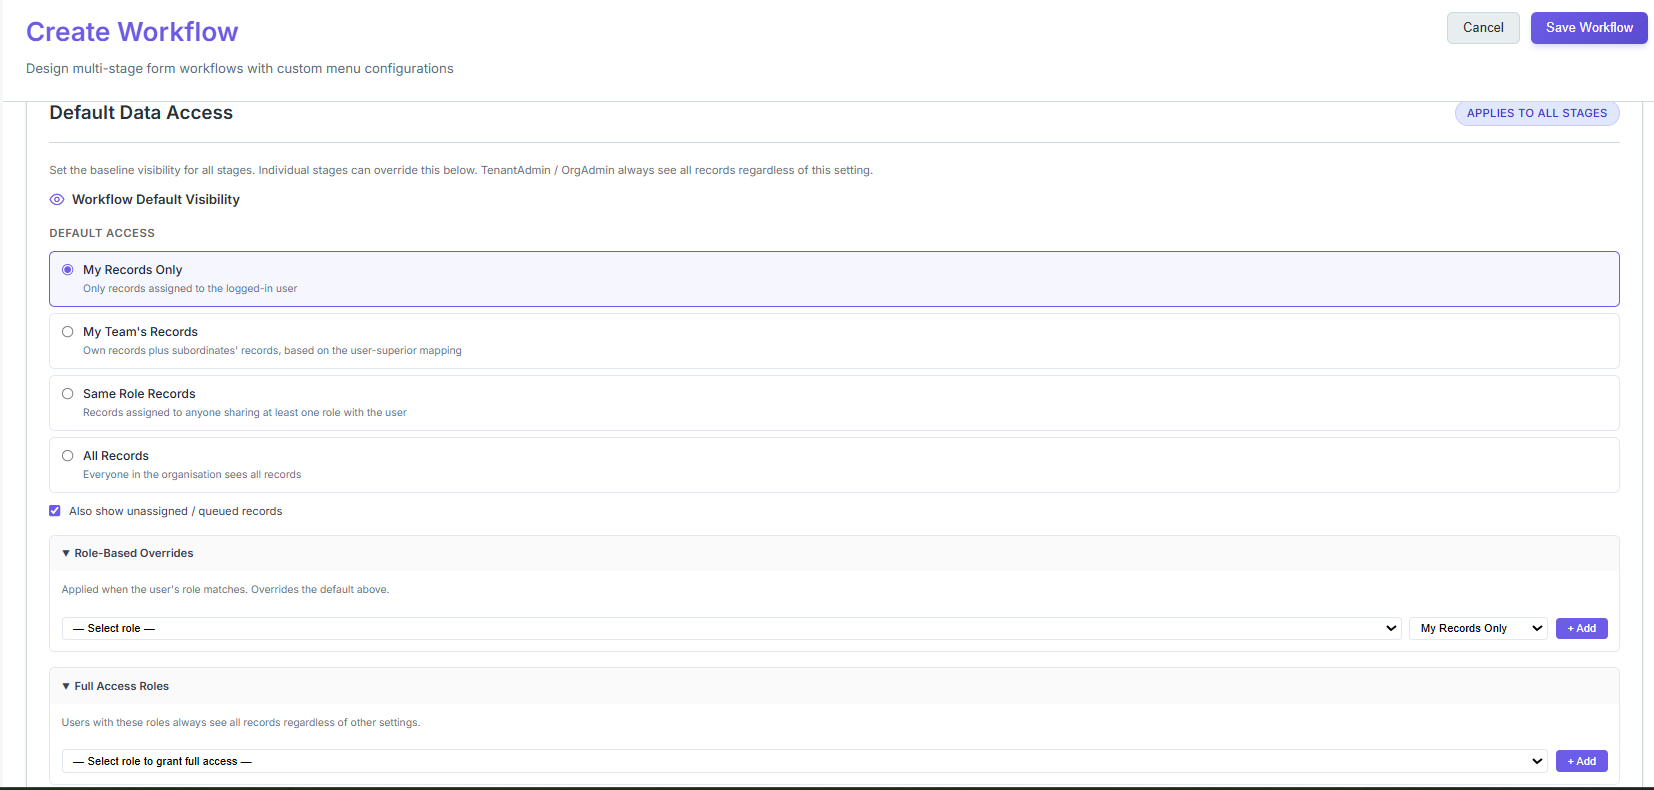
Step 3: Default Data Access Configuration(STEP 1 OF 2)
This section sets the baseline visibility for ALL stages. Individual stages can override this. TenantAdmin / OrgAdmin always see all records regardless of this setting.
Default Access — 4 Radio Options:
| Option | Who Can See |
|---|---|
| My Records Only (default) | Only records assigned to the logged-in user |
| My Team's Records | Own records + subordinates' records (based on user-superior hierarchy mapping) |
| Same Role Records | Records assigned to anyone sharing at least one role with the user |
| All Records | Everyone in the organisation sees all records |
Also show unassigned / queued records (Checkbox)
When enabled, users also see records that are not assigned to anyone (queued/unassigned pool)
Expandable Sections (click "▶" to open):
| Section | Purpose |
|---|---|
| ▶ Role-Based Overrides | Set different access rules for specific roles (override the default above) |
| ▶ Full Access Roles | Grant full visibility to selected roles regardless of the default setting |
| ▶ Preview: Who Can See What? | Preview tool — shows which users/roles can see what data under the current config |
Step 4: Workflow Stages Configuration (STEP 2 OF 2)
This section is at the bottom of the same page.
Adding Stages
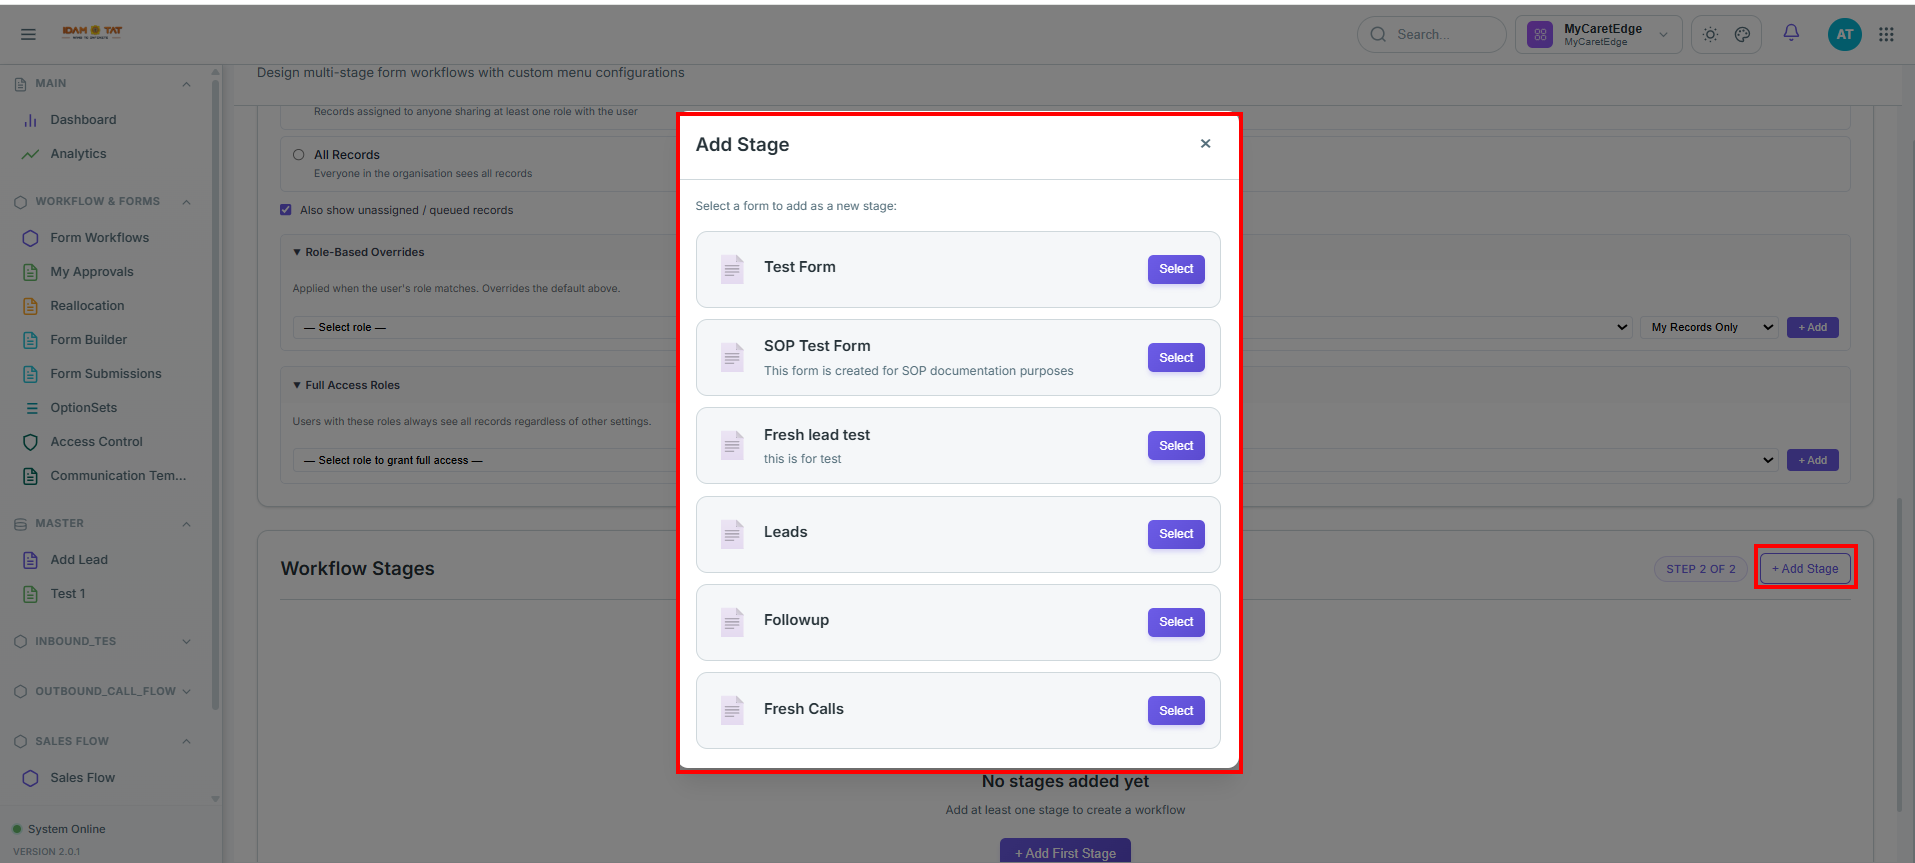
- Click "+ Add Stage" button (top right of the Stages section)
- A pop with all previous created forms will appear, Select the forms you want to add for that particular workflow. (you can select multiple forms at a time)
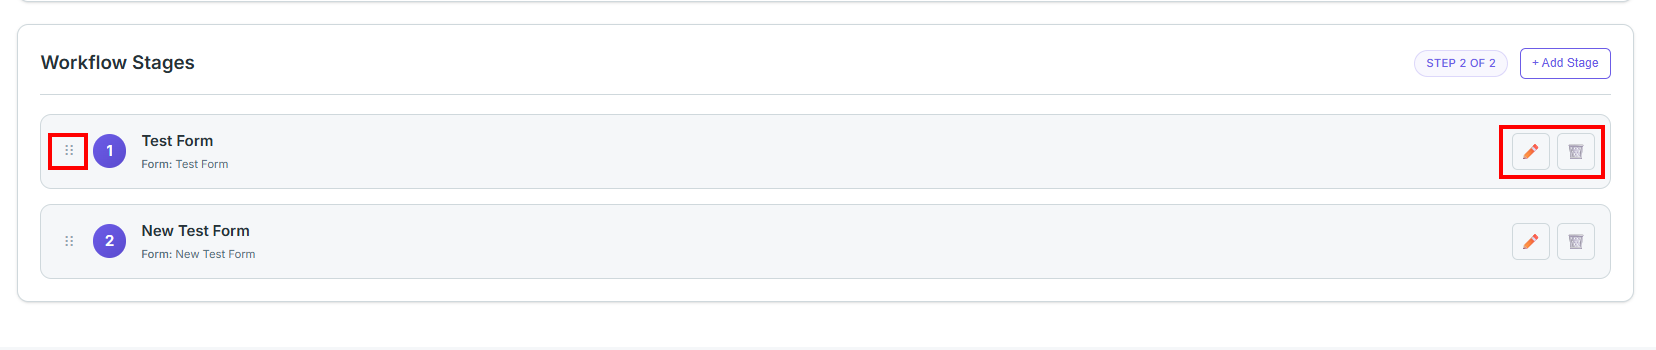
- After form selection, Each stage is displayed as a numbered card (1, 2, 3...)
- Stage card shows: Stage Number | Stage Name | Form linked
Stage Actions (per stage card):
| Icon | Action |
|---|---|
| ✏️ (pencil) | Opens the Configure Stage panel |
| 🗑️ (trash) | Deletes the stage |
| ⋮⋮ (drag handle) | Drag to reorder stages |
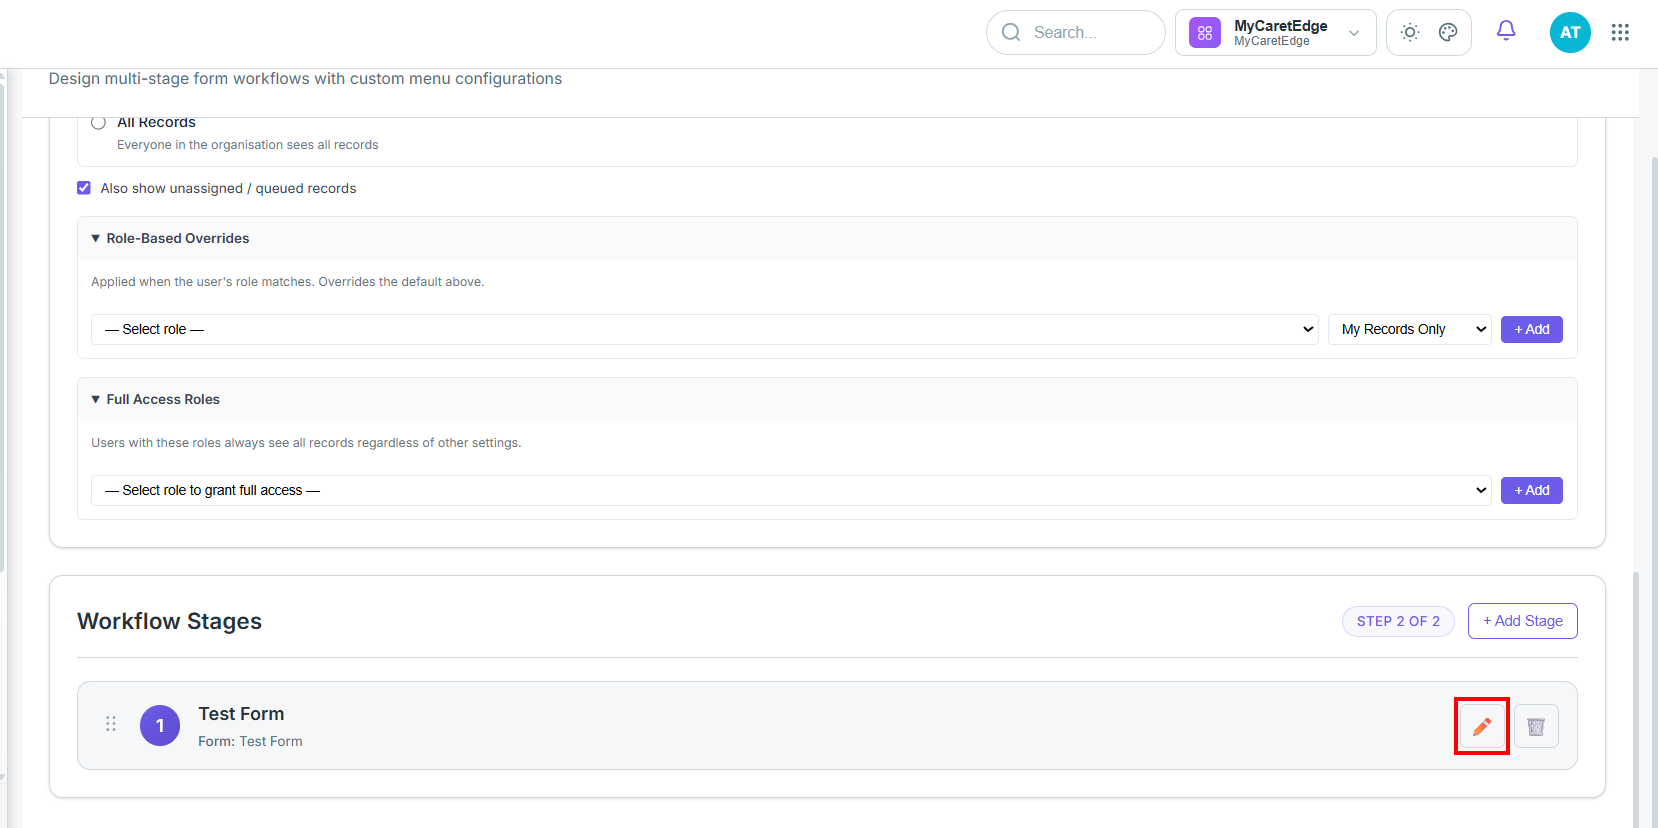
Step 5: Configure Stage — Detailed Panel
Configure Stage
Clicking the pencil ✏️ icon on any stage opens a "Configure Stage" side panel.
Configure Stage Tabs
⚙️ Settings 👥 Allocation ⏰ Scheduler ⛔ Data Drop Rules 🔍 Filters 📋 Columns 🔔 Notifications 👁️ Visibility
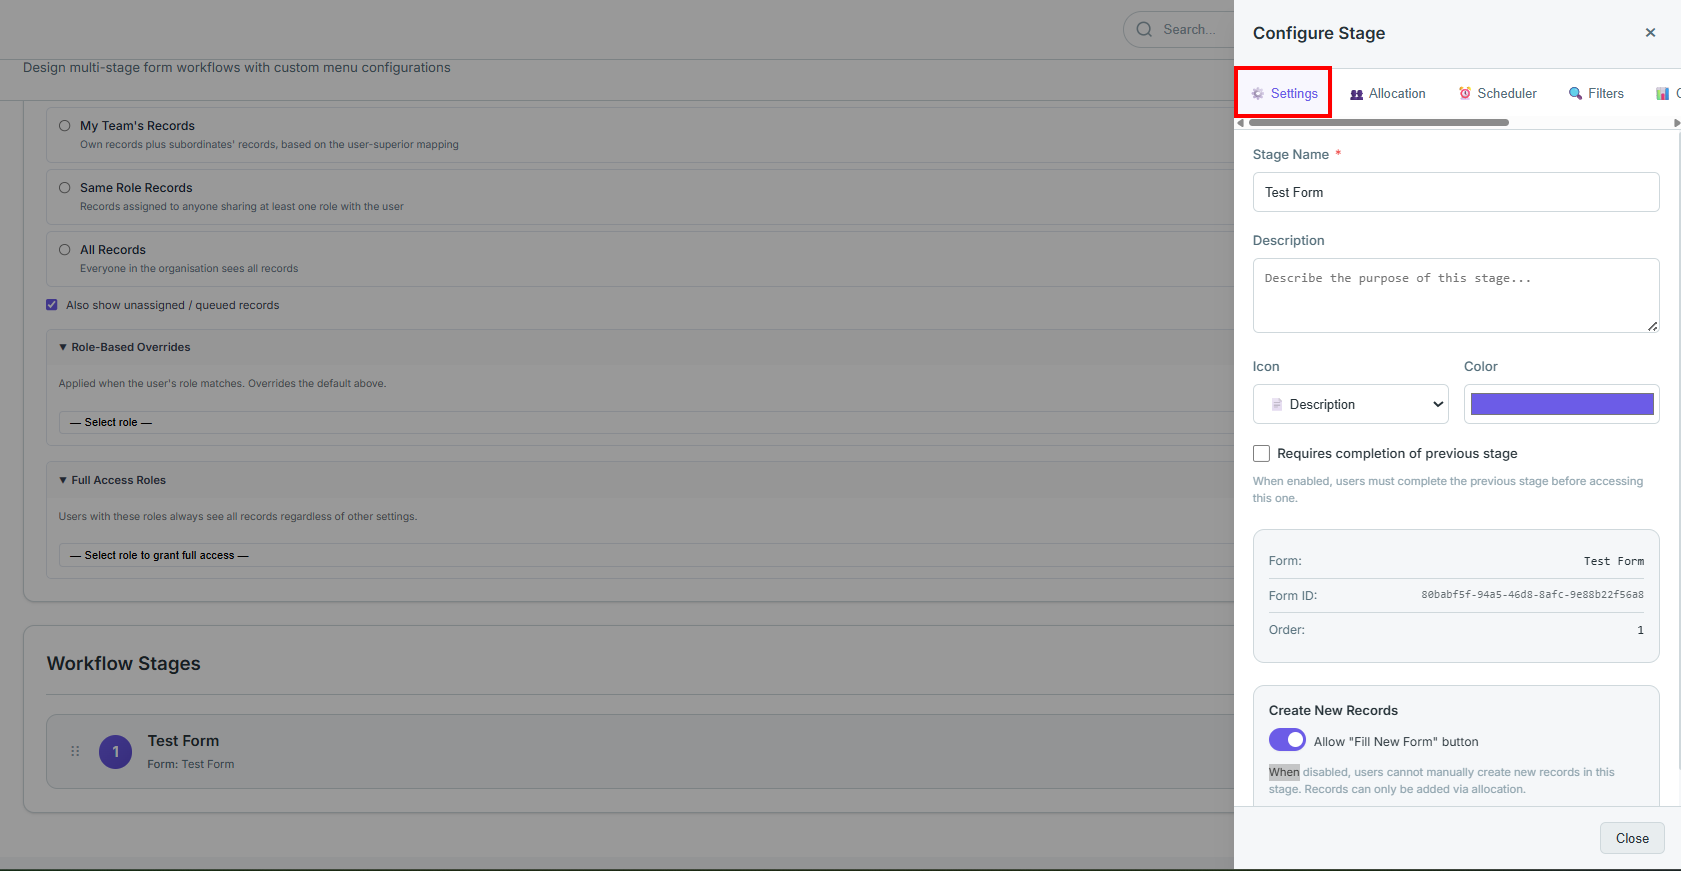
TAB 1: Settings
Tabs Navigation
⚙️ Settings 👥Allocation ⏰ Scheduler ⛔ Data Drop Rules 🔍 Filters 📋 Columns 🔔 Notifications 👁️ Visibility
| Field | Description |
|---|---|
| Stage Name (Required) | Name of this stage (e.g., "Test Form", "Fresh lead test") |
| Description | Purpose of this stage |
| Icon | Select an icon for the stage (dropdown, e.g., "Description") |
| Color | Color picker for the stage badge/label |
| Requires completion of previous stage (Checkbox) | Disabled by Default When enabled, users must complete the prior stage before accessing this one — enforces sequential flow |
| Form | The form linked to this stage (read-only, shows Form name + Form ID + Order) |
| Create New Records | Allow new Form Button(Toggle) :ON by Default When disabled, users cannot manually create new records in this stage. Records can only be added via allocation. |
TAB 2: Allocation
Tabs Navigation
⚙️ Settings 👥 Allocation ⏰ Scheduler ⛔ Data Drop Rules 🔍 Filters 📋 Columns 🔔 Notifications 👁️ Visibility
Allocation rules automate the routing and ownership of a record when a form in the current stage is submitted. This allows records to transition automatically between stages or change hands across teams.
Click the "+ Add Rule" button to open the Add Allocation Rule modal.
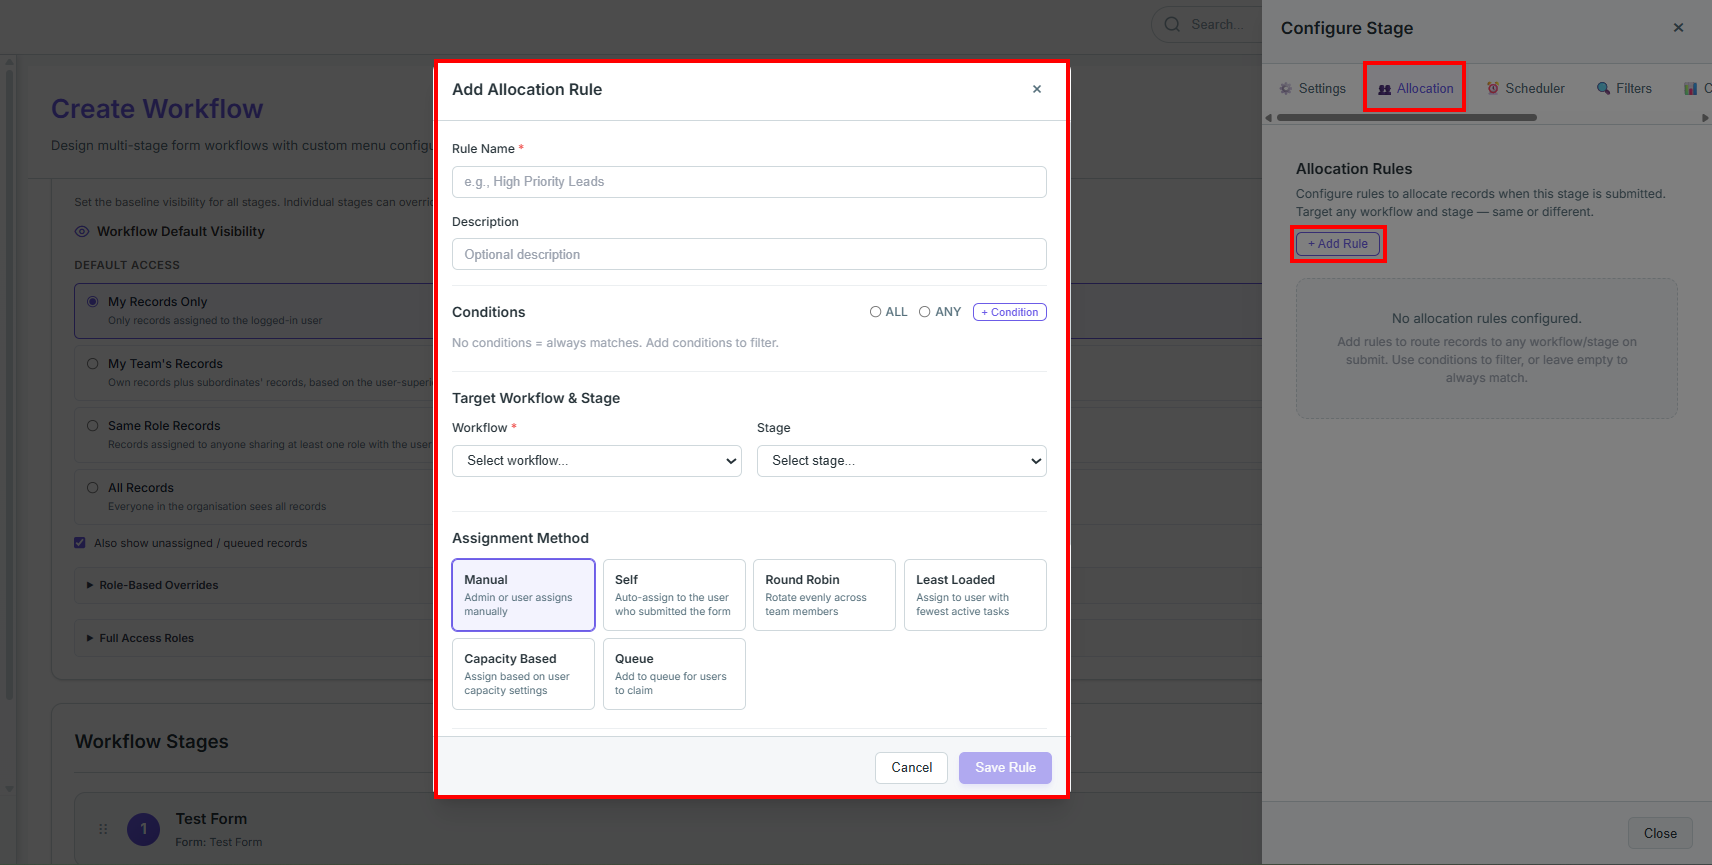
Add Allocation Rule Configuration
The configuration modal consists of the following parameters:
- Rule Name (Required): Input a clear, unique identifier for the routing logic. Example:
e.g., High Priority Leads. - Description (Optional): Contextual notes summarizing the business rule or routing target queue.
- Conditions:
- ALL (default): Every single configured condition must evaluate to
Truefor the rule to trigger (logical AND). - ANY: The rule triggers if at least one of the configured conditions is met (logical OR).
- + Condition Button: Click to define a new condition filter (e.g., checking if a specific field value meets a threshold).
Note: If no conditions are defined, the rule always matches and triggers on every submission.
- Target Workflow & Stage
- Workflow (Required): Select the destination workflow pipeline from the dropdown.
- Stage: Select the specific destination stage within that workflow from the dropdown.
- Assignment Method & Configurations Defines how ownership is assigned to a user once the record lands in the destination stage, alongside the dynamic configuration options revealed for each method:
| Assignment Method | Direct Behavior | Dynamic UI Configurations Revealed |
|---|---|---|
| Manual (Selected) | Routes the record to the target stage without an owner. An administrator or manager must manually assign it later. | Manual Allocation Preset: • Allow selecting multiple users (Checkbox): Permits assigning the record to multiple owners simultaneously in the form renderer. • + Add Preset Filter (Button): Restricts the user selection list by predefined roles or departments. |
| Self | Automatically assigns ownership to the active agent who submitted the stage form, ensuring service continuity. | None (Hidden) — Automatically hardcoded to the submitting agent. |
| Round Robin | Distributes incoming records in a balanced, circular order among all active users in the candidate pool. | User Pool Configuration: • ROLES: Filter candidates by user roles (e.g., Agent, team_leader).• HIERARCHY: Filter candidates by organizational hierarchy locations (e.g., MyCaretEdge > Sales).• SYSTEM MAPPINGS: Filter candidates by attributes (e.g., matching local departments). |
| Least Loaded | Scans user workloads and assigns the record to the active agent who currently has the lowest active task count. | User Pool Configuration: • ROLES: Filter candidates by user roles (e.g., Agent, team_leader).• HIERARCHY: Filter candidates by organizational hierarchy locations (e.g., MyCaretEdge > Sales).• SYSTEM MAPPINGS: Filter candidates by attributes (e.g., matching local departments). |
| Capacity Based | Routes records to agents based on custom maximum capacity thresholds defined in their user profiles. | User Pool Configuration: • ROLES: Filter candidates by user roles (e.g., Agent, team_leader).• HIERARCHY: Filter candidates by organizational hierarchy locations (e.g., MyCaretEdge > Sales).• SYSTEM MAPPINGS: Filter candidates by attributes (e.g., matching local departments). |
| Queue | Places the record into a shared, unassigned queue where any eligible user can manually grab or "claim" it. | User Pool Configuration: • ROLES: Filter candidates by user roles (e.g., Agent, team_leader).• HIERARCHY: Filter candidates by organizational hierarchy locations (e.g., MyCaretEdge > Sales).• SYSTEM MAPPINGS: Filter candidates by attributes (e.g., matching local departments). |
Rule Processing & Priority (Global Settings)
These settings reside at the bottom of the allocation rule modal and control execution precedence:
- Priority (lower = first): An input field (default:
0) defining the evaluation order when a form submission matches multiple allocation rules. Lower numbers are evaluated first. - Stop processing rules after match (Checkbox): When enabled (checked by default), rule evaluation terminates immediately once a match is found and this rule executes, preventing subsequent lower-priority rules from running.
TAB 3: Scheduler
Tabs Navigation
⚙️ Settings 👥 Allocation ⏰ Scheduler ⛔ Data Drop Rules 🔍 Filters 📋 Columns 🔔 Notifications 👁️ Visibility
Allocation Scheduler Rules — Configure scheduled rules to allocate records to target workflows/stages. A background job evaluates conditions daily at the configured time.
- A background job evaluates conditions daily at a configured time.
- Supports cross-workflow allocation with field mappings and user assignment.
- Click "+ Add Rule" to open the Add Scheduler Rule modal.
- Empty state: "No scheduler rules configured. Add rules to auto-allocate records based on date conditions."
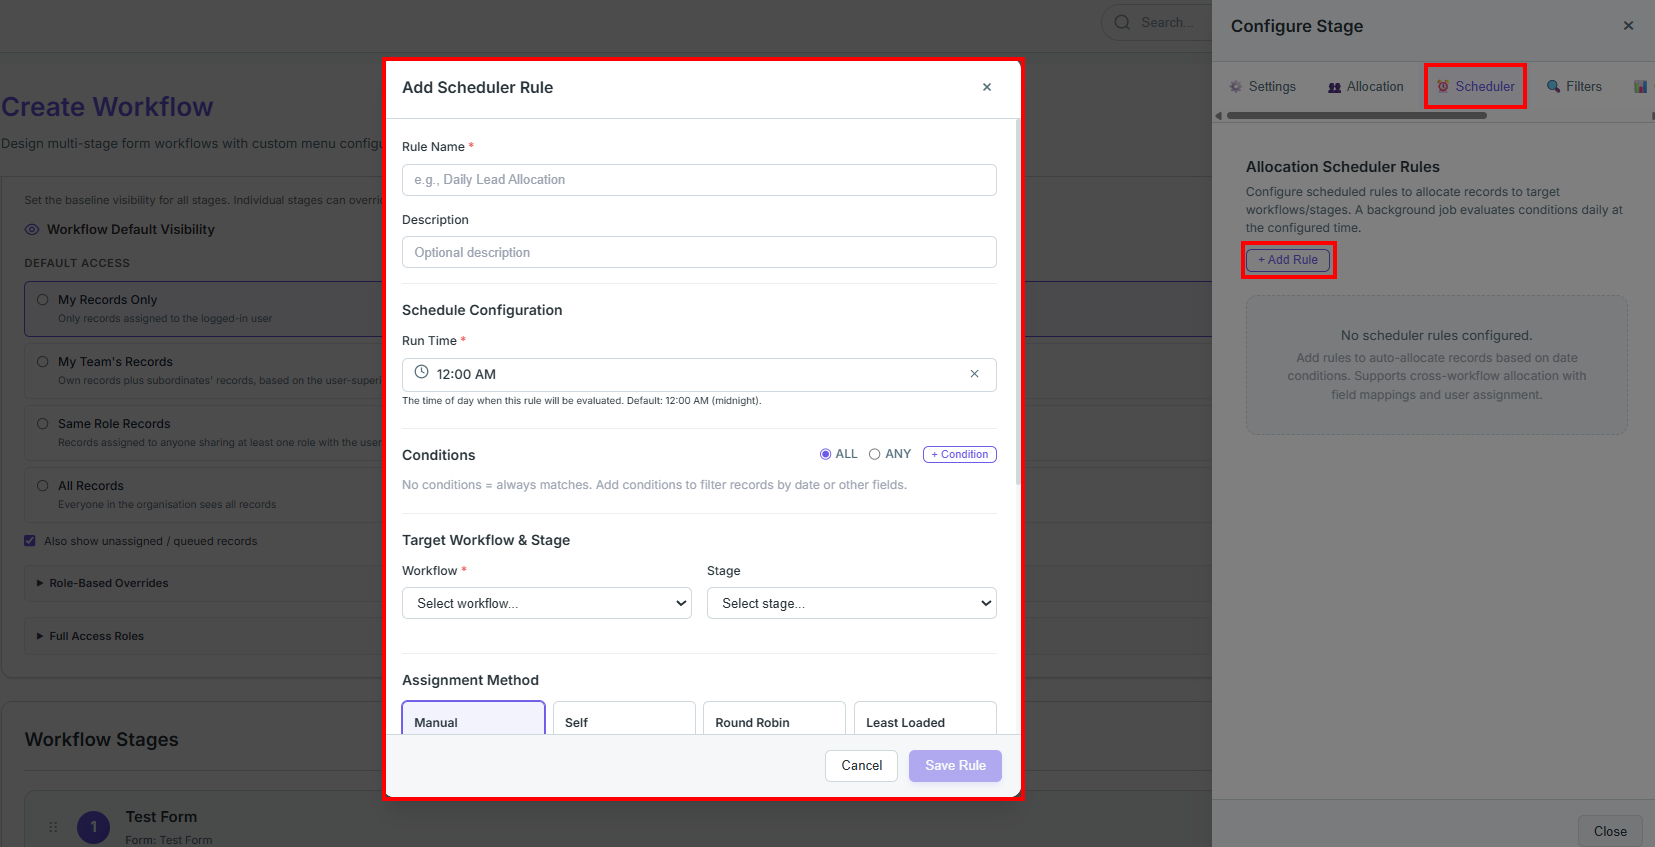
Add Scheduler Rule Configuration
The configuration modal contains the following parameters:
- Rule Name (Required): Input a clear, unique identifier for the routing logic. Example placeholder:
e.g., Daily Lead Allocation. - Description (Optional): Contextual notes summarizing the business rule or routing target queue.
- Schedule Configuration:
- Run Time (Required): Define the specific time of day (e.g.,
12:00 AM) when the scheduler background job will evaluate this rule. Default is 12:00 AM (midnight).
- Run Time (Required): Define the specific time of day (e.g.,
- Conditions:
- ALL (default): Every single configured condition must evaluate to
Truefor the rule to trigger (logical AND). - ANY: The rule triggers if at least one of the configured conditions is met (logical OR).
- + Condition Button: Click to define a new condition filter (e.g., filtering records by date or other fields).
Note: If no conditions are defined, the rule always matches and evaluates all records in the stage.
- Target Workflow & Stage: Defines where the matched records will be routed:
- Workflow (Required): Select the destination workflow pipeline from the dropdown.
- Stage: Select the specific destination stage within that workflow from the dropdown.
- Assignment Method: Defines how ownership is assigned to a user once the record lands in the destination stage, alongside the dynamic configuration options revealed for each method:
| Assignment Method | Direct Behavior | Dynamic UI Configurations Revealed |
|---|---|---|
| Manual (Selected) | Routes the record to the target stage without an owner. An administrator or manager must manually assign it later. | Manual Allocation Preset: • Allow selecting multiple users (Checkbox): Permits assigning the record to multiple owners simultaneously in the form renderer. • + Add Preset Filter (Button): Restricts the user selection list by predefined roles or departments. |
| Self | Automatically assigns ownership to the active agent who submitted the stage form, ensuring service continuity. | None (Hidden) — Automatically hardcoded to the submitting agent. |
| Round Robin | Distributes incoming records in a balanced, circular order among all active users in the candidate pool. | User Pool Configuration: • ROLES: Filter candidates by user roles (e.g., Agent, team_leader).• HIERARCHY: Filter candidates by organizational hierarchy locations (e.g., MyCaretEdge > Sales).• SYSTEM MAPPINGS: Filter candidates by attributes (e.g., matching local departments). |
| Least Loaded | Scans user workloads and assigns the record to the active agent who currently has the lowest active task count. | User Pool Configuration: • ROLES: Filter candidates by user roles (e.g., Agent, team_leader).• HIERARCHY: Filter candidates by organizational hierarchy locations (e.g., MyCaretEdge > Sales).• SYSTEM MAPPINGS: Filter candidates by attributes (e.g., matching local departments). |
| Capacity Based | Routes records to agents based on custom maximum capacity thresholds defined in their user profiles. | User Pool Configuration: • ROLES: Filter candidates by user roles (e.g., Agent, team_leader).• HIERARCHY: Filter candidates by organizational hierarchy locations (e.g., MyCaretEdge > Sales).• SYSTEM MAPPINGS: Filter candidates by attributes (e.g., matching local departments). |
| Queue | Places the record into a shared, unassigned queue where any eligible user can manually grab or "claim" it. | User Pool Configuration: • ROLES: Filter candidates by user roles (e.g., Agent, team_leader).• HIERARCHY: Filter candidates by organizational hierarchy locations (e.g., MyCaretEdge > Sales).• SYSTEM MAPPINGS: Filter candidates by attributes (e.g., matching local departments). |
Rule Processing & Priority (Global Settings)
These settings reside at the bottom of the allocation rule modal and control execution precedence:
- Priority (lower = first): An input field (default:
0) defining the evaluation order when a form submission matches multiple allocation rules. Lower numbers are evaluated first. - Stop processing rules after match (Checkbox): When enabled (checked by default), rule evaluation terminates immediately once a match is found and this rule executes, preventing subsequent lower-priority rules from running.
TAB 4: Data Drop Rules
Tabs Navigation
⚙️ Settings 👥 Allocation ⏰ Scheduler ⛔ Data Drop Rules 🔍 Filters 📋 Columns 🔔 Notifications 👁️ Visibility
Configure rule-based removal (drop) or reassignment (move) of records. Rules fire on upload or on a schedule.
- Click the "+ Add Rule" button to open the Add Data Drop Rule modal.
- Empty state: "No data-drop rules configured. Add rules to drop or move records based on conditions. Supports upload-time and scheduled triggers."
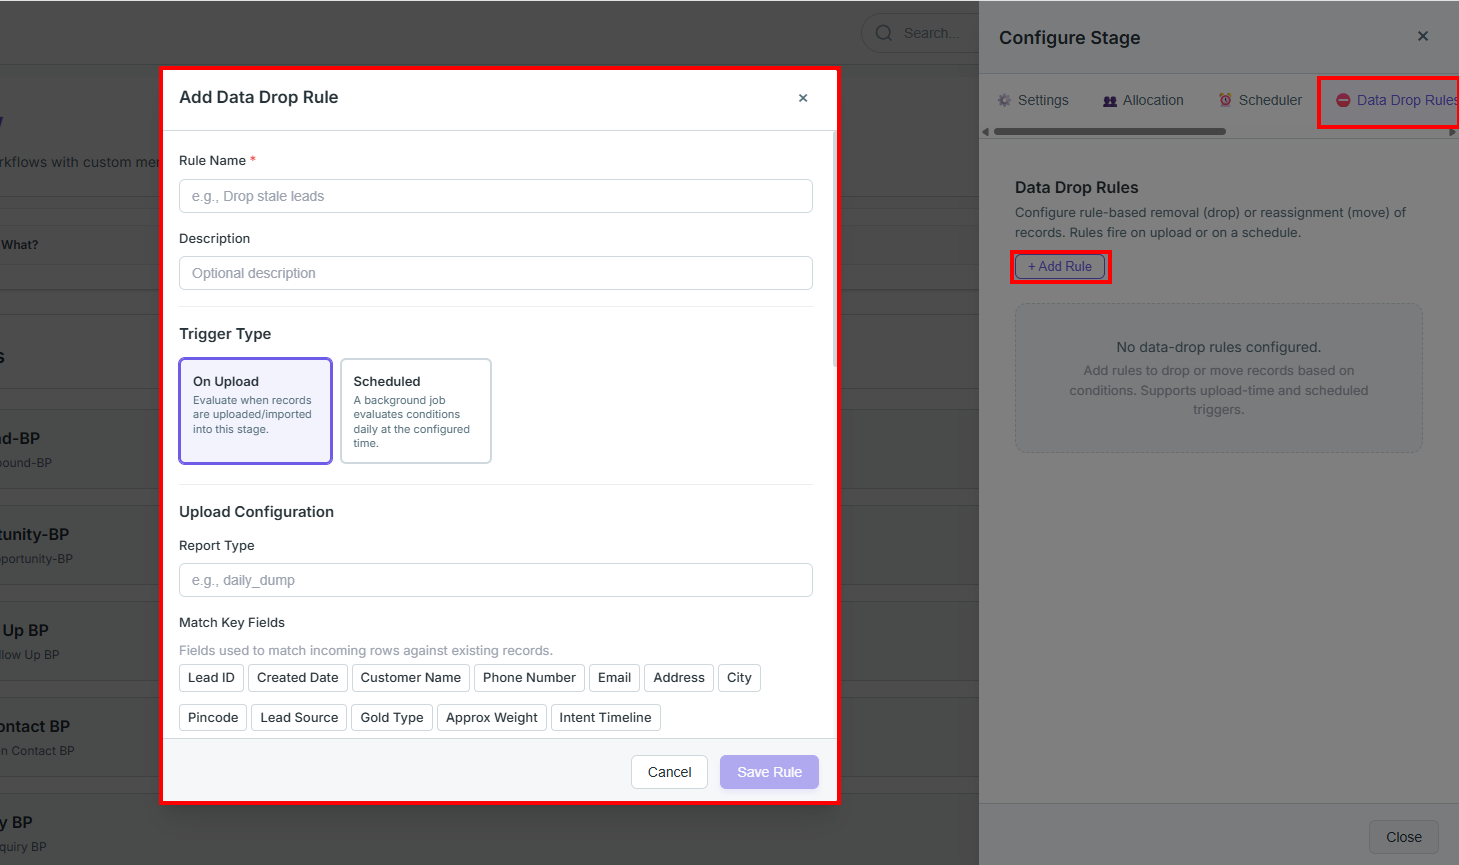
Add Data Drop Rule Configuration
The configuration modal contains the following parameters:
- Rule Name (Required): Input a clear, unique identifier for the routing/dropping logic. Example:
e.g., Drop stale leads. - Description (Optional): Contextual notes summarizing the drop rule. Example:
Optional description. -
Trigger Type: Select when the rule should evaluate:
- On Upload: Evaluate when records are uploaded/imported into this stage.
- Scheduled: A background job evaluates conditions daily at the configured time.
-
Upload Configuration (Visible when On Upload is selected):
- Report Type: Specify the report type. Example:
e.g., daily_dump. - Match Key Fields: Select fields used to match incoming rows against existing records in the database. These fields are dynamically populated based on the form linked to the current stage (e.g.,
Lead ID,Customer Name,Phone Number,Email, etc.).
- Report Type: Specify the report type. Example:
-
Schedule Configuration (Visible when Scheduled is selected):
- Run Time: Define the specific time of day (e.g.,
12:00 AM) when the scheduler background job will evaluate this rule. Default is 12:00 AM (midnight). - Attempt Window (days): Define the window in days for which the evaluation is attempted. Example:
30. - Service Type SLA (days): Configure service level agreements (SLAs) for different service types.
- Click "+ Add" to add a new service type SLA.
- Define the
Service typename and specify the duration in days (e.g.,0). - Click the "x" button to remove a configured SLA.
- Run Time: Define the specific time of day (e.g.,
-
Conditions:
- AND: Every single configured condition must evaluate to
Truefor the rule to trigger (logical AND). - OR: The rule triggers if at least one of the configured conditions is met (logical OR).
- AND: Every single configured condition must evaluate to
- + Condition: Click to define a new condition filter.
- + Group: Click to nest a sub-group of conditions.
Note: If no conditions are defined, the rule always matches and targets all records.
-
Action:
- Drop: Remove the matching record from this stage.
- Move: Reassign the matching record to a target stage.
-
If Move is selected, reveals additional configurations:
- Target:
- Target Workflow: Select the destination workflow from the dropdown. Example:
This workflow. - Target Stage (Required): Select the specific stage within the target workflow.
- Target Workflow: Select the destination workflow from the dropdown. Example:
- Assignee: Choose how ownership is assigned in the target stage:
- Keep same assignee: Carry the current assignee over to the target stage.
- Reassign: Pick a new assignee via an assignment method.
- When Reassign is selected, choose one of the following Assignment Methods:
- Manual: Assign to a specific user.
- Self: Auto-assign to the record creator.
- Round Robin: Rotate evenly across team members.
- Least Loaded: Assign to user with fewest active tasks.
- Capacity Based: Assign based on user capacity settings.
- Queue: Add to a shared queue for users to manually claim.
- When Reassign is selected, choose one of the following Assignment Methods:
- Target:
-
Exclude Stages: Select stages where records are exempt from this rule. These options are dynamically populated with the names of the stages defined in the workflow (e.g.,
Inbound-BP,Opportunity-BP,Follow Up BP, etc.). -
Drop Remark: Reason recorded on each dropped/moved record.
-
Cooling-off: Configure cooling-off periods for dropped/moved records.
- Enable cooling-off period (Checkbox): When checked, enables a period during which dropped/moved records are restricted.
- Cooling-off Days: Specify the duration of the cooling-off period in days. Example:
0 - Unblock Target Stage: Specify the target behavior after cooling-off ends. Example:
Stay dropped
-
Rule Processing & Priority (Global Settings):
- Priority (lower = first): An input field (default:
0) defining the evaluation order when a record matches multiple drop rules. Lower numbers are evaluated first. - Stop processing rules after match (Checkbox): When checked, evaluation terminates immediately once a match is found and this rule executes, preventing subsequent lower-priority rules from running.
- Priority (lower = first): An input field (default:
TAB 5: Filters
Tabs Navigation
⚙️ Settings 👥 Allocation ⏰ Scheduler ⛔ Data Drop Rules 🔍 Filters 📋 Columns 🔔 Notifications 👁️ Visibility
Stage Filters: Configure filters to help users find records in this stage.
- Click "+ Add Filter" to define filter conditions
- Filters appear as quick-filter options when users browse this stage
- Empty state: "No filters configured. Add filters to help users find records in this stage."
- To give filter you need to select the Column name from the data set. You can give multiple filters.
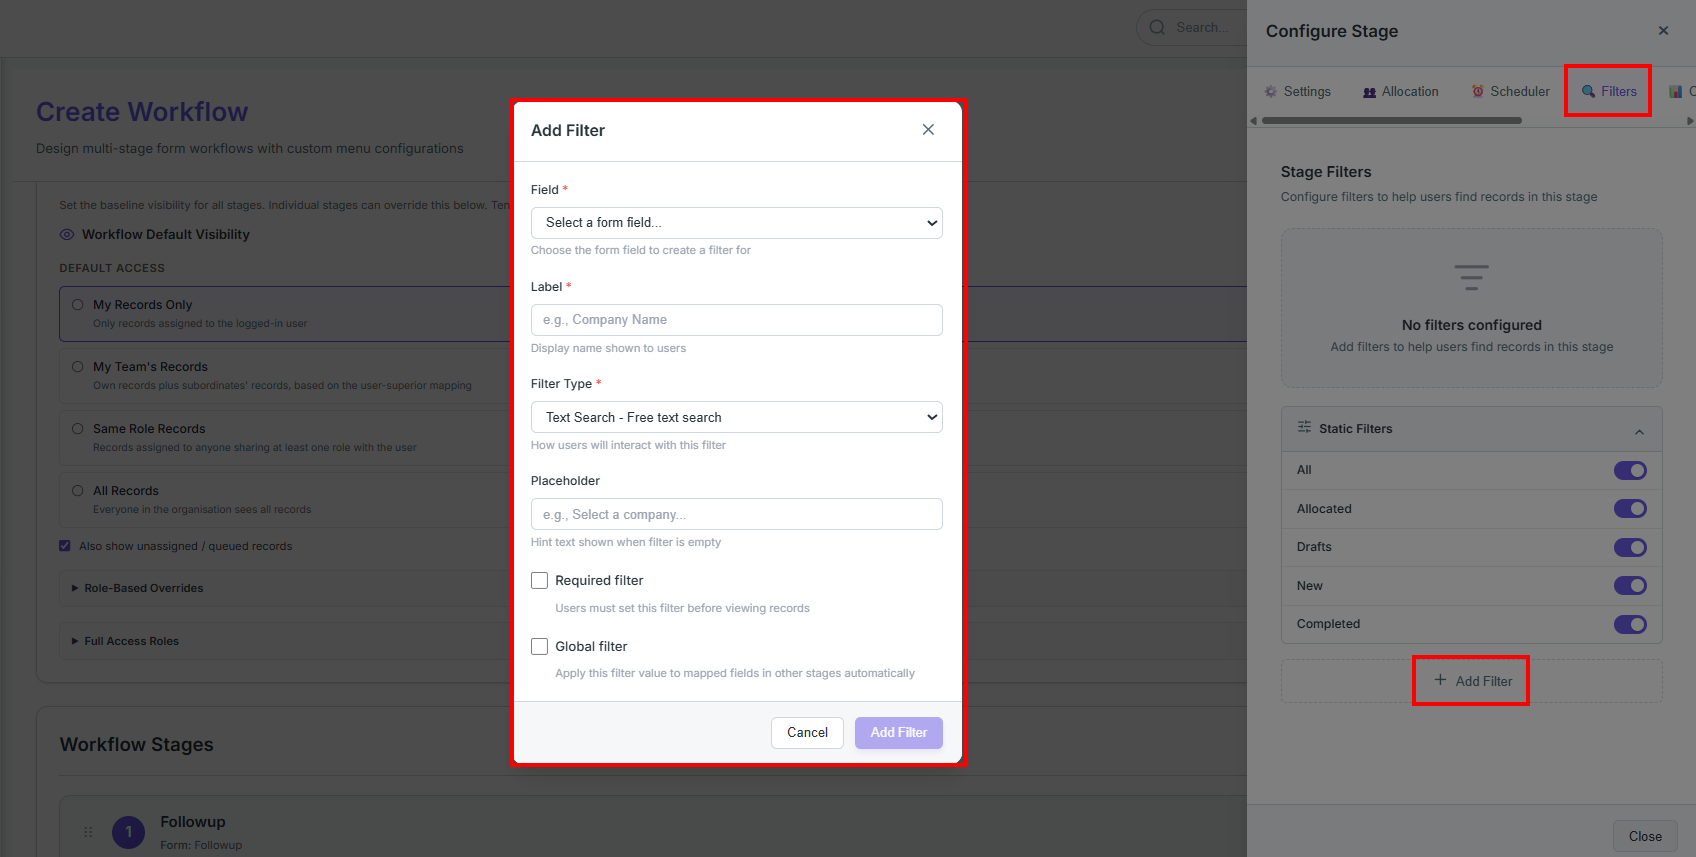
-
Static Filters: These are standard, built-in system filters that can be toggled ON or OFF at the bottom of the Filters sidebar tab:
-
All: Displays all records in the stage.
- Allocated: Shows records that have been assigned to an owner.
- Drafts: Shows incomplete records currently saved as drafts.
- New: Shows recently arrived or untouched records.
-
Completed: Shows records that have successfully completed all actions required for this stage.
-
Add Filter: Click the dotted "+ Add Filter" button to define custom filter parameters based on your form fields. This opens the Add Filter configuration modal with the following parameters:
- Field (Required): Dropdown menu to select any field from your linked stage form.
- Label (Required): Enter a clear user-facing label. Example:
e.g., Company Name. - Filter Type (Required): Choose how users will interact with this filter (e.g.,
Text Search - Free text search, Dropdown, Date Range, etc.). - Placeholder (Optional): Input hint text shown in the filter search box when empty. Example:
e.g., Select a company.... - Required filter (Checkbox): When checked, mandates that users must select/fill this filter before the system loads and displays any records on screen.
- Global filter (Checkbox): When checked, applying this filter value automatically cascades and filters mapped fields in all other stages across the active workflow.
TAB 6: Columns
Tabs Navigation
⚙️ Settings 👥 Allocation ⏰ Scheduler ⛔ Data Drop Rules 🔍 Filters 📋 Columns 🔔 Notifications 👁️ Visibility
Display Columns: Configure which form fields appear as columns in the stage list view.
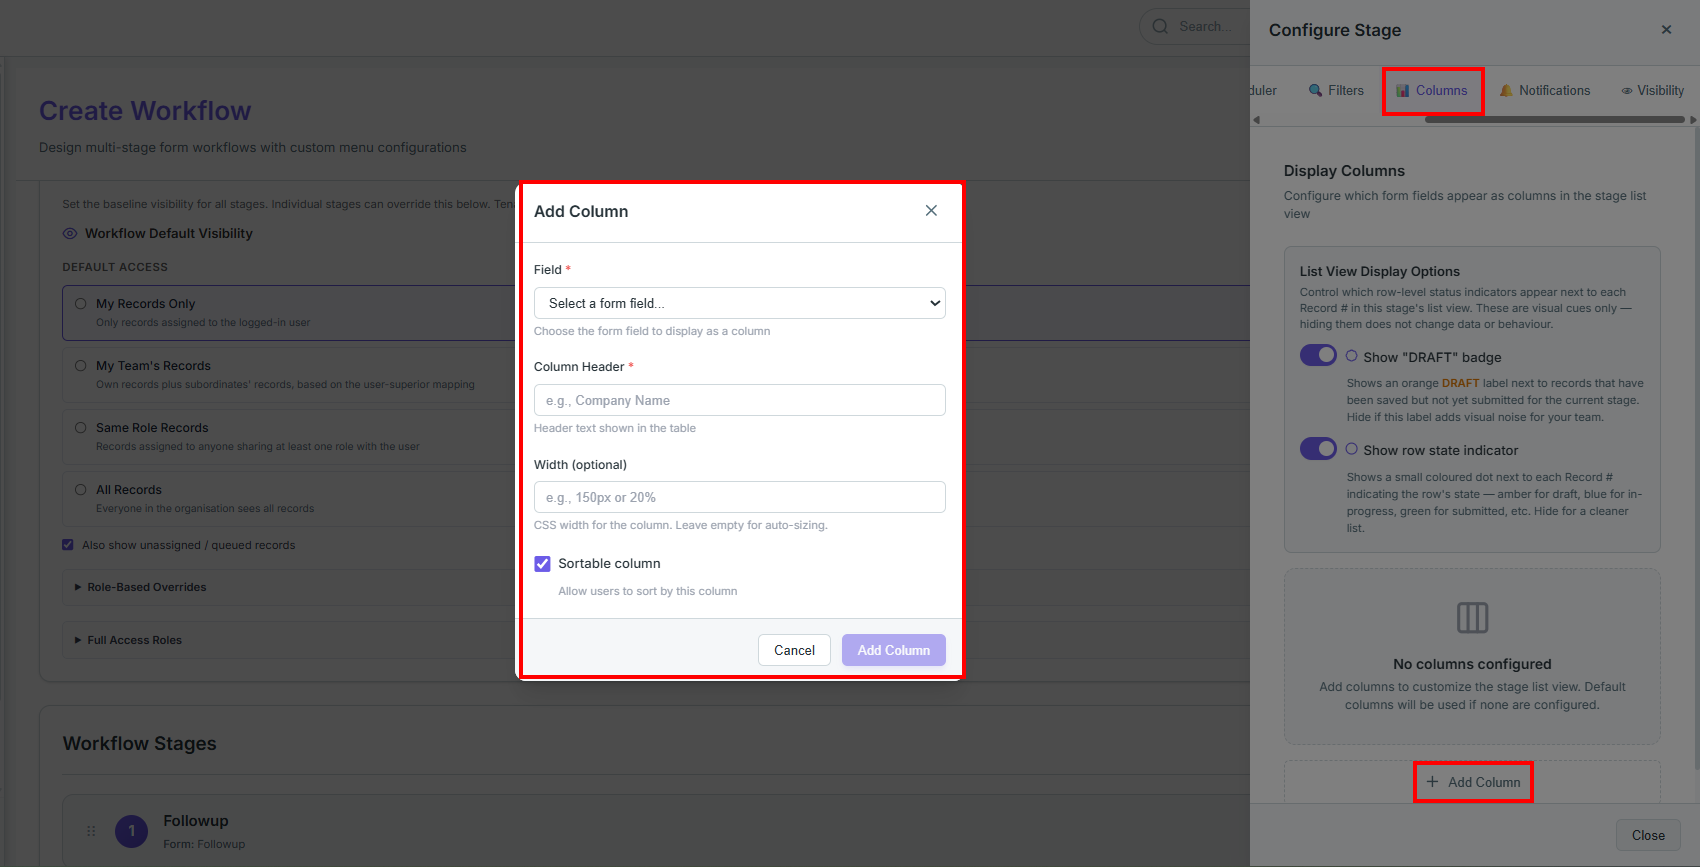
- List View Display Options: Configure row-level visual cues in the stage list view:
- Show "DRAFT" badge (Toggle): When enabled, displays an orange DRAFT label next to records that have been saved but not yet submitted for the current stage.
-
Show row state indicator (Toggle): When enabled, displays a small colored dot next to each Record # representing its current state (amber for draft, blue for in-progress, green for submitted).
-
Add Column: Click the dotted "+ Add Column" button to define custom display columns. This opens the Add Column configuration modal with the following parameters:
- Field (Required): Select the form field you want to display as a column in the table.
- Column Header (Required): Enter the custom text label shown in the table header (e.g., Company Name).
- Width (Optional): Specify custom CSS width (e.g., 150px or 20%). Leave blank for auto-sizing.
- Sortable column (Checkbox): When checked (default), allows users to sort records by this column.
TAB 7: Notifications
Tabs Navigation
⚙️ Settings 👥 Allocation ⏰ Scheduler ⛔ Data Drop Rules 🔍 Filters 📋 Columns 🔔 Notifications 👁️ Visibility
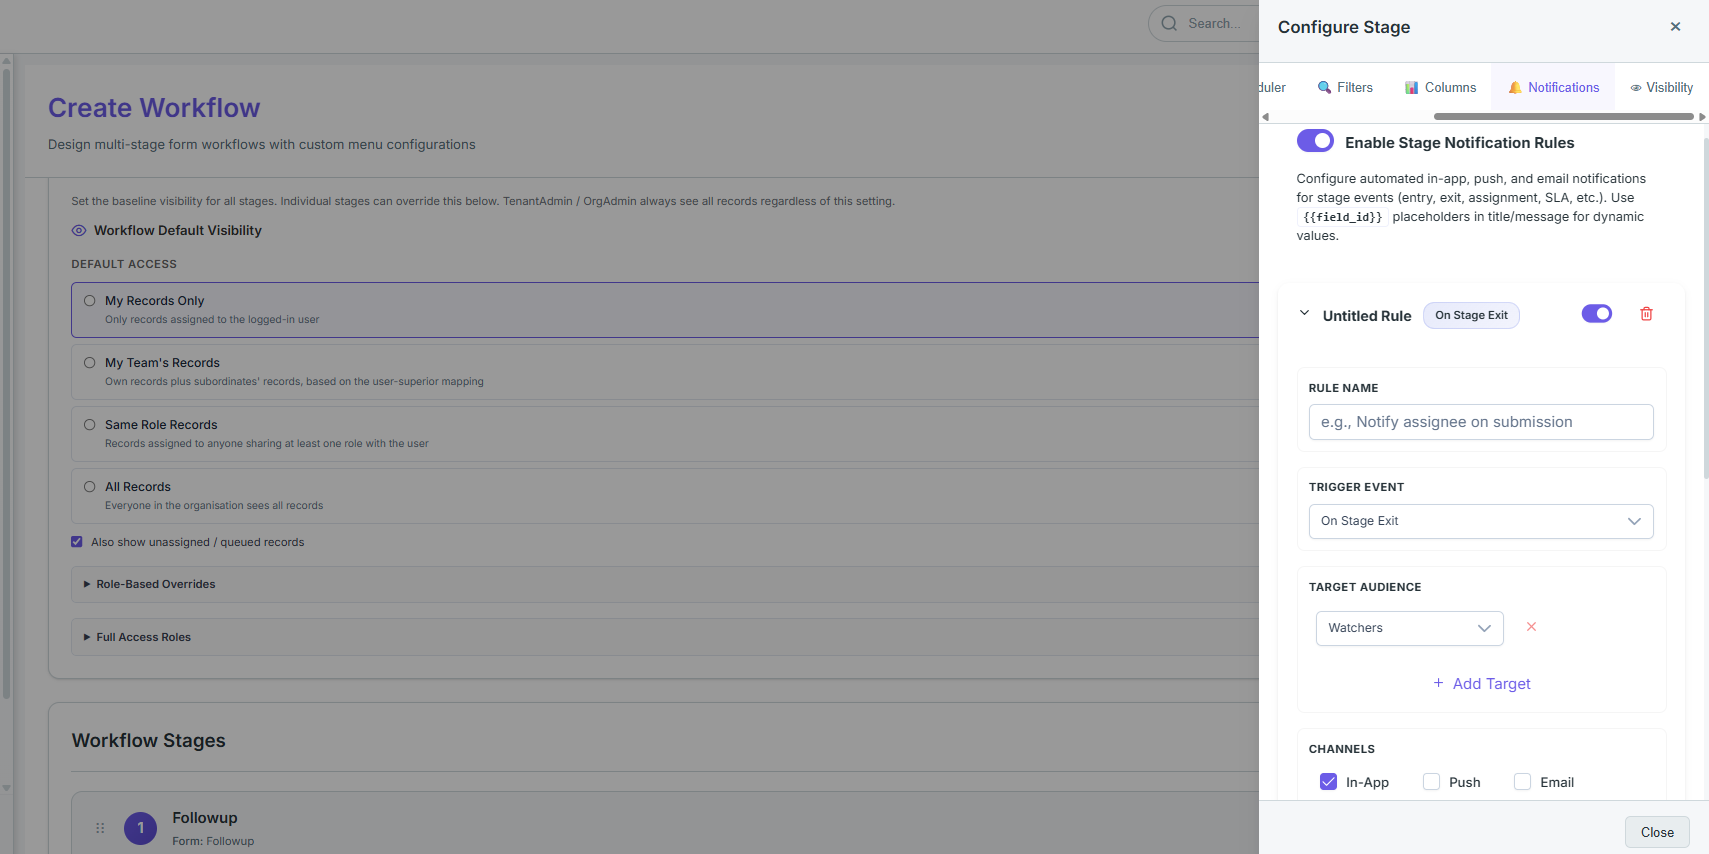
Enable Stage Notification Rules: Toggle "Enable Stage Notification Rules" to ON (blue). This activates automated in-app, push, and email notifications for stage events such as entry, exit, assignment, SLA warnings, etc. You can use {{field_id}} placeholders in the title/message for dynamic values
-
Add a Notification Rule: Click "+ Add Notification Rule" at the bottom of the panel
- A new rule card expands (labelled "Untitled Rule" with the default trigger "On Assignment")
- Rule Name: In the RULE NAME field, enter a descriptive name Example: Notify assignee on submission, Alert team on SLA breach
- Trigger Event: Click the TRIGGER EVENT dropdown and select one of the following events:
Trigger Event When It Fires On Stage Entry When a record enters this stage On Stage Exit When a record leaves this stage On Assignment When a record is assigned to a user at this stage On Reassignment When a record's assignee changes On SLA Warning When an SLA threshold is breached On SLA Breach When an SLA is breached On Escalation When an escalation rule is triggered - Target Audience: Under TARGET AUDIENCE, click the audience dropdown and select one or more of the following:
Option Who receives it Best used when Form submitter The person who originally filled out and submitted the form Sending confirmation or status updates to the submitter Assigned user Whoever is currently assigned to the record Notifying the active owner; changes if reassigned Approvers Users designated as approvers in the workflow A record needs review or sign-off at a workflow stage Form owner The creator or admin who owns the form Keeping an admin/team lead informed of all submissions Specific users Manually hand-picked individual users A small, fixed group always needs to be notified By role All users belonging to a specified role (e.g. "Manager") Notifying a whole team; new role members are auto-included Custom fields User or email stored in a custom field on the record Recipient varies per record based on field value Previous assignee The user assigned before the most recent reassignment Handoff scenarios — letting prior owner know the task moved on Stage manager The person responsible for overseeing a specific workflow stage A record enters or exits a stage they manage Watchers Users who opted in to follow the record without owning it Keeping interested parties informed without assigning them - Click "+ Add Target" to add multiple audiences to the same rule
- Channels: Under CHANNELS, check one or more delivery methods:
- In-App — Notification appears inside the platform (checked by default)
- Push — Sends a push notification to the user's device
- Email — Sends an email to the recipient
-
Notification Content: Under NOTIFICATION CONTENT, choose one of two modes:
- Option A – Write Inline:
- Fill in the TITLE field — e.g., {{record_number}} has been assigned
- Fill in the MESSAGE field — e.g., Record {{record_number}} was submitted by {{assigned_to}} in...
- Use the "Insert Variable" dropdown (next to both fields) to dynamically insert:
-
Option B – Use Template:
- Enter the pre-built TEMPLATE ID in the field provided (references a notification template from Communication Templates)
-
Exclude the user who triggered the event from receiving this notification. (Toggle)
- ON (default): The user who caused the event (e.g., the person who assigned the record) will NOT receive the notification
- OFF: All target audience members including the trigger user will receive the notification
-
Add Conditions (Optional)
- Click "Conditions (0)" to expand the conditions section
- Click "+ Add Condition" to define filter rules that control when this notification fires
Note: All conditions use AND logic — all must be true for the notification to send Leave empty to fire the notification unconditionally on every trigger event
- Option A – Write Inline:
-
The Toggle at the top-right of each rule card. lets you enable or disable individual rules without deleting them
-
Click "+ Add Notification Rule" again to add additional rules for different trigger events or audiences within the same stage
Tab 8: Visibility
Tabs Navigation
⚙️ Settings 👥 Allocation ⏰ Scheduler ⛔ Data Drop Rules 🔍 Filters 📋 Columns 🔔 Notifications 👁️ Visibility
The panel displays Stage Data Access Override settings
Note: The top of the panel states — "Leave unconfigured to inherit the workflow-level default visibility above." If no stage-specific override is needed, leave this tab at default.
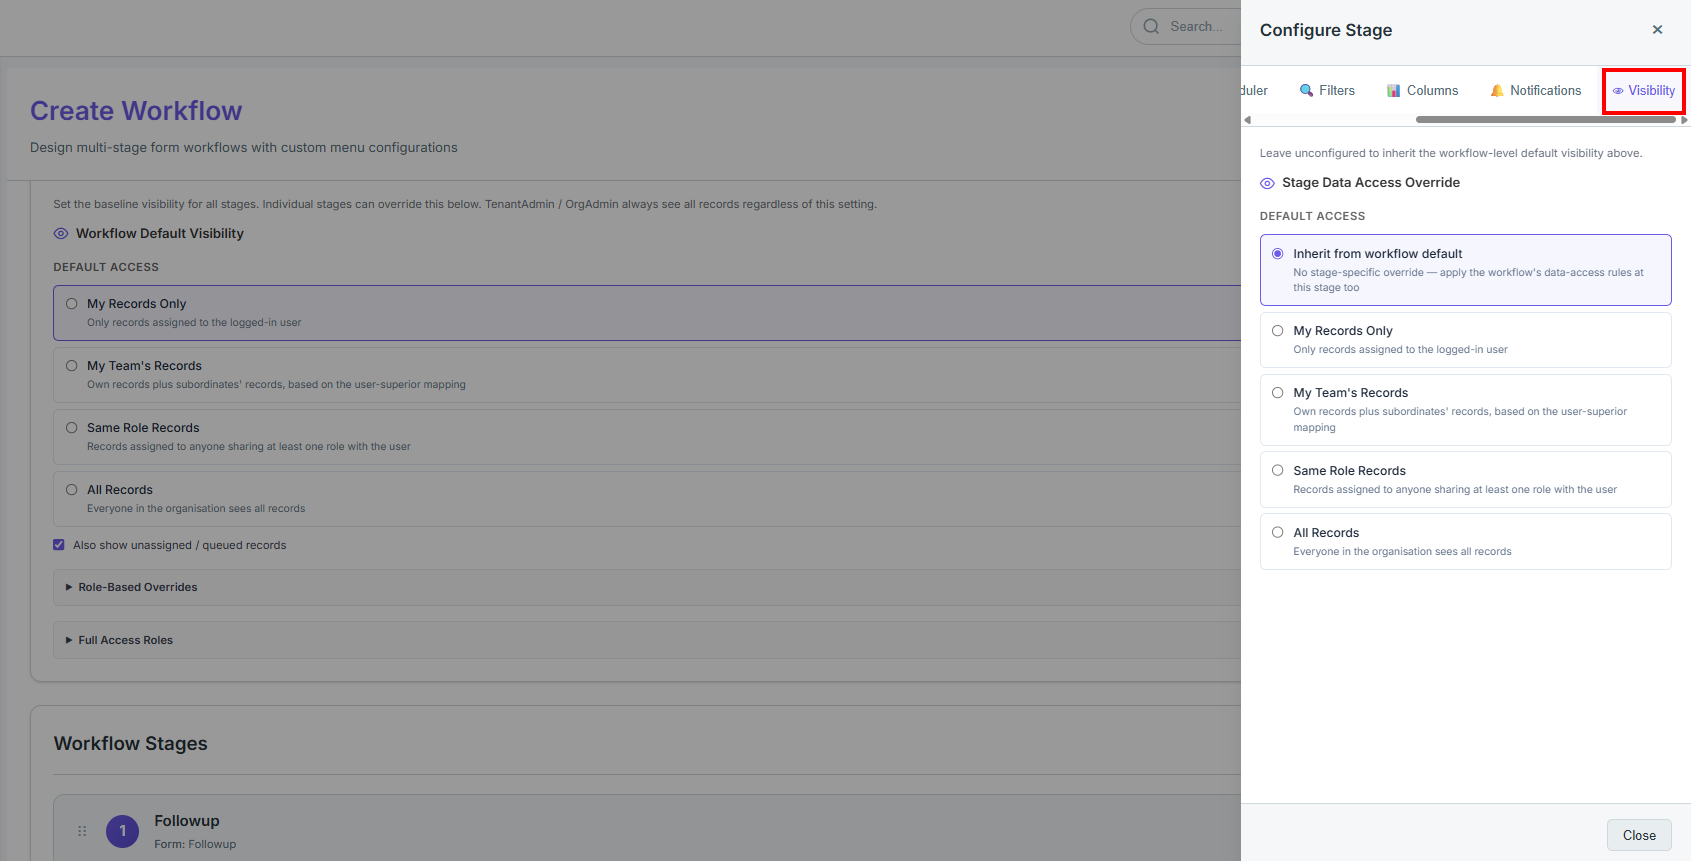
- Choose Default Access Level Under DEFAULT ACCESS, select one of the following options:
| Option | Description | Use Case | ---- |
|---|---|---|---|
| Inherit from workflow default (default) | No stage-specific override — applies the workflow's data-access rules at this stage too | When this stage should follow the same visibility as the rest of the workflow | |
| My Records Only | Only records assigned to the logged-in user are visible | Agents should only see their own records at this stage | |
| My Team's Records | Own records plus subordinates' records, based on the user-superior mapping | Team leads need visibility into their team's records at this stage | Team Depth : Controls how many levels deep in the team hierarchy are included Select it from the dropdown and by default "Max depth"is selected Reporting Chain : Determines which reporting chain is used to resolve team members Select it from the dropdown and by default "All chains"is selected |
| Same Role Records | Records assigned to anyone sharing at least one role with the user | Peer-level visibility across the same department/role | |
| All Records | Everyone in the organisation sees all records at this stage | Managers or admin-level visibility at a specific stage (e.g., Closed/Completed) |
for all the other option My records only , My Team's Records , Same Role Records, All Records
- "Also show unassigned / queued records" toggle option is enabled by default
- Role-Based Overrides: Applied when the user's role matches — overrides the default scope above | select role from the dropdown and select records from the drop down
- Full Access Roles: Users with these roles always see all records regardless of other settings |select role to grant full access from the drop down
After configuring both Notifications and Visibility as needed, click Close to save the stage settings
Save the overall workflow using the workflow-level Save button
Step 6: Save the Workflow
After completing all steps, click "Save Workflow" (purple button, top right)
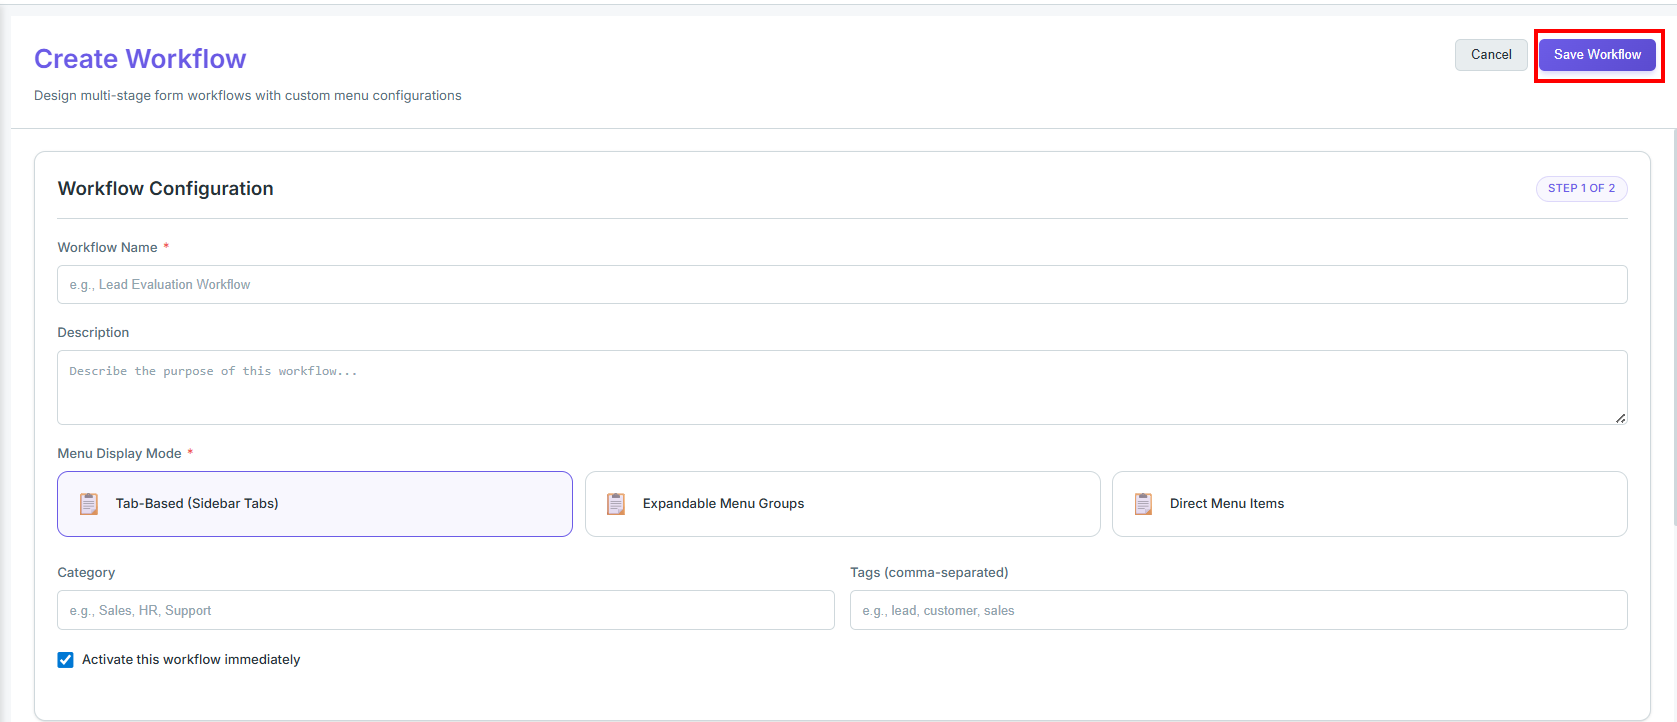
The workflow is saved and becomes ACTIVE (if checkbox was checked) the new workflow appears in the Workflows list
Managing existing workflows
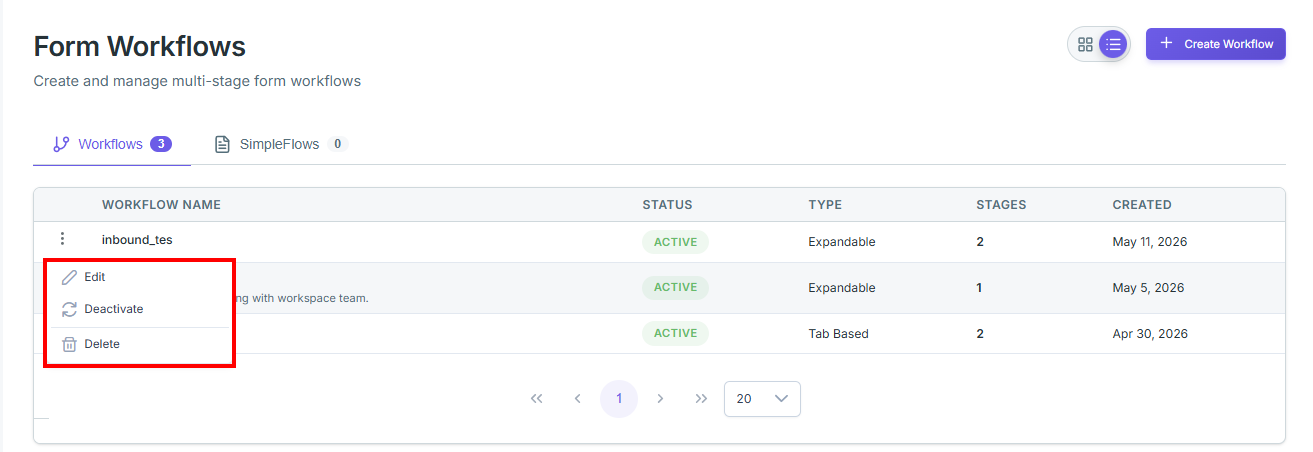
Edit
- On the landing page, click the workflow name (List View) OR click Edit button (Card View)
- Alternatively, click the ⋮ menu → Edit
- Modify any fields in Step 1 or Step 2
- Click "Save Workflow"
Deactivate
- Click ⋮ menu → Deactivate OR click the Deactivate button (Card View)
- Status changes from ACTIVE to INACTIVE
- The workflow stops being accessible to end users
- Can be re-activated by editing and checking "Activate this workflow immediately"
Delete
- Click ⋮ menu → Delete
- ⚠️ Permanent action — cannot be undone
- All stages, rules, and configurations linked to that workflow are removed
Sidebar of Workflow
Based on the Menu Display mode the stage will get visible in the left sidebar with work flow name and the stages as the sub options under the workflow name.
to the right side The page displays all submitted records for a specific form.

Page Header
- Form Title — Displays the name of the selected form (e.g. "Test Form") as the page heading
- + Fill New Form — A purple button in the top-right that opens a blank instance of this form to manually create a new submission
Form Tabs
At the top of the page, tabs represent all the Master-tagged forms available. Each tab shows:
- Form name (e.g. "Test Form", "New Test Form")
- Badge count — A purple circle next to the tab showing the number of submissions for that form (e.g.
1) - The active tab is underlined in purple; inactive tabs are plain text
Toolbar
| Element | Description |
|---|---|
| Search bar | Search across all records using keywords — placeholder text reads "Search records..." |
| Record count | Displayed on the top-right of the toolbar (e.g. "1 of 1 records") |
Submissions Grid
Displays all submitted records in a tabular format. Each row is one submission.
- Record #: A unique system-generated ID for the submission, displayed as a clickable blue link (e.g.
6a279eac276529b3f9a11ae4). Also has an external link icon (↗) on the left to open the record in full view. - Title: Auto-generated title for the submission (e.g.
WF-L50RLRuOuxUC). - Status: Current status of the submission shown as a colored badge (e.g.
INPROGRESSin blue). - Assigned To: The user the submission is assigned to. Shows
—if unassigned. - Created: The date the submission was created (e.g.
09/06/2026). Has a sort arrow (↓) indicating the grid is currently sorted by this column in descending order.
Record View
Clicking the external link icon (↗) on any submission row opens the full record in a new tab.
The page layout depends on whichever layout was selected during form setup. The page is divided into three panels:
Left Panel — Customer Details
Displays the customer's details associated with the record for reference while working on the form.
Center Panel — Form
Displays the actual form fields for the record. The user can view or edit the form data here.
Right Panel — Multiple Sections
The right panel contains multiple collapsible sections:
1. Communication
Quick Actions
Allows the user to quickly reach out to the contact directly from the record.
| Action | Description |
|---|---|
| Call | Initiates a phone call with the contact |
| SMS | Sends a text message to the contact |
| Opens a WhatsApp chat with the contact | |
| Opens the email client to compose an email to the contact |
Allocation Settings
Configures where and to whom the submission will be allocated automatically on form submit.
- "Configure allocation target. The record will be allocated when you submit the form."
Target Workflow — Dropdown to select which workflow to allocate to (e.g. New Workflow).
Target Stage — Dropdown to select the stage within the chosen workflow (e.g. Test Form). Populates based on the selected workflow.
Assign To — Controls who gets assigned after allocation:
| Option | Description |
|---|---|
| Auto-assign (use target stage config) | Assigns automatically based on the target stage's assignment rules |
| Specific User | Manually pick a user from the available user list |
When Specific User is selected, a user list appears:
| Element | Description |
|---|---|
| Radio button | Select one user to assign to |
| Name | Full name of the user |
| User's email address | |
| Role | User's role (e.g. Agent, TenantAdmin, Team Lead) |
| 0/50 badge | Current allocation load out of maximum allowed |
The selected user is highlighted with a purple border.
2. Extension
Additional extension actions available for the record.
3. Resources
Displays all files and documents linked to the record. Resources shown here can be configured in the Cards Library → Resources section.
Search — Search bar to find files quickly across all resources.
Section 1 — Files manually attached to the record outside of form fields.
| Element | Description |
|---|---|
| Collapse arrow (∨) | Expands or collapses the section |
| Badge count | Number of files in this section |
| File name & size | Name and size of the uploaded file |
| Download icon (↓) | Downloads the file directly |
Transaction Files — Files uploaded through form fields within a submission.
- Shows "No files uploaded yet" when empty
- Helper text: "Files uploaded through form fields will appear here"
Creating a New SimpleFlow
SimpleFlow allows you to configure a simplified, single-form, status-driven flow for managing records (e.g., Lead Management, Support Tickets).
Navigation: Form workflow → SimpleFlow → Create SimpleFlow
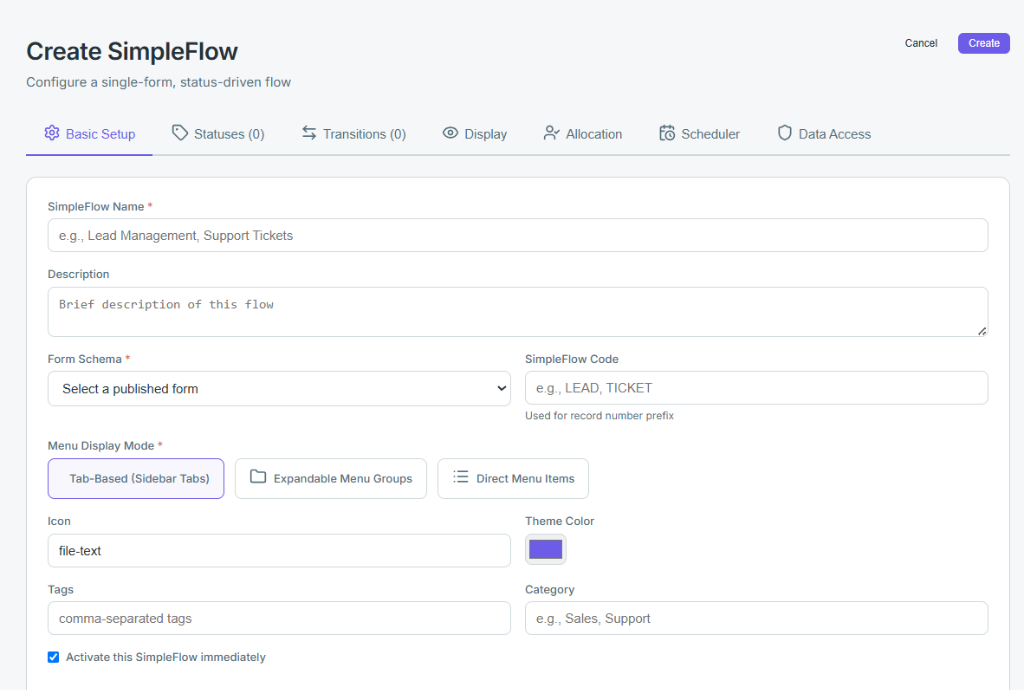
The SimpleFlow creation wizard contains the following configuration tabs at the top:
| Tab | Purpose |
|---|---|
| Basic Setup | Core metadata, form schema, and menu display settings |
| Statuses | Define the list of workflow statuses (states) that a record passes through |
| Transitions | Configure the allowed rules and paths for records to transition between statuses |
| Display | Customize the card layouts and columns shown to users in list and board views |
| Allocation | Configure automatic or manual user assignment rules |
| Scheduler | Define automated rules that run on a daily time-based schedule |
| Data Access | Restrict read/write permissions based on organization roles |
Tip: The flow is created and saved once Step 2 (Statuses) is complete — but to make the flow function correctly, it's best to configure all remaining steps before activating it for use.
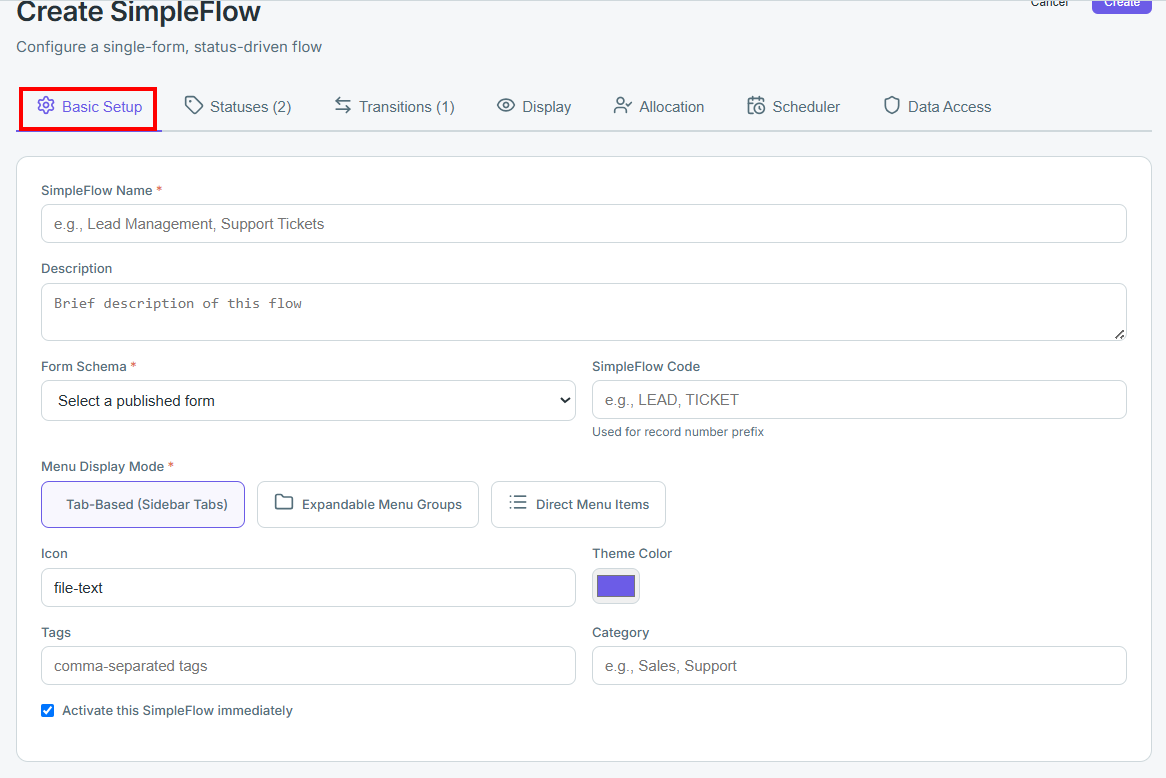
Step 1: Basic Setup
Under the Basic Setup tab, configure the following fields:
| Field | Required? | Description |
|---|---|---|
| SimpleFlow Name | Required | A descriptive, unique name for the flow. Example: Lead Management |
| Description | Optional | A summary of the flow's purpose |
| Form Schema | Required | Select a published form from the dropdown to link as the primary data structure for this flow |
| SimpleFlow Code | Required | A unique prefix used to generate sequential record numbers. Example: LEAD → LEAD-001 |
| Menu Display Mode | Required | How this flow is displayed in the platform's sidebar (see below) |
| Icon | Optional | Icon slug to customize the navigation icon. Example: file-text |
| Theme Color | — | Click to select a color badge/theme for the flow |
| Tags | Optional | Comma-separated tags to label and index the flow |
| Category | Optional | Department heading to categorize this flow under. Example: Sales, Support |
| Activate this SimpleFlow immediately | Checkbox | Checked by default — activates and makes the flow immediately available to users upon creation |
Menu Display Mode options: * Tab-Based (Sidebar Tabs): Shows as individual tabs inside a sidebar menu. * Expandable Menu Groups: Groups multiple views into expandable sidebar folders. * Direct Menu Items: Displays as a single top-level link in the main navigation.
Step 2: Status
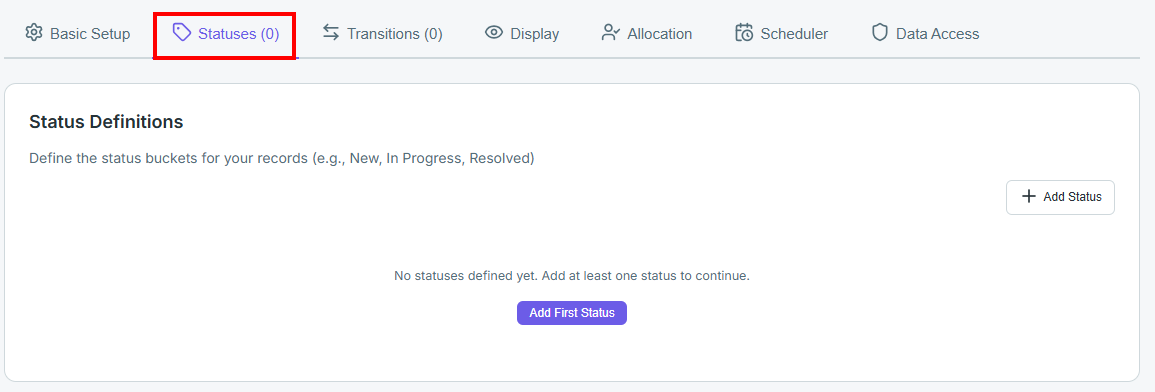
Under the Status tab, define the lifecycle states (status buckets) that records pass through within this SimpleFlow. At least one status is required to proceed.
Adding a Status
Click + Add Status to open the status builder modal and configure:
| Field | Required? | Description |
|---|---|---|
| Status Name | Required | Unique identifier for the state. Example: New, In Progress, Resolved |
| Description | Optional | Summary of when records enter this status |
| Icon | — | Icon badge name; defaults to circle |
| Color | — | Color selected from the palette grid to represent the status badge |
| Terminal status | Checkbox | Marks this status as a final phase of the record lifecycle (e.g., Closed, Resolved, Won, Lost). Terminal statuses represent completed flows |
Click Save (purple button) to add the status to the list.
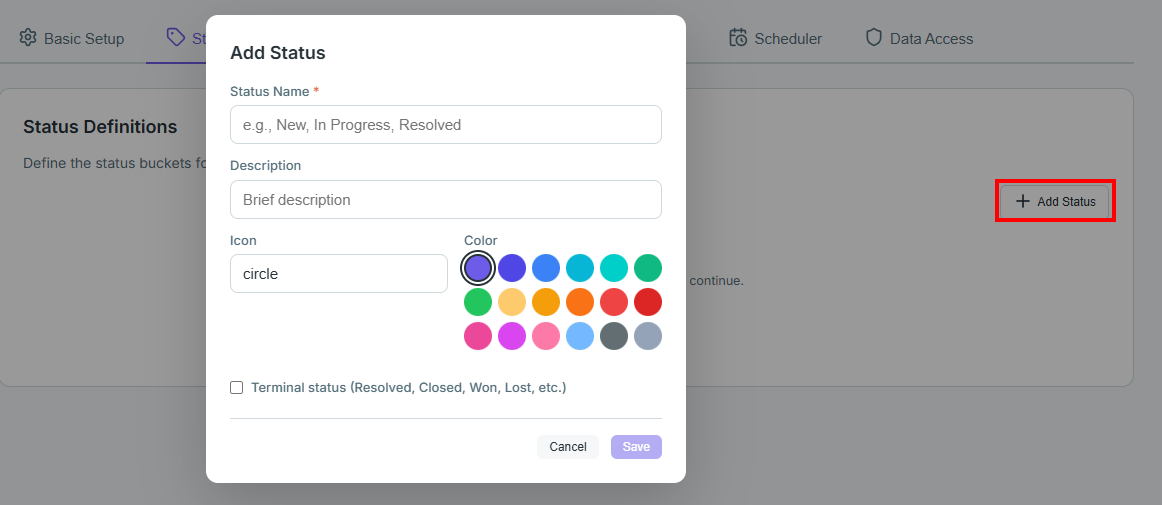
Managing Statuses
Once statuses are added, they appear in the Status Definitions list:
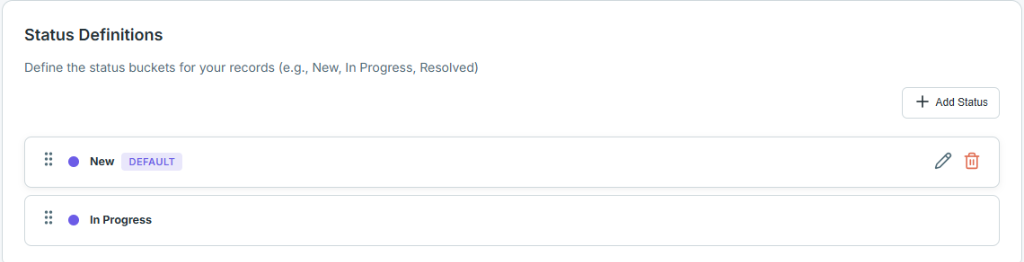
| Action | Description |
|---|---|
| Default Status | The first status created is marked with a DEFAULT badge. All new or imported records automatically start in this state |
| Reordering | Hover over the drag handle (::) on the left of any status card, then drag and drop to reorder chronologically |
| Edit | Click the pencil icon (✏️) to reopen the builder and modify name, description, icon, color, or terminal status |
| Delete | Click the trash icon (🗑️) to remove the status from the flow |
Click Create (top right) to save the flow configuration.
Step 3: Transitions
Under the Transitions tab, configure the rules governing how records are allowed to change states from one status to another.
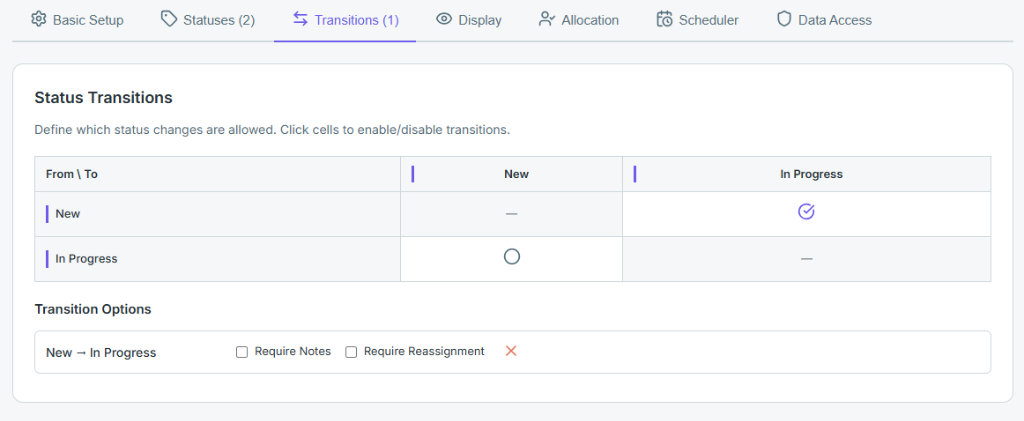
3.1 Status Transitions Matrix
The grid matrix lists all defined statuses as rows (From status) and columns (To status). Click any cell to toggle a transition path:
| Symbol | Meaning |
|---|---|
| Purple Checkmark | Transition path enabled (e.g., New → In Progress is allowed) |
| Empty Circle | Transition path disabled (e.g., In Progress → New is not allowed) |
| Dash (—) | Diagonal cells (same-status transitions) are disabled by default |
3.2 Transition Options
For each enabled transition path, a configuration panel appears below under Transition Options (e.g., New → In Progress):
- Require Notes (Checkbox): Requires the user to input a reason/notes when performing this transition.
- Require Reassignment (Checkbox): Requires assigning a new owner to the record when performing the transition.
- Delete Transition (✕): Disables and deletes the transition path.
Step 4: Display
Under the Display tab, configure the layout and presentation of records in list and board views.
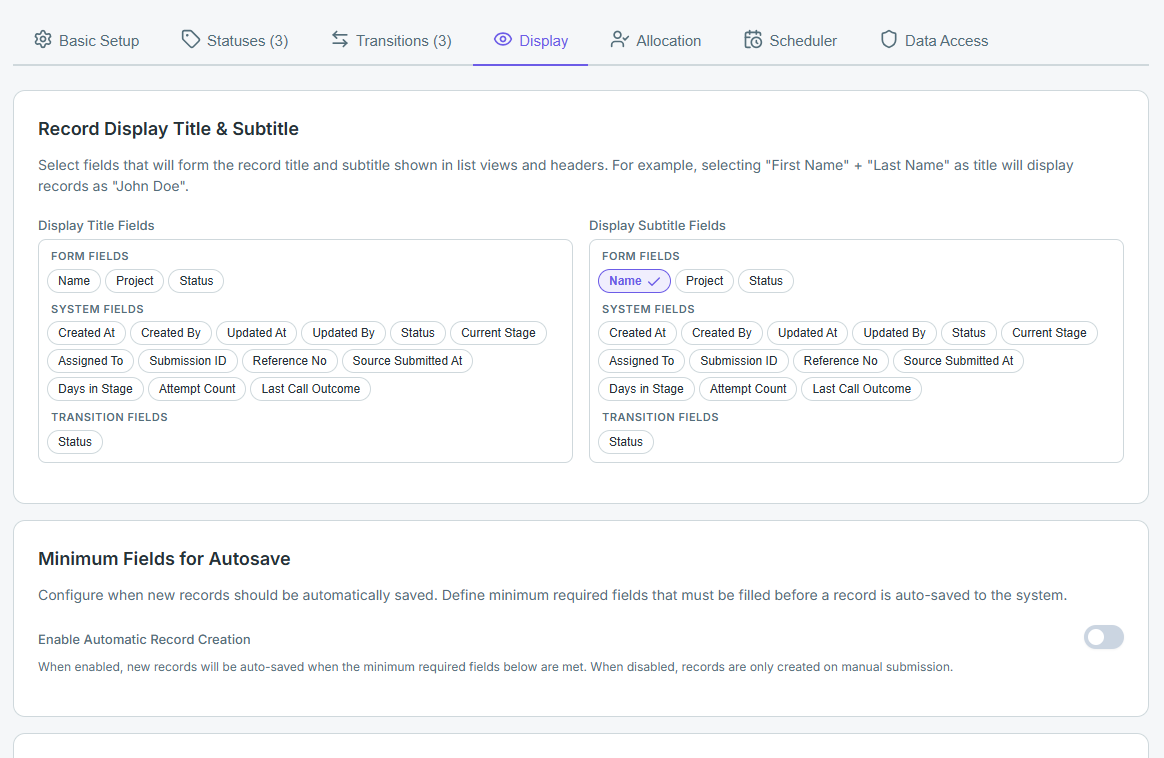
4.1 Record Display Title & Subtitle
Select fields that will form the record title and subtitle shown in list views and headers. Example: selecting First Name + Last Name as title displays records as John Doe.
- Display Title Fields: Choose one or more fields to compose the record's main title.
- Display Subtitle Fields: Choose one or more fields to compose the record's subtitle.
Both fields draw from the same three dynamic field groups:
| Group | Source |
|---|---|
| Form Fields | Populated automatically from the fields defined on the current form |
| System Fields | Populated automatically from the system-level fields available on the record type |
| Transition Fields | Populated automatically from the fields defined on the flow's transitions |
Note: Selected fields are shown in the order chosen; combining multiple fields concatenates them in the title/subtitle display.
4.2 Minimum Fields for Autosave
Configure when new records should be automatically saved.
- Enable Automatic Record Creation (Toggle): Defaults to Off.
- When On: New records are auto-saved once the minimum required fields are met.
- When Off: Records are only created on manual submission.
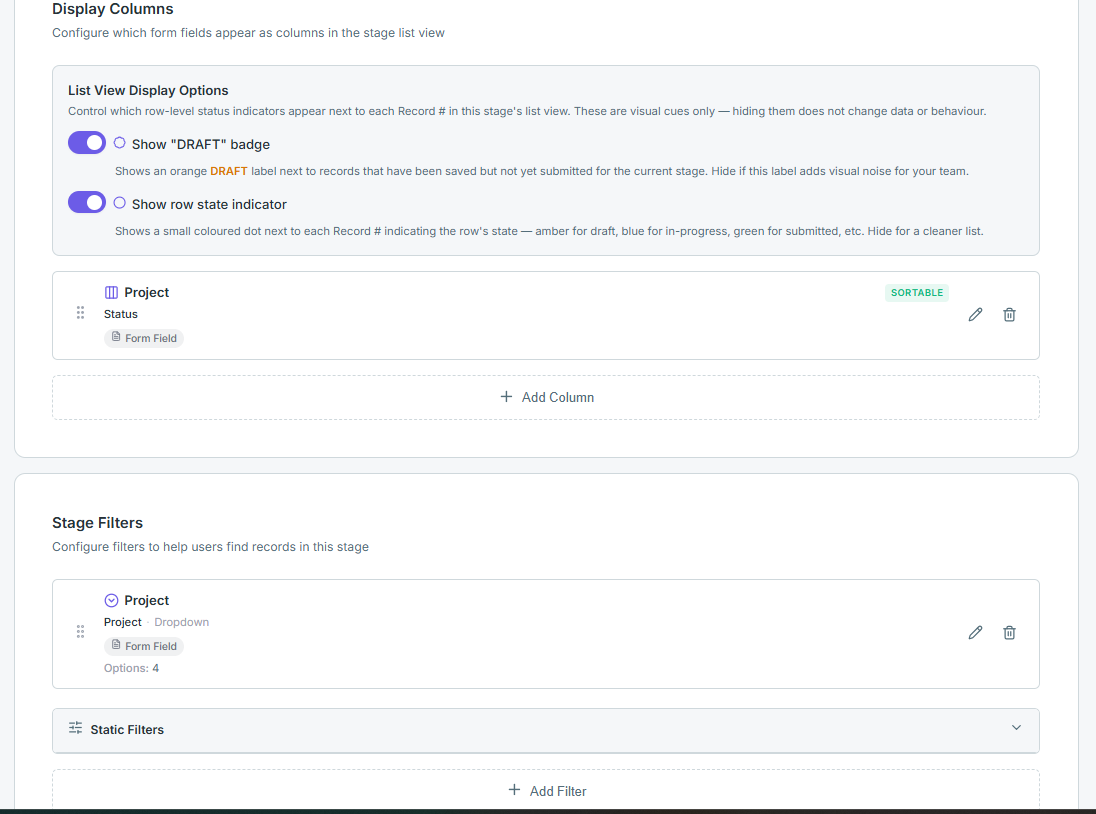
4.3 Display Columns
Configure which form fields appear as columns in the stage list view.
List View Display Options — row-level status indicators next to each Record #. These are visual cues only — hiding them does not change data or behaviour.
- Show "DRAFT" badge (Toggle): Defaults to On. Shows an orange
DRAFTlabel next to records saved but not yet submitted for the current stage. - Show row state indicator (Toggle): Defaults to On. Shows a small coloured dot indicating the row's state.
Columns: Add fields to appear as list-view columns, each configurable as Sortable.
4.4 Stage Filters
Configure filters to help users find records in this stage.
- Filters: Field-based filters (e.g., Dropdown) sourced from Form Fields.
- Static Filters: Collapsible group of filters that are always applied and not user-editable.
4.5 Field Change Tracking
All fields are tracked by default. Uncheck fields you want to exclude from the change audit trail.
- Form Fields (dynamic): Each field on the current form, individually checkable.
- System Fields (dynamic): Each system-level field on the record type, individually checkable.
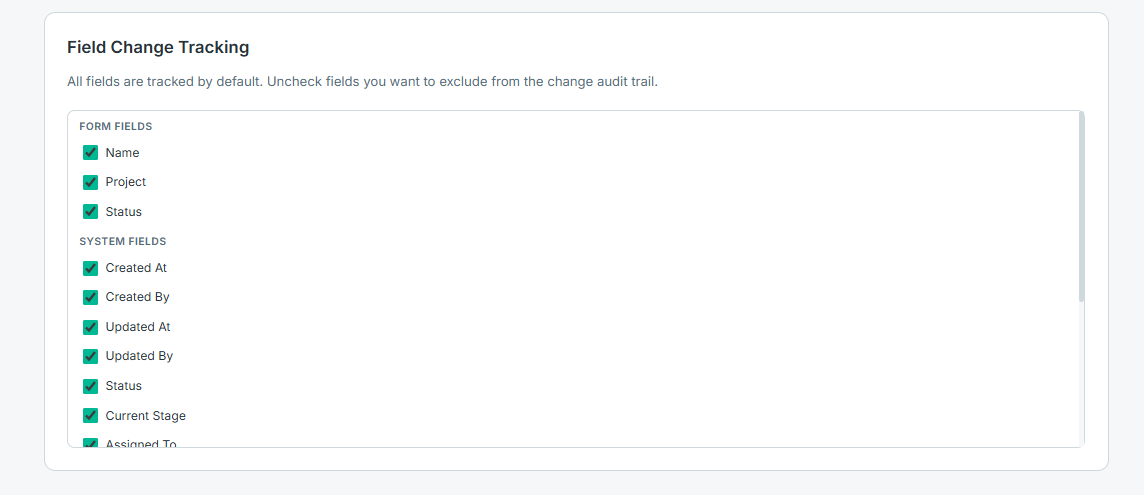
Note: Unchecking a field stops future changes to it from being recorded in the audit trail; it does not remove existing history.
Live Field Sync: Fields selected as Display Columns are live-synced with the record list. When a user updates one of these fields on the record's form — even without explicitly saving/submitting the form — the new value is written through immediately and reflected in the corresponding column in the record list view. There's no need to complete or save the full form for the change to appear; the list updates in near real-time as the field value changes.
Step 5: Allocation
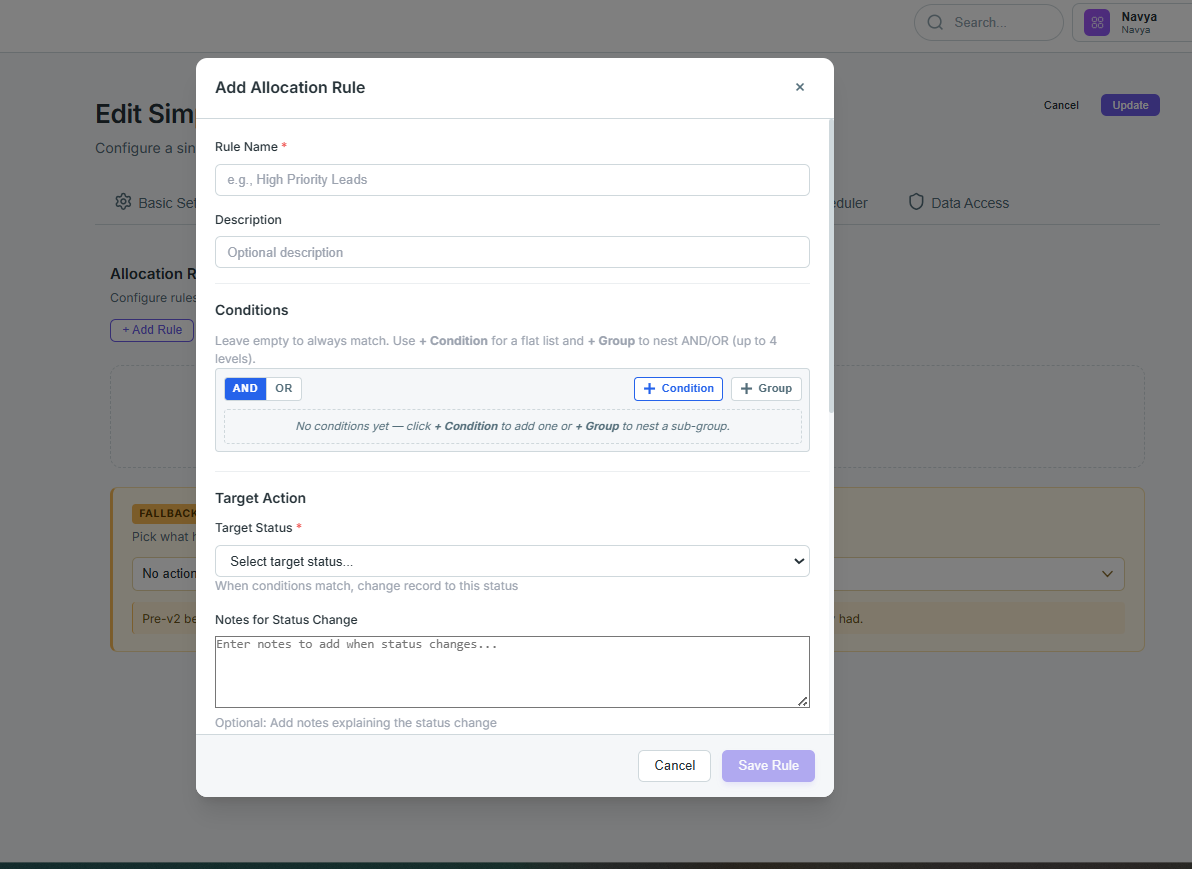
Configure rules to automatically change status and assign records based on conditions. Click + Add Rule to open the Add Allocation Rule modal.
5.1 Rule Basics & Conditions
| Field | Required? | Description |
|---|---|---|
| Rule Name | Required | A clear, unique identifier for the rule. Example: High Priority Leads |
| Description | Optional | Notes explaining the rule's purpose |
Conditions: Set matching filters using form fields.
- AND / OR logic: Whether records must match ALL (AND) or ANY (OR) conditions.
- + Condition: Add a flat filter to the list.
- + Group: Nest sub-groups of AND/OR filters (up to 4 levels of hierarchy).
Note: Leaving conditions empty means the rule always matches.
5.2 Target Action
| Field | Required? | Description |
|---|---|---|
| Target Status | Required | The status matched records will change to |
| Notes for Status Change | Optional | Notes automatically appended to the record's activity log when the status changes |
5.3 Assignment Method
Choose how matching records are assigned/reallocated when transitioning to the target status:
| Method | Description |
|---|---|
| Manual | Admin or user assigns manually |
| Self | Auto-assign to the user who submitted the form |
| Round Robin | Rotate evenly across team members |
| Least Loaded | Assign to the user with the fewest active tasks |
| Capacity Based | Assign based on user capacity settings |
| Queue | Add to a queue for users to claim |
| From form field | Read the assignee from a form field — value can be a user id, email, or username |
5.4 Manual Allocation Preset (shown when Assignment Method = Manual)
Configure filters shown to end users when manually allocating in the form renderer.
- Allow selecting multiple users (Checkbox): Off by default.
- + Add Preset Filter: Add a filter to narrow the list of assignable users. Each preset filter has:
- Filter Type (Dropdown):
Role,Hierarchy Node, orSystem Mapping. - Values: One or more values for the selected filter type (e.g., for
Role—Creator,Team Lead). - Locked (Checkbox): Prevents end users from changing this filter at allocation time.
- Required (Checkbox): Forces the filter to be applied before allocation can be completed.
- ✕: Remove the preset filter.
- Filter Type (Dropdown):
5.5 Rule Processing
- Priority (lower = first): Numeric field controlling evaluation order. Defaults to
0. - Stop processing rules after match (Checkbox): Defaults to On. Stops evaluating further rules once this one matches.
- Re-trigger this rule when it maps to its own stage (Checkbox): Defaults to Off. If this rule's target stage is the same stage it runs on, it keeps the record here without re-allocating (no duplicate allocation history). Turn on only to deliberately let the same-stage rule re-fire and re-record on entry.
Step 6: Scheduler
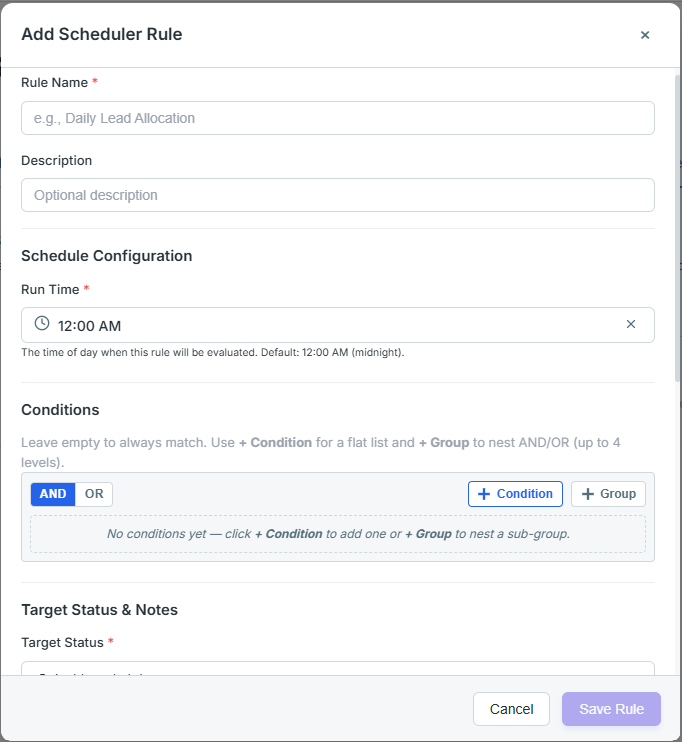
Under the Scheduler tab, define automated, time-based rules that run on a daily schedule to evaluate record conditions and trigger status updates and user assignments.
Click + Add Rule to open the Add Scheduler Rule wizard modal.
6.1 Core Setup & Schedule
| Field | Required? | Description |
|---|---|---|
| Rule Name | Required | A clear, unique identifier for the scheduler rule. Example: Daily Lead Reassignment |
| Description | Optional | Notes explaining the business rule's logic |
| Run Time | Required | Time of day the scheduler job runs to evaluate this rule. Example: 12:00 AM. Defaults to 12:00 AM (midnight) |
Conditions: Set matching filters using form fields.
* AND / OR logic: Whether records must match ALL (AND) or ANY (OR) conditions.
* + Condition: Add flat fields to filter. Example: Created Date is older than 30 days.
* + Group: Nest sub-groups of AND/OR filters (up to 4 levels of hierarchy).
Note: Leaving conditions empty means the rule matches all active records in the flow.
6.2 Target Status & Notes
| Field | Required? | Description |
|---|---|---|
| Target Status | Required | The status bucket matched records will transition to |
| Notes | Optional | Notes automatically appended to the record's activity log when the transition triggers |
6.3 Assignment Method
Choose how matching records are assigned/reallocated when transitioning to the target status:
| Method | Description |
|---|---|
| Manual | Routes the record to the target status with no active owner; managers must allocate manually |
| Self | Automatically assigns the record to its original creator |
| Round Robin | Evenly rotates assignments among eligible users in the pool |
| Least Loaded | Assigns to the active user with the fewest active assignments |
| Capacity Based | Evaluates maximum capacity configurations in user profiles and routes accordingly |
| Queue | Puts the record into a shared queue for eligible team members to claim manually |
6.4 User Pool Configuration
When using dynamic assignment methods (Round Robin, Least Loaded, Capacity Based, Queue), filter which users are candidates for allocation:
- ROLES: Select organizational roles to restrict candidates. Example:
Sales Rep,Team Lead. - HIERARCHY: Restrict candidates by organizational locations or nodes. Example:
Navya. - SYSTEM MAPPINGS: Click + Add Filter to match candidates by system attributes (e.g., matching departments or regions).
6.5 Priority & Processing (Global settings)
- Priority (lower = first): Integer (default
0) defining evaluation order when a record qualifies for multiple scheduler rules. Lower values execute first. - Stop processing rules after match (Checkbox): Terminates evaluation immediately when a match is found, preventing subsequent lower-priority rules from triggering.
Click Save Rule (purple button) to deploy the rule.
Step 7: Data Access
Under the Data Access tab, configure record visibility settings to control which records users are allowed to see in this SimpleFlow's list and board views.
Note: Users with the TenantAdmin and OrgAdmin roles always bypass these settings and can see all records.
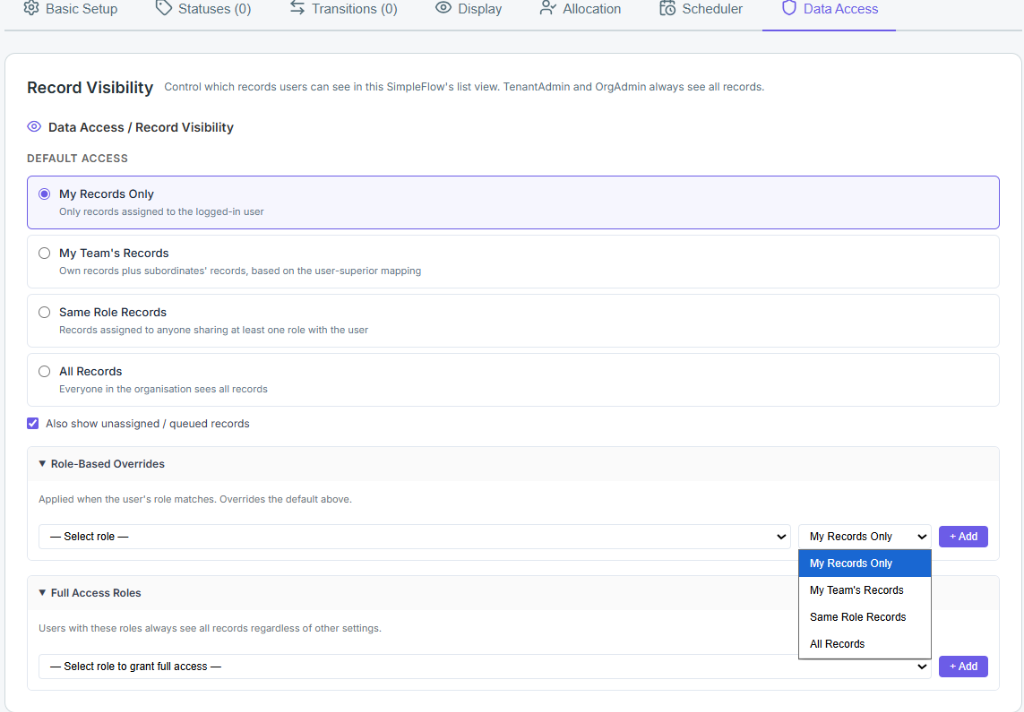
7.1 Default Access
Select the default scope of record visibility for users browsing this SimpleFlow:
| Scope | Description |
|---|---|
| My Records Only | Users can only see records specifically assigned to them |
| My Team's Records | Users can see their own records plus all records assigned to their subordinates (based on the org's user-superior reporting hierarchy) |
| Same Role Records | Users can see records assigned to anyone sharing at least one role with them |
| All Records | All users in the organization can see all records in this flow |
- Also show unassigned / queued records (Checkbox): Checked by default — adds unassigned or queued records to the user's default scope.
7.2 Role-Based Overrides
Set specific visibility rules for individual roles that override the default access setting:
- Select role: Choose the target role from the dropdown.
- Access Scope: Select the override scope (
My Records Only,My Team's Records,Same Role Records,All Records). - Click + Add to save the override.
7.3 Full Access Roles
Specify roles that are granted unrestricted access to all records in this SimpleFlow, regardless of other settings:
- Select role to grant full access: Choose the role from the dropdown.
- Click + Add to save the full access grant.
Step 8: Click Create (top right) to save the flow configuration.
Managing Existing SimpleFlows
Once a SimpleFlow has been created, you can manage it from the SimpleFlows list page.
The page has two tabs — Workflows and SimpleFlows (each showing a count badge) — with SimpleFlows selected by default. Above the list, a + Create SimpleFlow button opens the creation wizard, and a grid/list view toggle switches how flows are displayed.
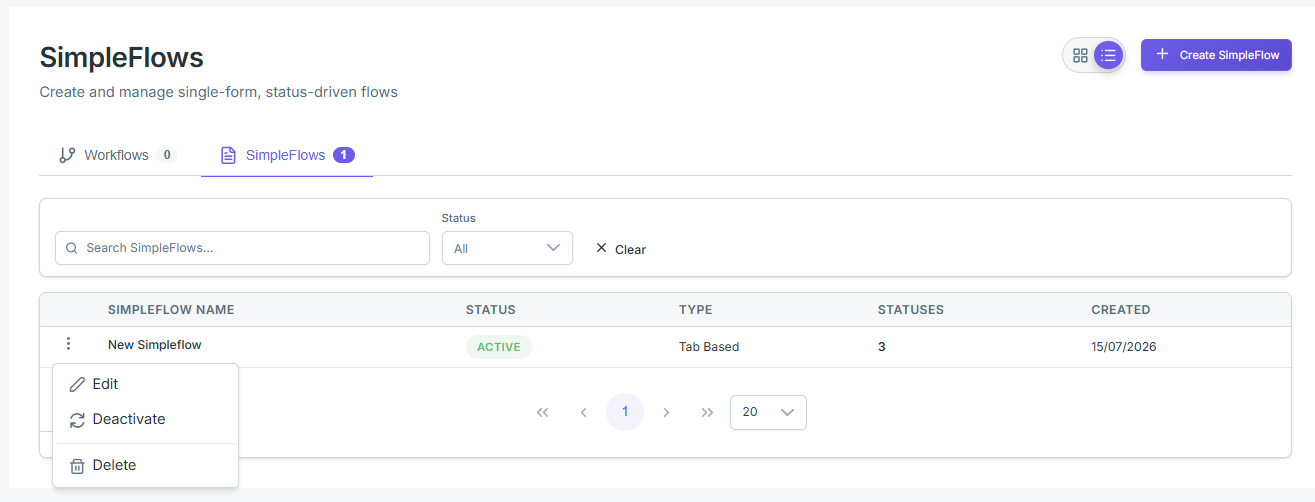
-
Search & Filter:
- Search SimpleFlows...: Search by flow name.
- Status (Dropdown): Filter by status. Defaults to
All. - ✕ Clear: Reset the search and status filter.
-
List Columns:
| Column | Description |
|---|---|
| SIMPLEFLOW NAME | Name of the flow |
| STATUS | ACTIVE or INACTIVE badge |
| TYPE | Menu display mode (e.g., Tab Based, Expandable Menu Group, Direct Menu Item) |
| STATUSES | Total number of statuses configured for the flow |
| CREATED | Date the flow was created |
1. Row Actions
Click the ⋮ (three-dot) icon to the left of any SimpleFlow's name to open its action menu:
- Edit: Opens the flow's configuration page, where you can modify any aspect of the flow. You can reorder, add, or delete statuses, change transitions, and update allocation logic, and so on.
When you make changes, click Update (top right) to save your modifications.
-
Deactivate / Activate: Toggles the flow's status.
- Active: The flow appears in the sidebar navigation and can be used to create and manage records.
- Inactive: The flow is hidden from the sidebar navigation. Users cannot access the flow or create new records through it. Existing records remain in their current status but can still be accessed and updated through the Workflow List page (Admin-only) if not archived.
Note: When deactivated, the SimpleFlow is hidden for all users, including Admins. Only users with the TenantAdmin or OrgAdmin roles can see and manage inactive flows.
-
Delete: Permanently removes the SimpleFlow. Deleting a SimpleFlow:
- Removes it from the sidebar navigation.
- Prevents the creation of new records through the flow.
- Does NOT delete existing records created through the flow — these remain in their last known status and stay visible in the Workflow List page.
Note: Deletion is permanent and cannot be undone. Archived records remain even after deleting the flow.
Sidebar of Simpleflow
Based on the Menu Display mode the Flows will get visible in the left sidebar with SimpleFlow name and the list of simpleflows related to the simpleflow menu will be shown as the sub options under the Simpleflow name.
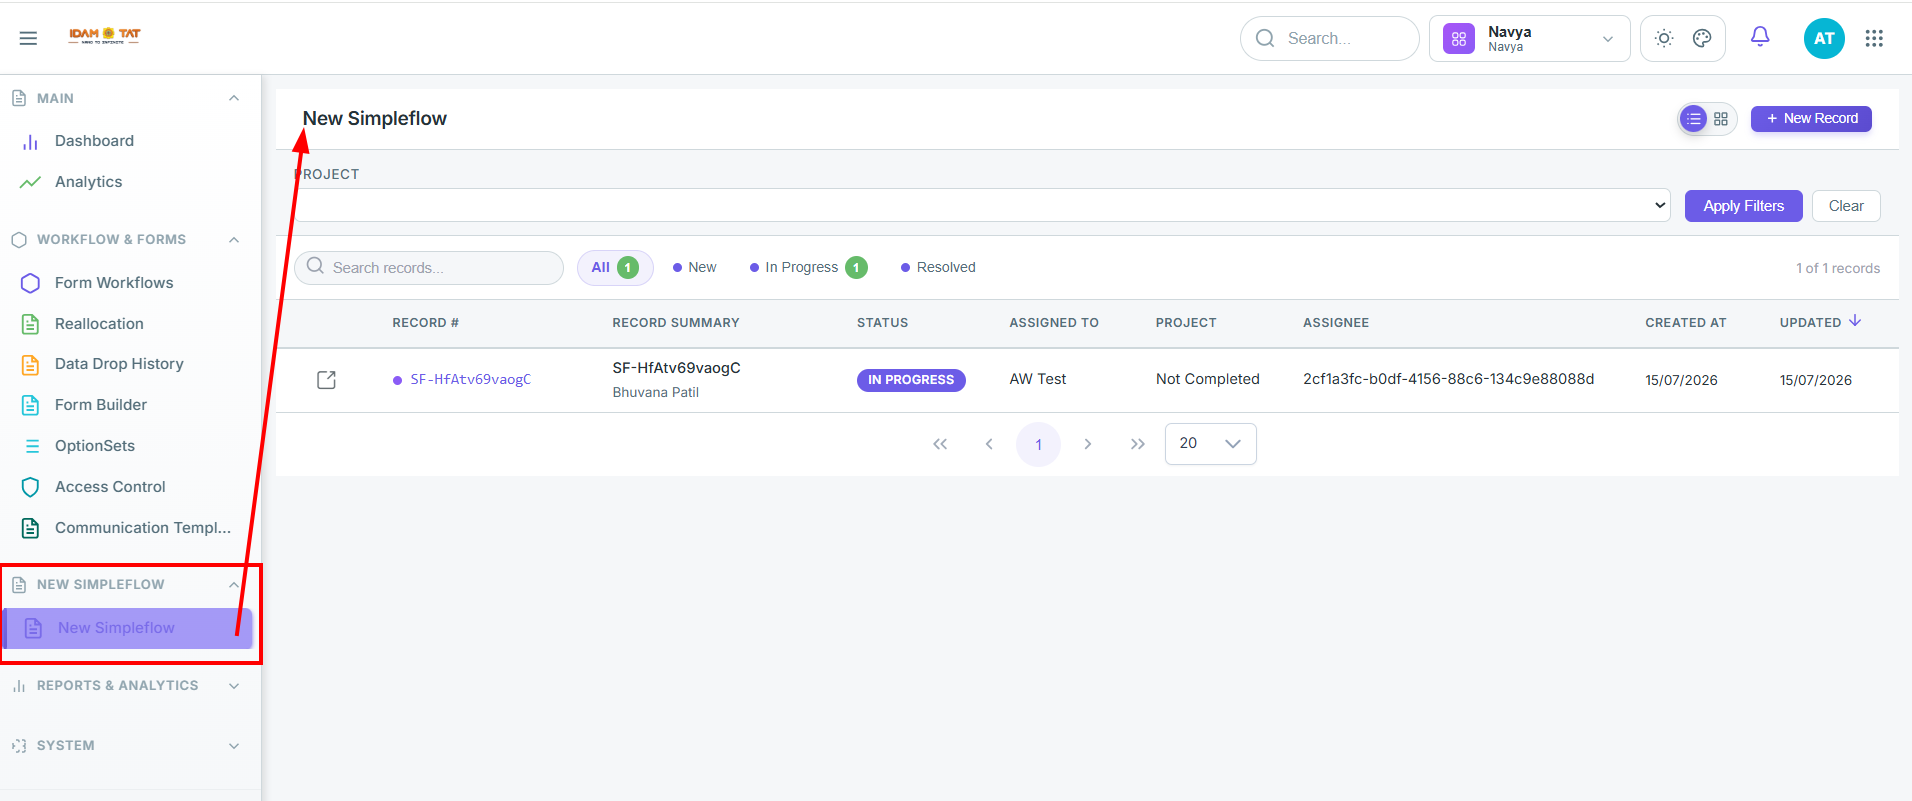
to right side the page will display all the submitted records for that particular simpleflow
This is the record list view for an individual SimpleFlow (here, "New Simpleflow") — the page users land on to see and manage all records created through that flow.
Header
- New Simpleflow — the flow's name, shown as the page title.
- List/Grid toggle (top right) — switch between table view and card/board view.
- + New Record — opens the form to manually create a new record in this flow.
Filters
- PROJECT — a dropdown filter sourced from a form field (Step 4: Display → 4.4 Stage Filters).
- Apply Filters / Clear — apply or reset the selected filter values.
Status Tabs & Search
- Search records... — free-text search across records.
- All (1) / New / In Progress (1) / Resolved — quick filter chips for each status defined in Step 2 (Statuses). The number badge shows how many records currently sit in that status. Clicking a chip filters the table to just that status.
- 1 of 1 records (top right) — count of records matching the current filter/search.
Table Columns in List View
| Column | What it shows |
|---|---|
| RECORD # | Auto-generated record ID (using the SimpleFlow Code prefix, e.g. SF-), with a colored dot indicating current status and an external-link icon to open the record |
| RECORD SUMMARY | The record's display title/subtitle, (built from the fields chosen in Step 4: Display → 4.1 Record Display Title & Subtitle) (here: record # as title, "Bhuvana Patil" as subtitle) |
| STATUS | Current status badge (e.g. IN PROGRESS) |
| ASSIGNED TO | Value from a form/assignment field (AW Test) |
| PROJECT | Value of the Project field for this record |
| ASSIGNEE | The system-assigned owner's user ID (raw UUID here, would normally resolve to a name) |
| CREATED AT / UPDATED ↓ | Timestamps, sortable (arrow shows current sort direction) |
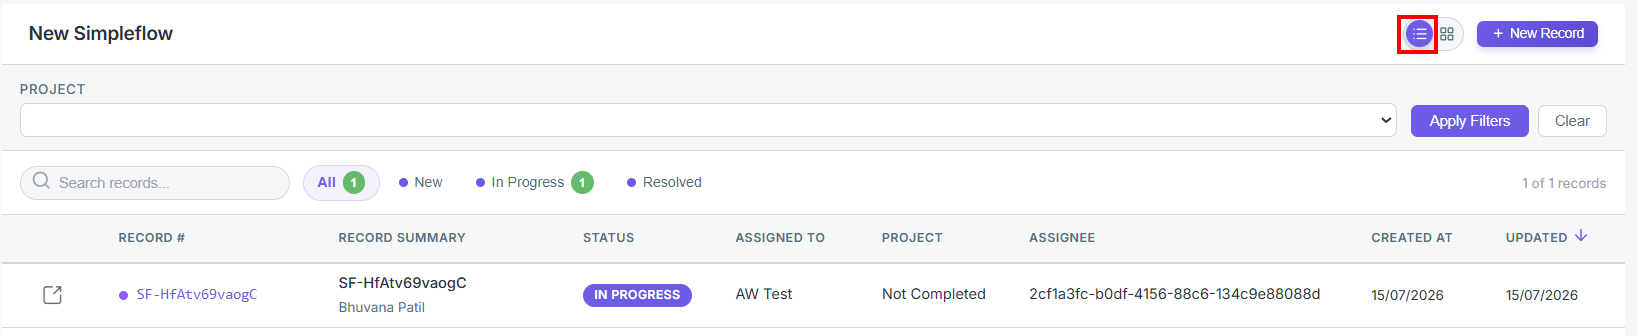
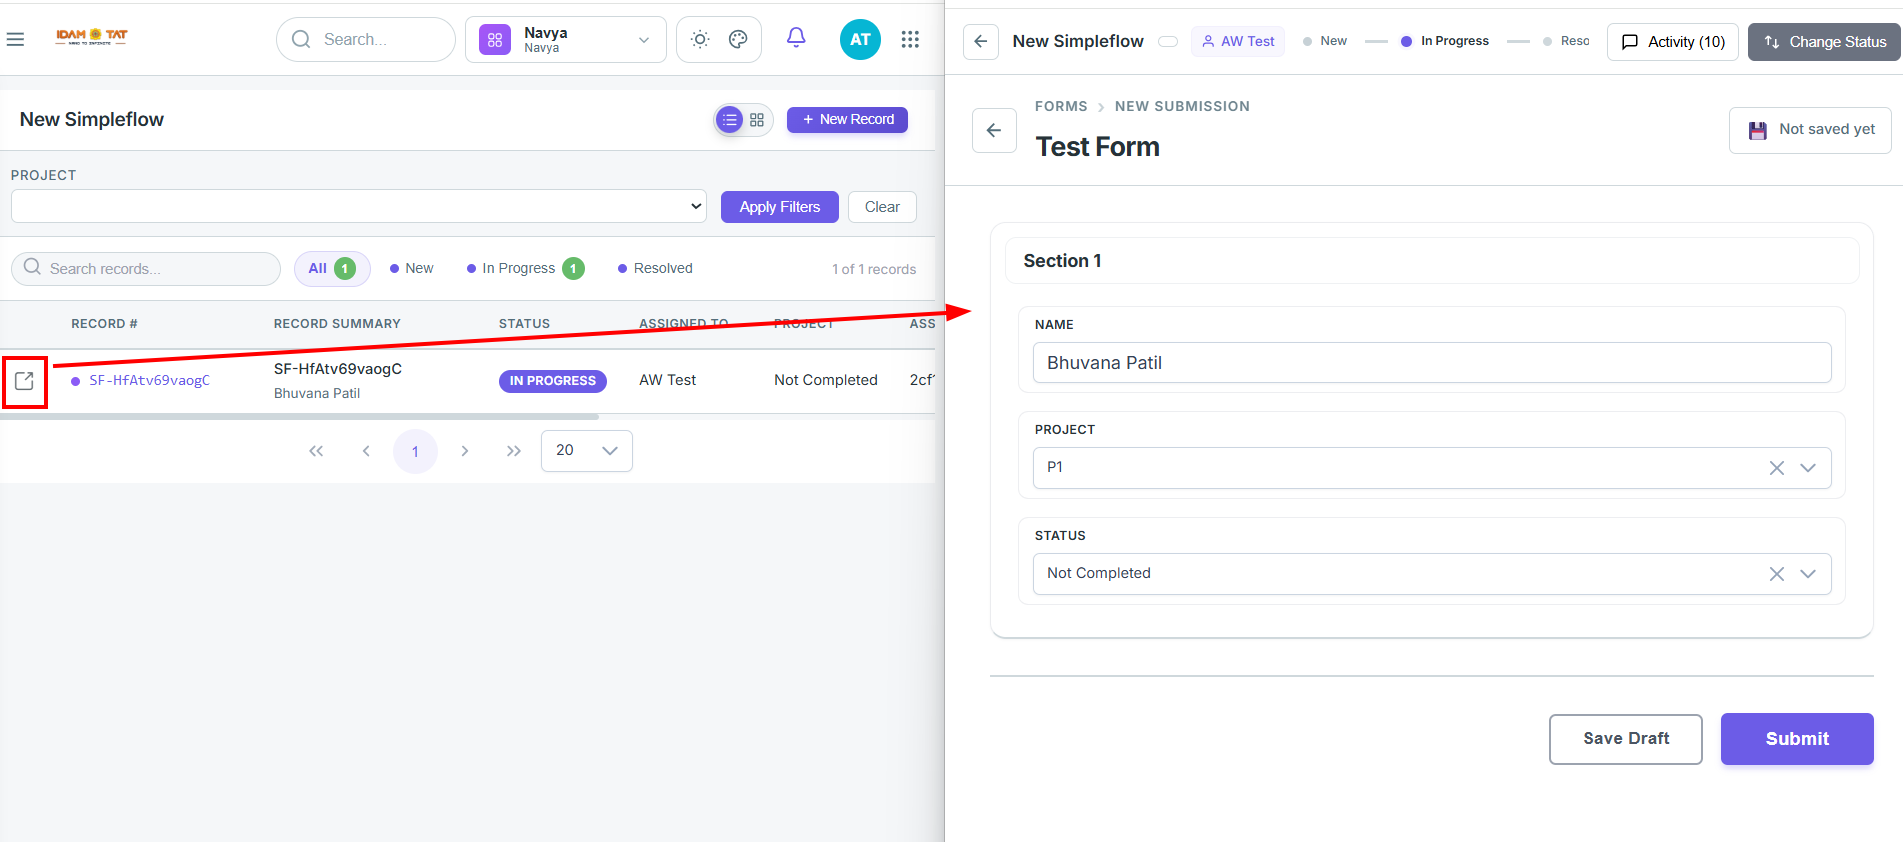
Opening a Record & Changing Status
- Opening a Record Click the external-link icon (⧉) next to a record in the list to open its Record Page, showing the full record details.
- Changing Status On the record page, click the Change Status icon (top right) to open a status-change pop-up:
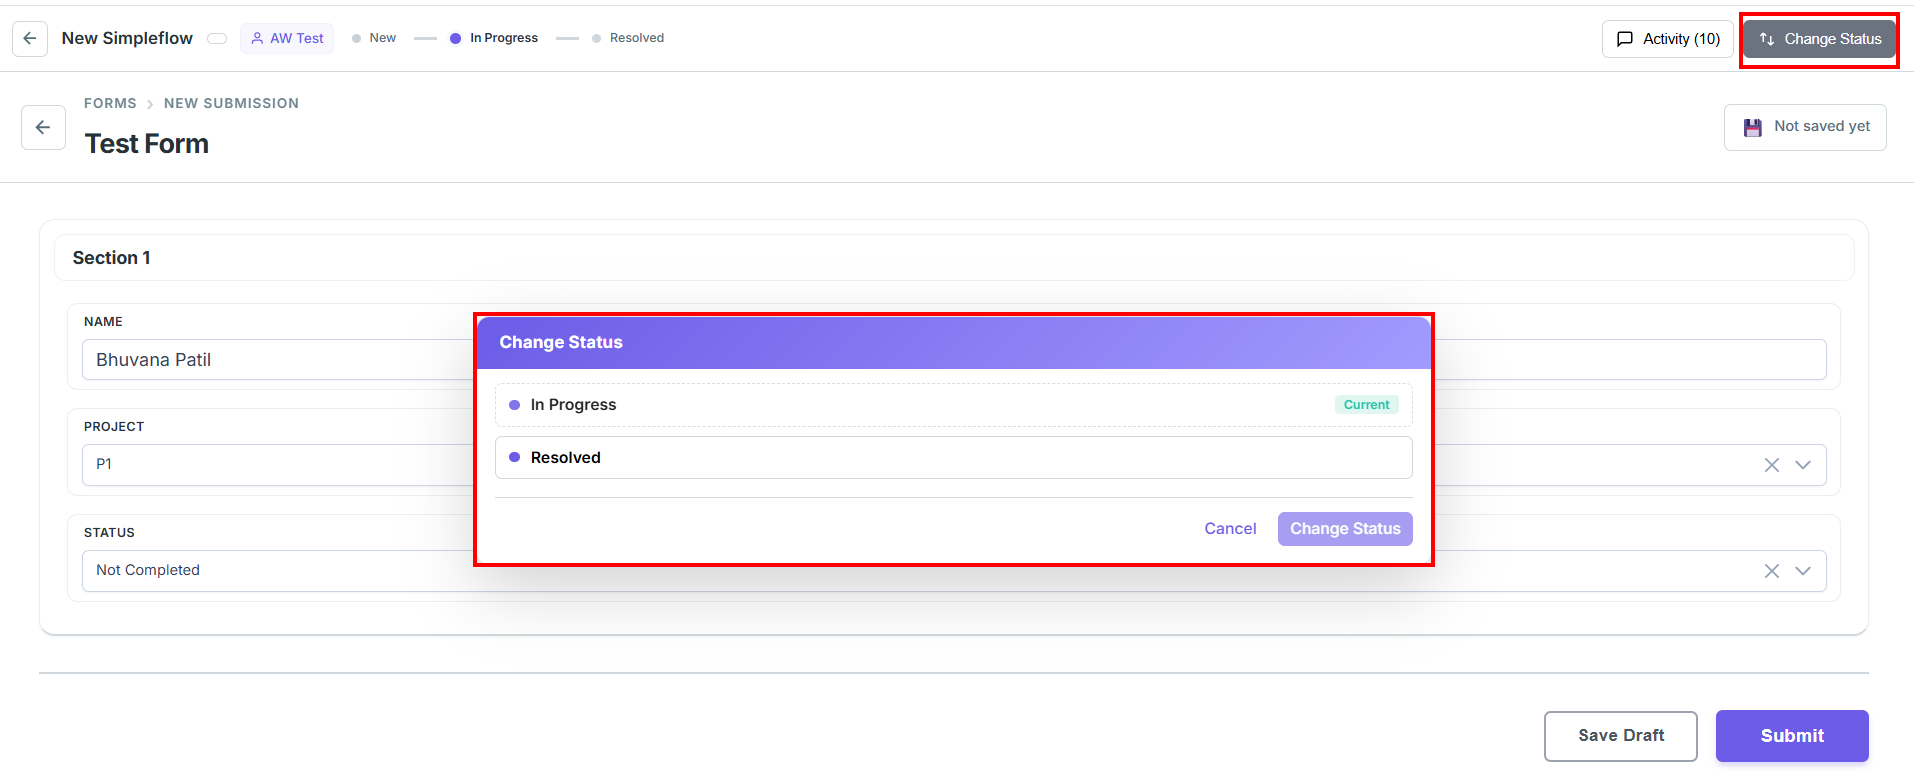
- Select Status: A dropdown lists the available target statuses — these are the same statuses defined as valid transitions from the record's current status in (Step 3: Transitions) of the SimpleFlow setup. Only statuses with an enabled transition path from the current status will appear.
- Depending on how that transition was configured, the pop-up may also prompt for:
- Notes (if Require Notes was enabled for this transition)
- Reassignment (if Require Reassignment was enabled for this transition)
- Click Change Status to confirm — the record moves to the selected status immediately.
Note: The status options shown here are dynamic and directly reflect the transition matrix configured for the flow, so a status will only be selectable if a transition path to it has been explicitly enabled.
Kanban View
Toggling to Grid view (top right icon toggle) switches the record list from a table into a Kanban-style board, with one column per status defined in (Step 2: Status).
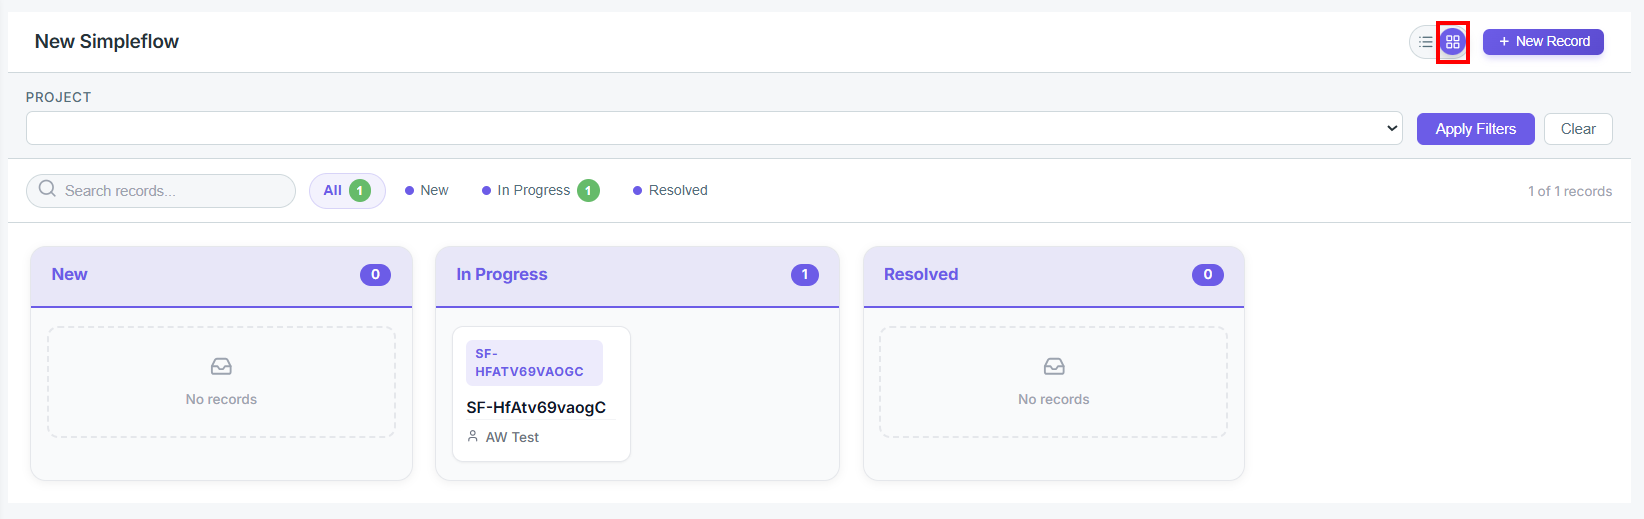
- Columns: Each status (
New,In Progress,Resolved, etc.) is shown as its own column, with a count badge indicating how many records currently sit in that status. - Record Cards: Each record appears as a card showing its Record # and Record Summary (same fields configured in Display → Record Display Title & Subtitle).
- Empty Columns: Statuses with no records show a placeholder ("No records").
- Drag & Drop: Records can be dragged from one column and dropped into another to change their status directly from the board — this triggers the same status-change logic as using the Change Status action on the record page.
- A record can only be dropped into a column if a valid transition path exists from its current status to the target status (as defined in Step 3: Transitions). Dropping into a column without an enabled transition path is not allowed.
- If the transition has Require Notes or Require Reassignment enabled, the drag-and-drop action will prompt for that input before completing the move.
The same filters, search, and status chips from the list view apply here as well.
Activity Tab
on the top right coner there is an activity tab Click on it to open
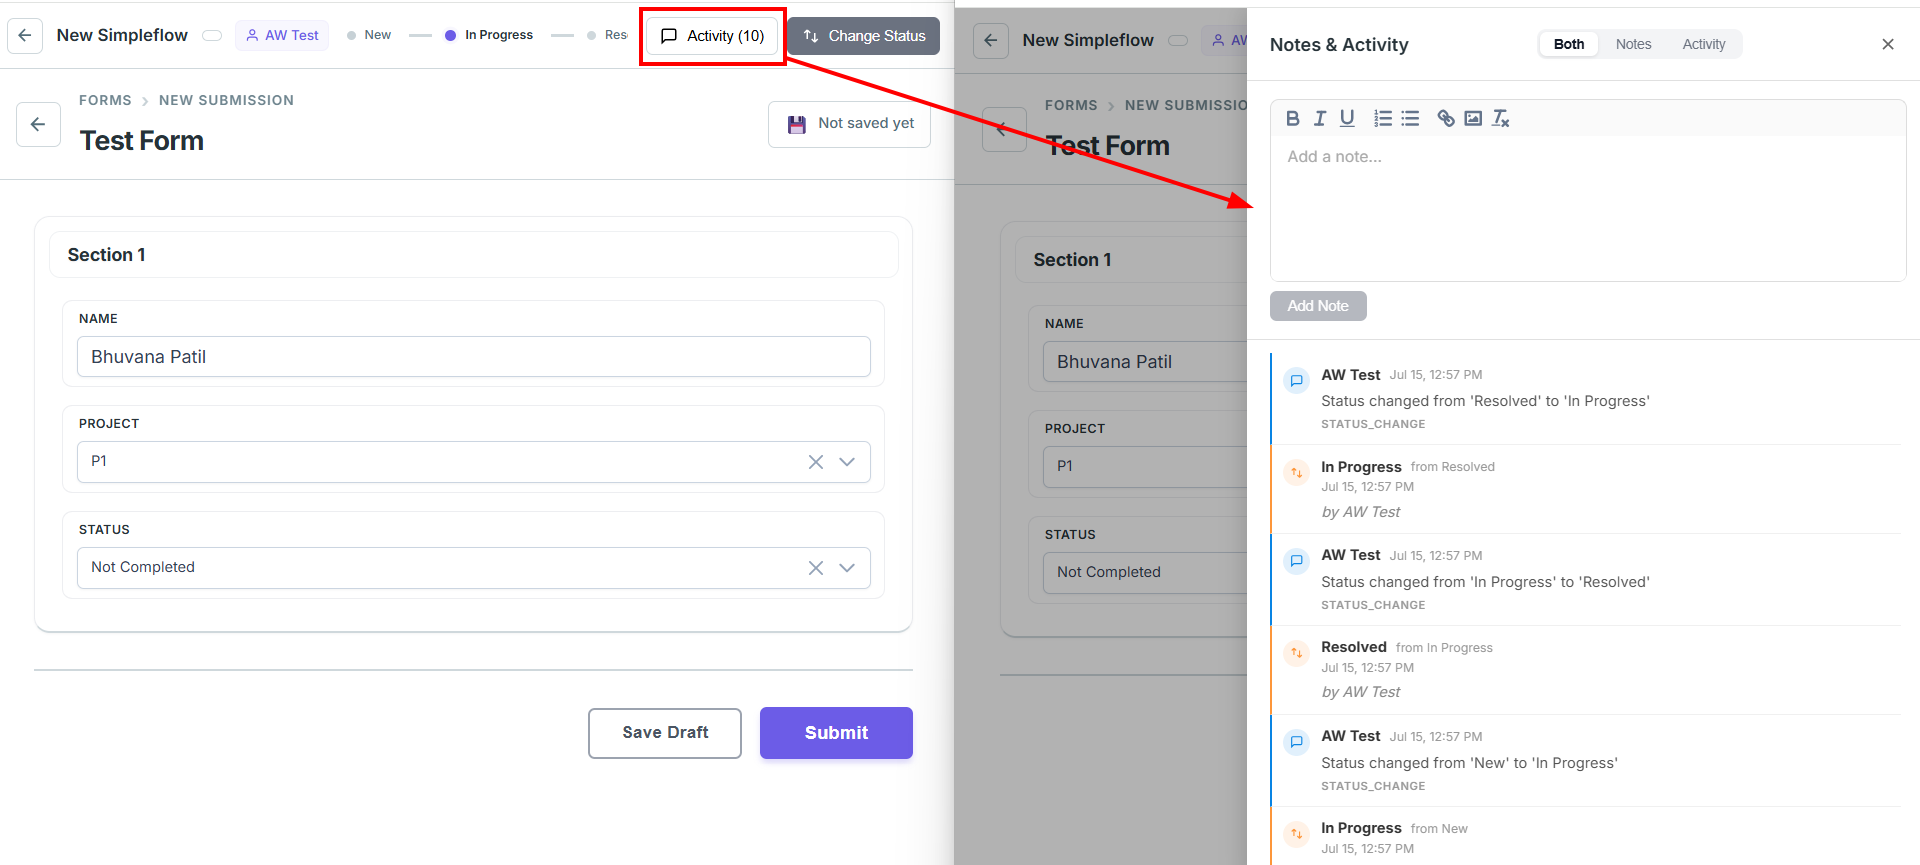
The Activity tab on the record page shows a complete audit trail of the record, including:
- Status History: Every status change made to the record, in chronological order.
- Notes: Any notes added during status changes, plus a space to manually add new notes to the record at any time.
Frequently Asked Questions (FAQs)
Q1. What is a Form Workflow?
A: A Form Workflow is a multi-stage pipeline that moves leads or records through defined steps, each with its own form, data access rules, and allocation logic. It lets you control who sees what, which form is shown at each stage, and how records are automatically routed between teams.
Q2. What is the difference between a Workflow and a SimpleFlow?
A: A Workflow supports multiple stages, complex allocation rules, notifications, and custom visibility settings — ideal for multi-team processes like lead management or onboarding. A SimpleFlow is a lighter, single-form, status-driven option suited for simpler ticket-style use cases where you don't need multiple stages.
Q3. How do I create a new workflow?
A: Navigate to Left Sidebar → Workflow & Forms → Form Workflows, then click the "+ Create Workflow" button (top right). Follow the 2-step wizard: first configure the workflow name, display mode, and visibility defaults; then add and configure your stages.
Q4. What are the three Menu Display Mode options?
A: Tab-Based: Stages appear as horizontal tabs at the top of the sidebar page. Expandable Menu Groups: Stages are grouped under a collapsible sidebar folder. Direct Menu Items: Each stage is a flat, standalone link in the main navigation sidebar.
Q5. What happens when I deactivate a workflow?
A: Deactivating a workflow changes its status from ACTIVE to INACTIVE. New records can no longer enter the workflow, but existing records and configurations are preserved. You can reactivate it at any time by editing the workflow and checking "Activate this workflow immediately."
Q6. Can I reorder stages after creating them?
A: Yes. In the Stages section (Step 4), each stage card has a drag handle (⋮⋮). Simply drag a stage card up or down to change its position in the workflow.
Q7. Is deleting a workflow reversible?
A: No. Deleting a workflow is a permanent action. All stages, allocation rules, scheduler rules, filters, columns, notifications, and visibility settings linked to that workflow are completely and irreversibly removed from the system.
Q8. What does the "Requires completion of previous stage" checkbox do?
A: When enabled on a stage, users must fully complete the preceding stage before they can access the current one. This enforces a strict sequential flow and is disabled by default, meaning stages are accessible independently unless you turn this on.
Q9. How do multiple allocation rules get evaluated, and how do I control their order?
A: When a form is submitted, all allocation rules for that stage are evaluated in order of their Priority value (lower number = evaluated first). If the "Stop processing rules after match" checkbox is enabled (default), evaluation stops as soon as the first matching rule is found. If it is disabled, all matching rules are executed in sequence. To ensure a catch-all rule fires last, give it the highest priority number.
Q10. What is the difference between Allocation Rules (Tab 2) and Scheduler Rules (Tab 3)?
A: Allocation Rules are triggered in real time when a user submits a form — they immediately route the record to a target stage and assign it to a user. Scheduler Rules run as a background job once daily at a configured time, evaluating conditions on records already sitting in a stage and re-routing them if criteria are met. Use Scheduler Rules for time-based scenarios like escalating stale leads every morning.
Q11. How does the "Least Loaded" assignment method determine workload?
A: The Least Loaded method scans the active task or record count for every eligible user in the configured pool (filtered by Role, Hierarchy, or System Mappings) and assigns the incoming record to whichever user currently has the lowest active count. This helps distribute work evenly without manual intervention.
Q12. How do Role-Based Overrides and Full Access Roles interact with the Default Access setting?
A: The Default Access setting is the baseline rule for all users. Role-Based Overrides let you define a different access scope for specific roles, which takes precedence over the default for those users. Full Access Roles go one step further — users with those roles can always see all records in that stage regardless of any other setting. The evaluation order is: Full Access Roles → Role-Based Overrides → Default Access.
Q13. Can a single allocation rule send a record to a different workflow altogether?
A: Yes. In both the Allocation (Tab 2) and Scheduler (Tab 3) rule modals, the Target Workflow dropdown lets you select any workflow in the system — not just the current one. This enables cross-workflow routing, such as moving a qualified lead from an Inbound Workflow directly into a Sales Workflow at a specific stage.
Q14. What is the purpose of the Global Filter option in Tab 4 (Filters)?
A: When the Global Filter checkbox is enabled on a filter, selecting a value for that filter automatically cascades and applies the same filter across all mapped fields in every other stage of the active workflow — not just the current stage. This is useful when you want a single filter selection (like "Region: North") to narrow down records consistently across all stages simultaneously.
Q15. How do notification conditions work, and what logic do they use?
A: Each notification rule can have optional conditions that control exactly when the notification fires. All conditions within a single rule use AND logic — every condition must be true for the notification to send. If you leave conditions empty, the notification fires unconditionally on every trigger event. To implement OR logic across different scenarios, create separate notification rules, one per scenario, each with its own conditions.
Q16. Can I use the same form in multiple different workflows?
A: Yes, the same form can be assigned to multiple workflows. When setting up the Stages (Step 4), each stage has a Form ID field where you can select any form from the available form repository. For example, a single "Lead Qualification Form" could be used in an "Inbound Sales Workflow," a "Referral Nurture Workflow," and a "Website Lead Capture Workflow" — each workflow would route and manage the form submissions independently based on its own rules and stages.