PERMISSION MANAGEMENT
The Permission Management module governs platform-wide access control.
Purpose: Provide a centralized, secure, and flexible system to govern access control across the entire platform. Its primary purpose is to ensure that users have the appropriate level of access to applications, modules, and resources based on their roles and organizational hierarchy, thereby enforcing security policies and safeguarding sensitive data.
Capabilities
- Create and manage permissions
- Assign permissions to roles
- Apply user-level overrides
- Configure hierarchy-based visibility
- Manage applications and reporting relationships
Permission List
The Permission List module is used to create and manage all system permissions available across applications. It acts as a central repository where administrators define granular access rules (Create, Edit, View, Delete) for specific resources within various functional modules. This foundational step is required before any permissions can be assigned to roles or users.
Accessing Permission List
Navigation: Permission Management → Permission List
Overview of Permission List
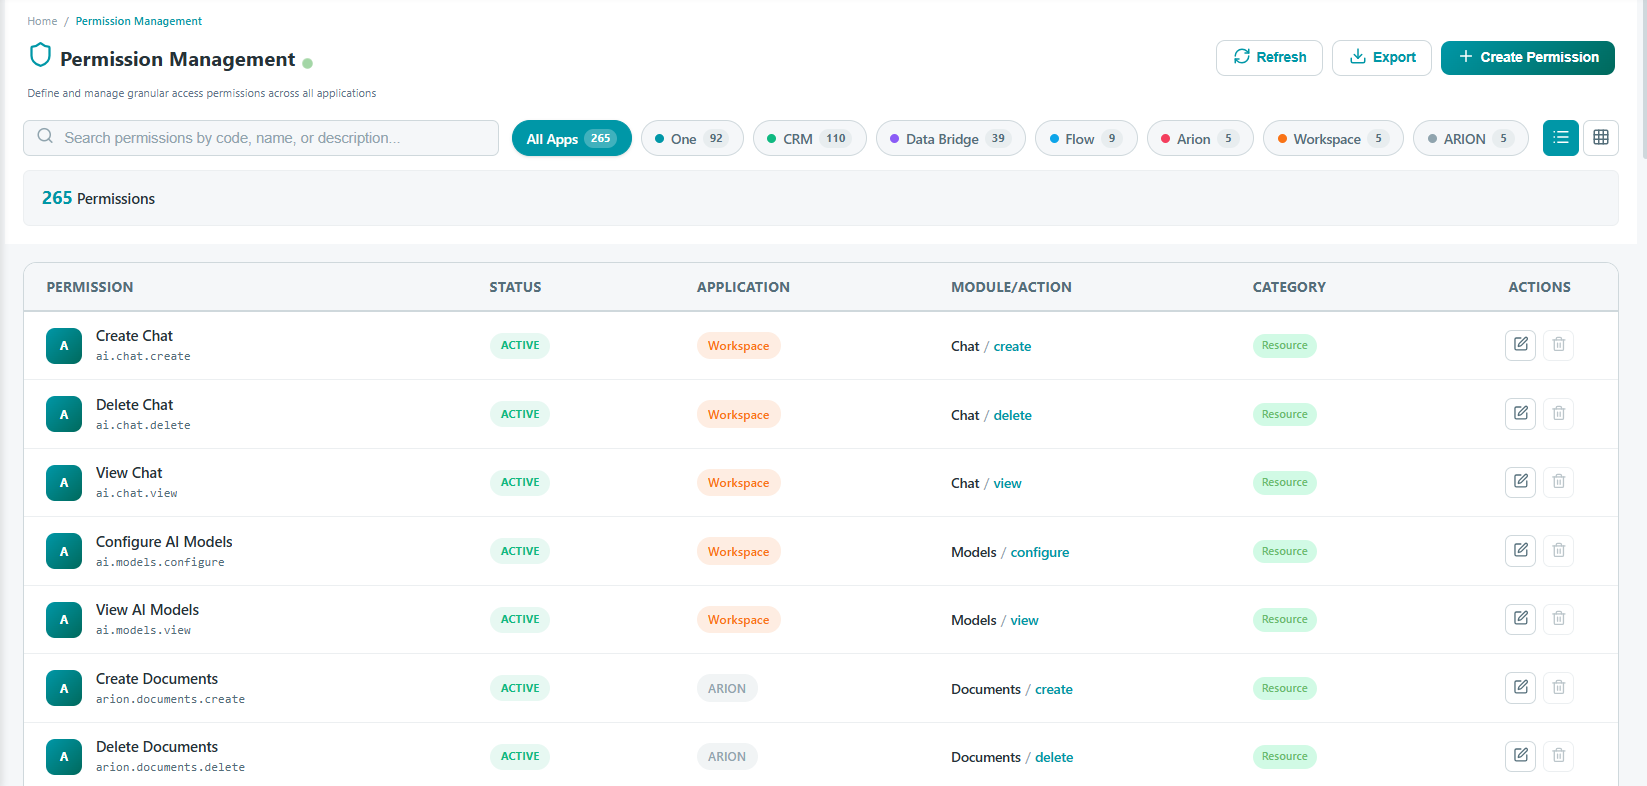
The Permission List interface provides a comprehensive view to easily navigate, filter, and manage all system permissions.
Top Bar Controls
- Search Bar: Search permissions quickly by their code, name, or description.
- Application Filters: Quick-filter pills allow you to filter the list by specific applications (e.g., CRM, Workspace, ARION) and see the total count of permissions within each.
- Action Buttons: Options to Refresh the list, Export data, and + Create Permission.
- View Toggles: Switch between list and grid views for your preferred layout.
Permission Table Columns
| Column | Description |
|---|---|
| PERMISSION | Displays the friendly display name (e.g., "Create Chat") alongside its unique system identifier code (e.g., ai.chat.create). |
| STATUS | Indicates if the permission is currently ACTIVE or INACTIVE. |
| APPLICATION | The overarching application the permission belongs to (e.g., Workspace, ARION). |
| MODULE/ACTION | Specifies the functional module and the specific action (e.g., Chat / create, Models / view). |
| CATEGORY | Classifies the type of permission (e.g., Resource). |
| ACTIONS | Quick action icons to Edit or Delete the specific permission. |
Steps to create new permission
- Navigate to Permission Management → Permission List.
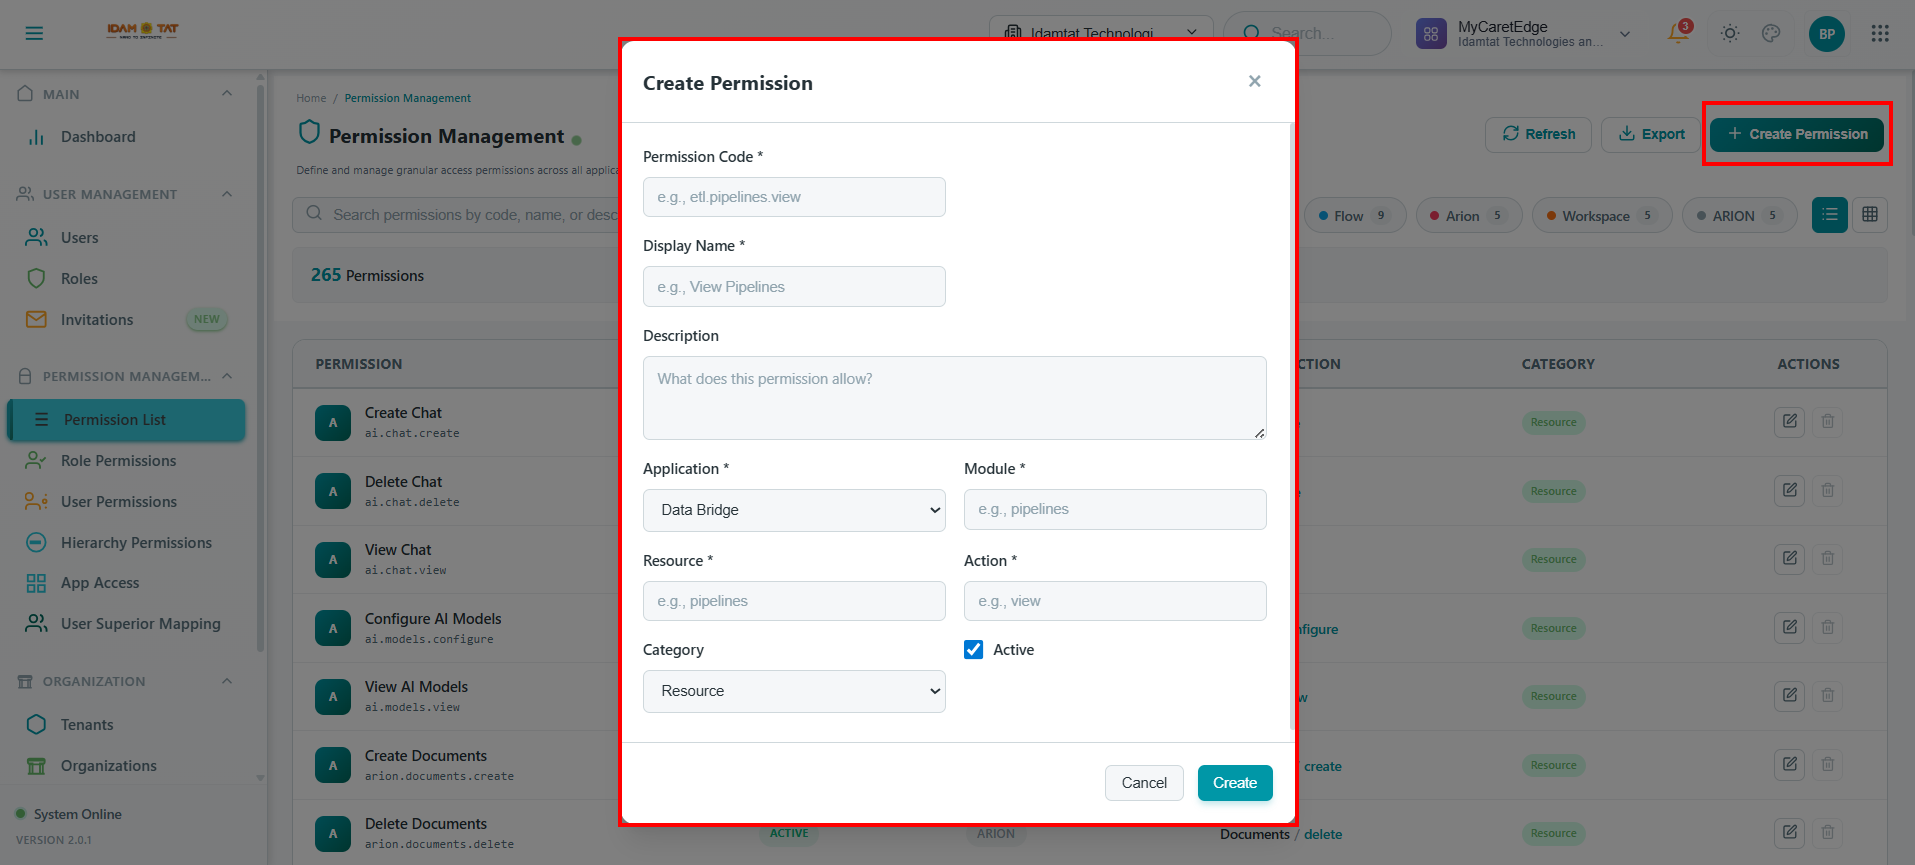
- Click the + Create Permission button in the top right corner.
- Fill in the required form fields (marked with *):
- Permission Code — enter a unique system identifier (e.g.,
app.module.action). - Display Name — enter a friendly name that will be shown in the UI.
- Application — select the overarching application from the dropdown.
- Module — select the specific functional module from the dropdown.
- Permission Category — choose the appropriate category (e.g., Resource) from the dropdown.
- Permission Code — enter a unique system identifier (e.g.,
- Set the Status toggle to ensure the permission is Active.
- Provide a Description explaining the purpose of this permission.
- Click Save to finalize and create the permission.
Role Permissions
The Role Permissions module simplifies access control by grouping individual permissions into logical roles. Instead of assigning permissions to each user, administrators assign a comprehensive set of permissions to a role (e.g., 'Manager', 'Analyst') and then assign that role to multiple users. This ensures consistency, reduces administrative overhead, and makes permission management scalable.
Accessing Role Permission
Navigation: Permission Management → Role Permissions
Steps to assign permission to a Role
- Navigate to Permission Management → Role Permissions.
- Select a Role from the dropdown.
- Expand the permission tree by Application → Module → Permission.
- Select the required permissions using the checkboxes.
- Click Save to apply changes.
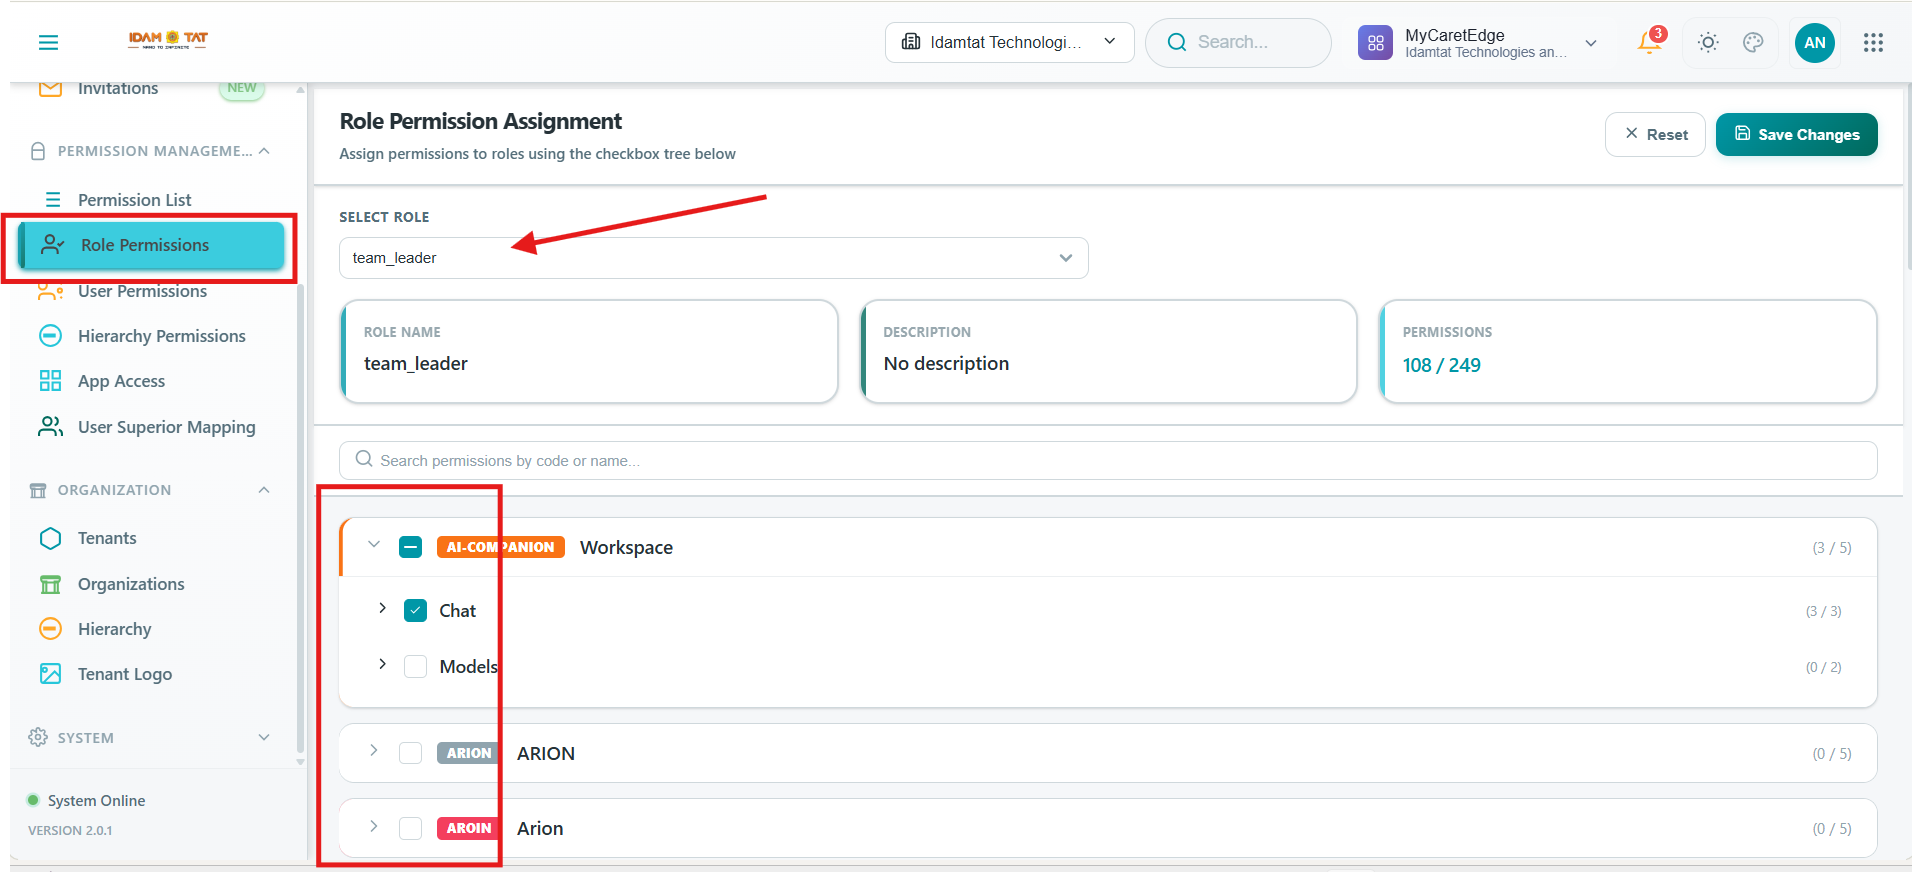
💡 Tips: Parent selections automatically include all children. Follow the Least Privilege Principle.
User Permissions
The User Permissions module allows administrators to:
• View inherited role permissions • Apply user-specific permission overrides
This module provides flexibility for exceptional scenarios. While most access should be governed by roles, there are cases where a specific user needs temporary or unique access rights that deviate from their assigned role. The user-level override allows for these granular adjustments without having to create a completely new role.
Accessing User Permission
Navigation: Permission Management → User Permissions
| Type | Meaning |
|---|---|
USER |
Direct permission assigned to the user |
ROLE |
Permission inherited from an assigned role |
Rule: User-level permissions always override role-level permissions.
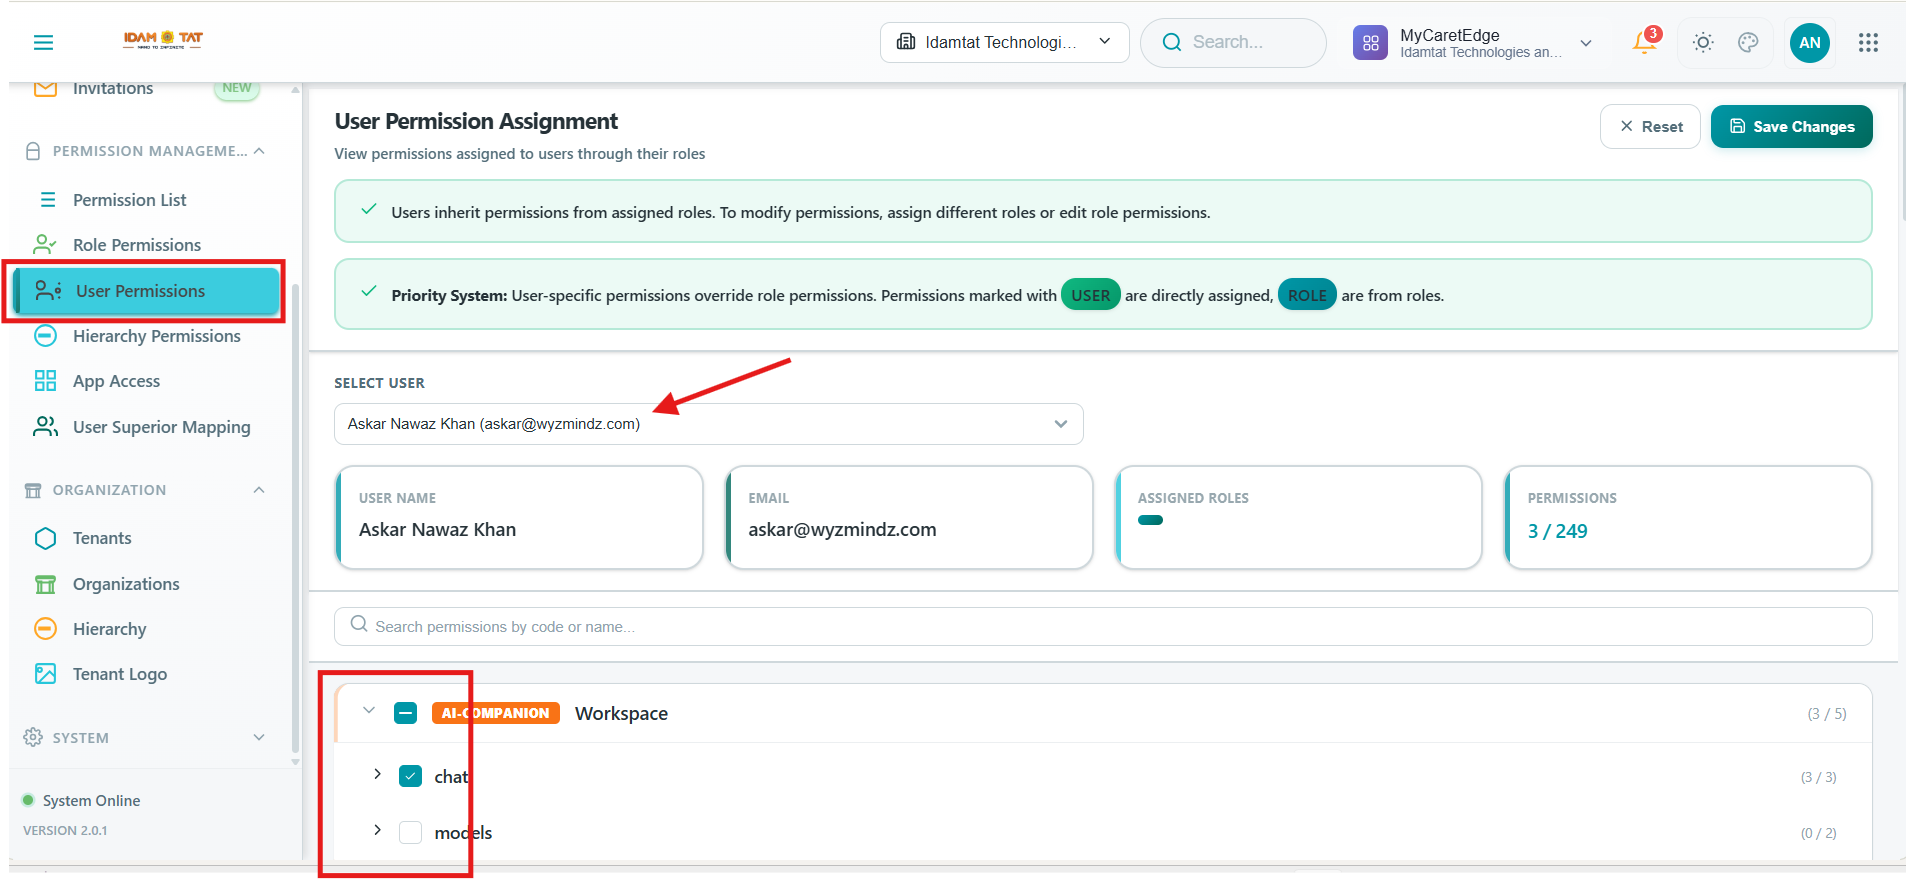
View User Permissions
- Navigate to Permission Management → User Permissions.
- Select a User from the dropdown.
- Review the user's permissions:
- ROLE — permissions inherited from an assigned role
- USER — permissions directly assigned to the user
Override a Permission
- Select the User from the dropdown.
- Locate the permission you want to override.
- Enable or Disable the permission directly using the toggle.
- Click Save to apply changes.
Hierarchy Permissions
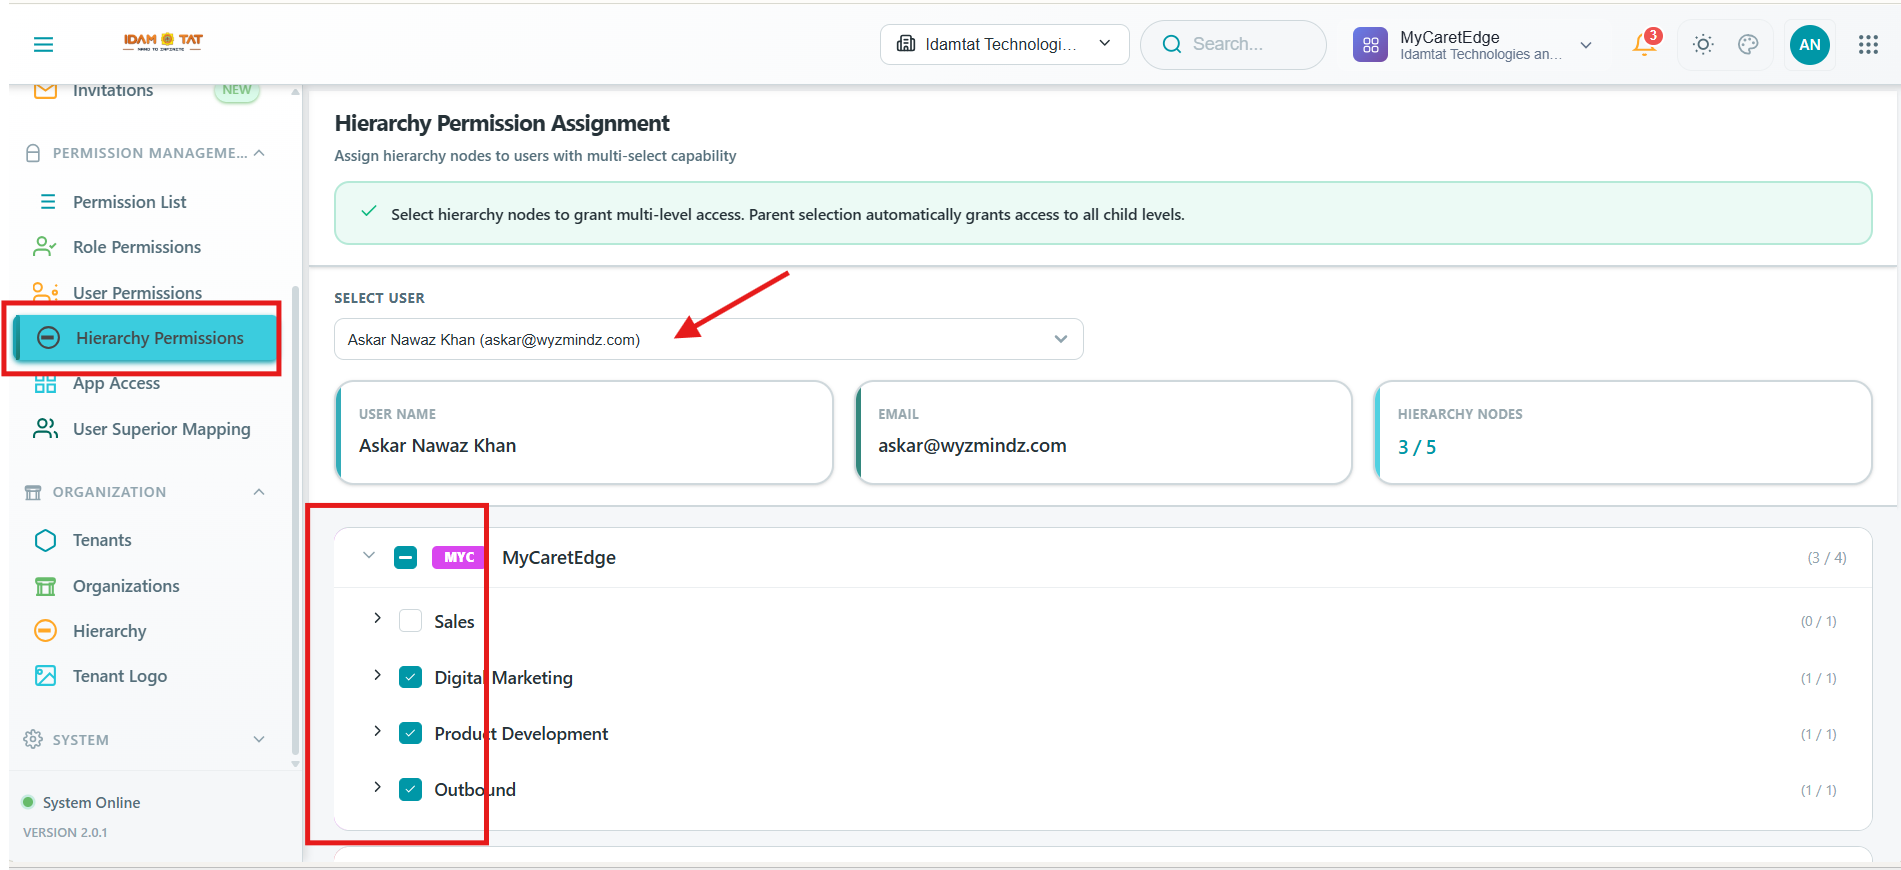
Hierarchy Permissions control which hierarchy nodes and organizational data a user can access.
In complex organizations, a user might have the 'View' permission for a resource, but they should only be able to view data relevant to their specific department or branch. Hierarchy Permissions intersect with Role Permissions to ensure users only interact with data within their designated organizational scope.
Accessing Hierarchy Permission
Navigation: Permission Management → Hierarchy Permissions
ℹ️ Selecting a parent node automatically grants all child-level access.
Steps to create/update hierarchy permission
- Select a user.
- Choose the relevant hierarchy nodes.
- Click Save.
App Access
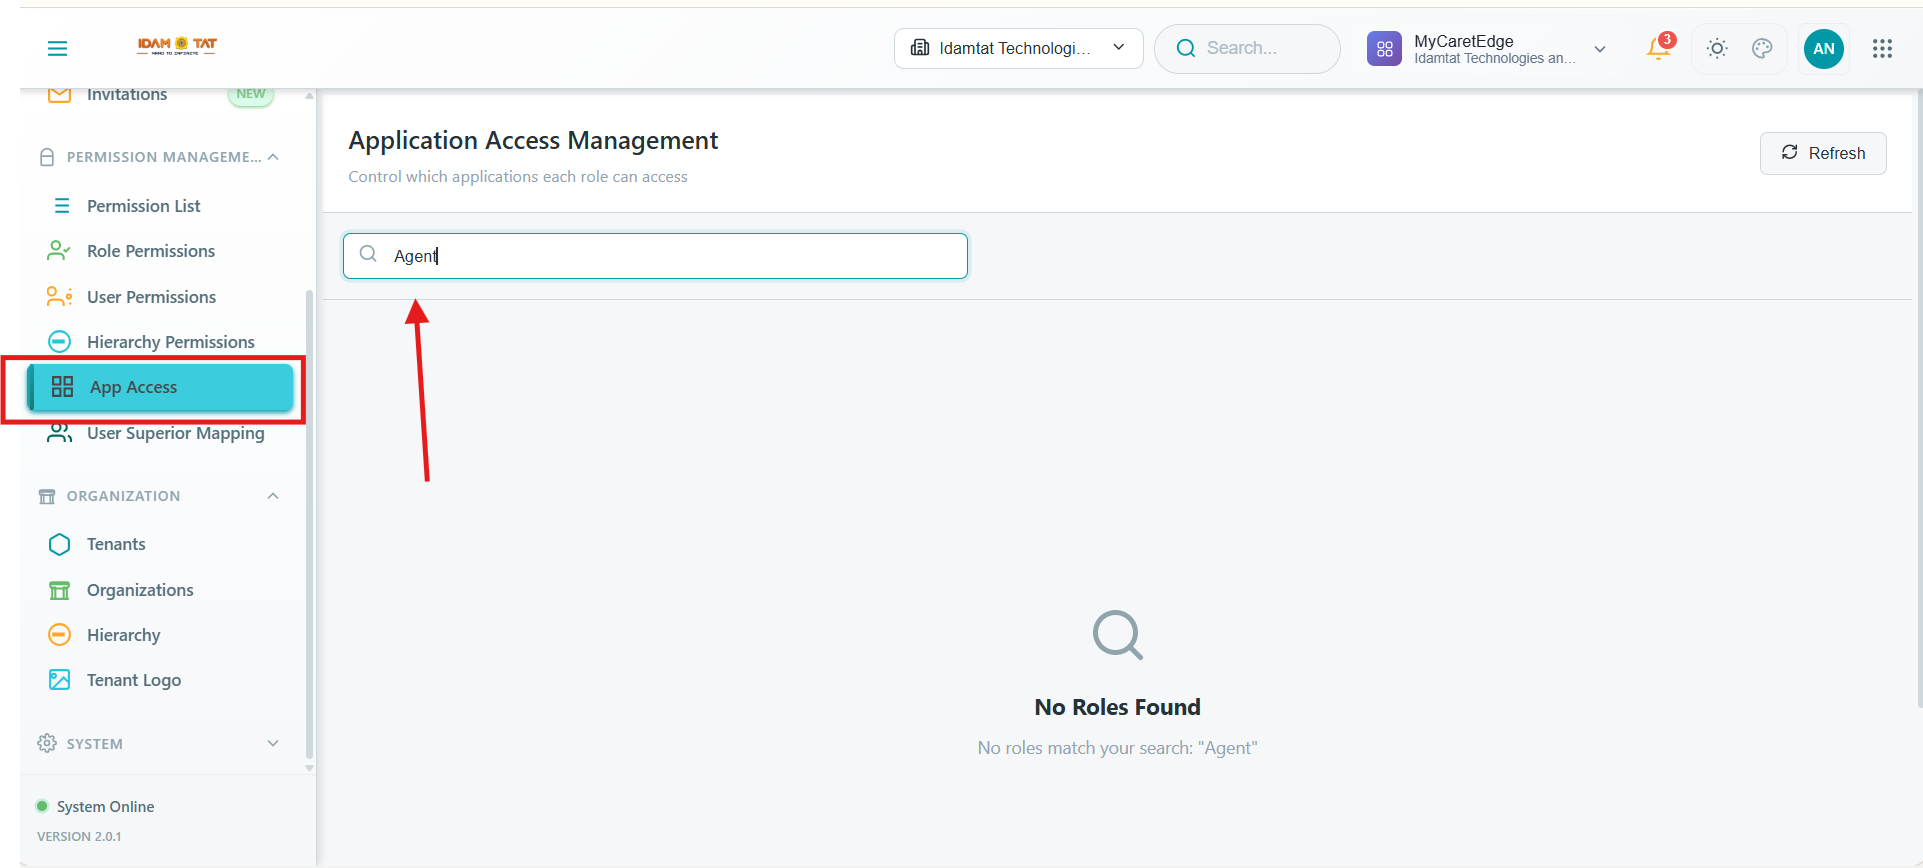
The App Access module controls which applications a role can access.
This acts as a high-level gatekeeper. Before a user can utilize specific module permissions within an application, their assigned role must first be granted access to the application itself. This ensures workspaces remain uncluttered and users only see the applications relevant to their duties.
Accessing App Access
Navigation: Permission Management → App Access
Steps to assign app access
- Select a role.
- Toggle application access on or off.
- Click Save.
ℹ️ Roles must exist before configuring App Access.
ℹ️ Changes apply during the user's next login session.
User Superior Mapping
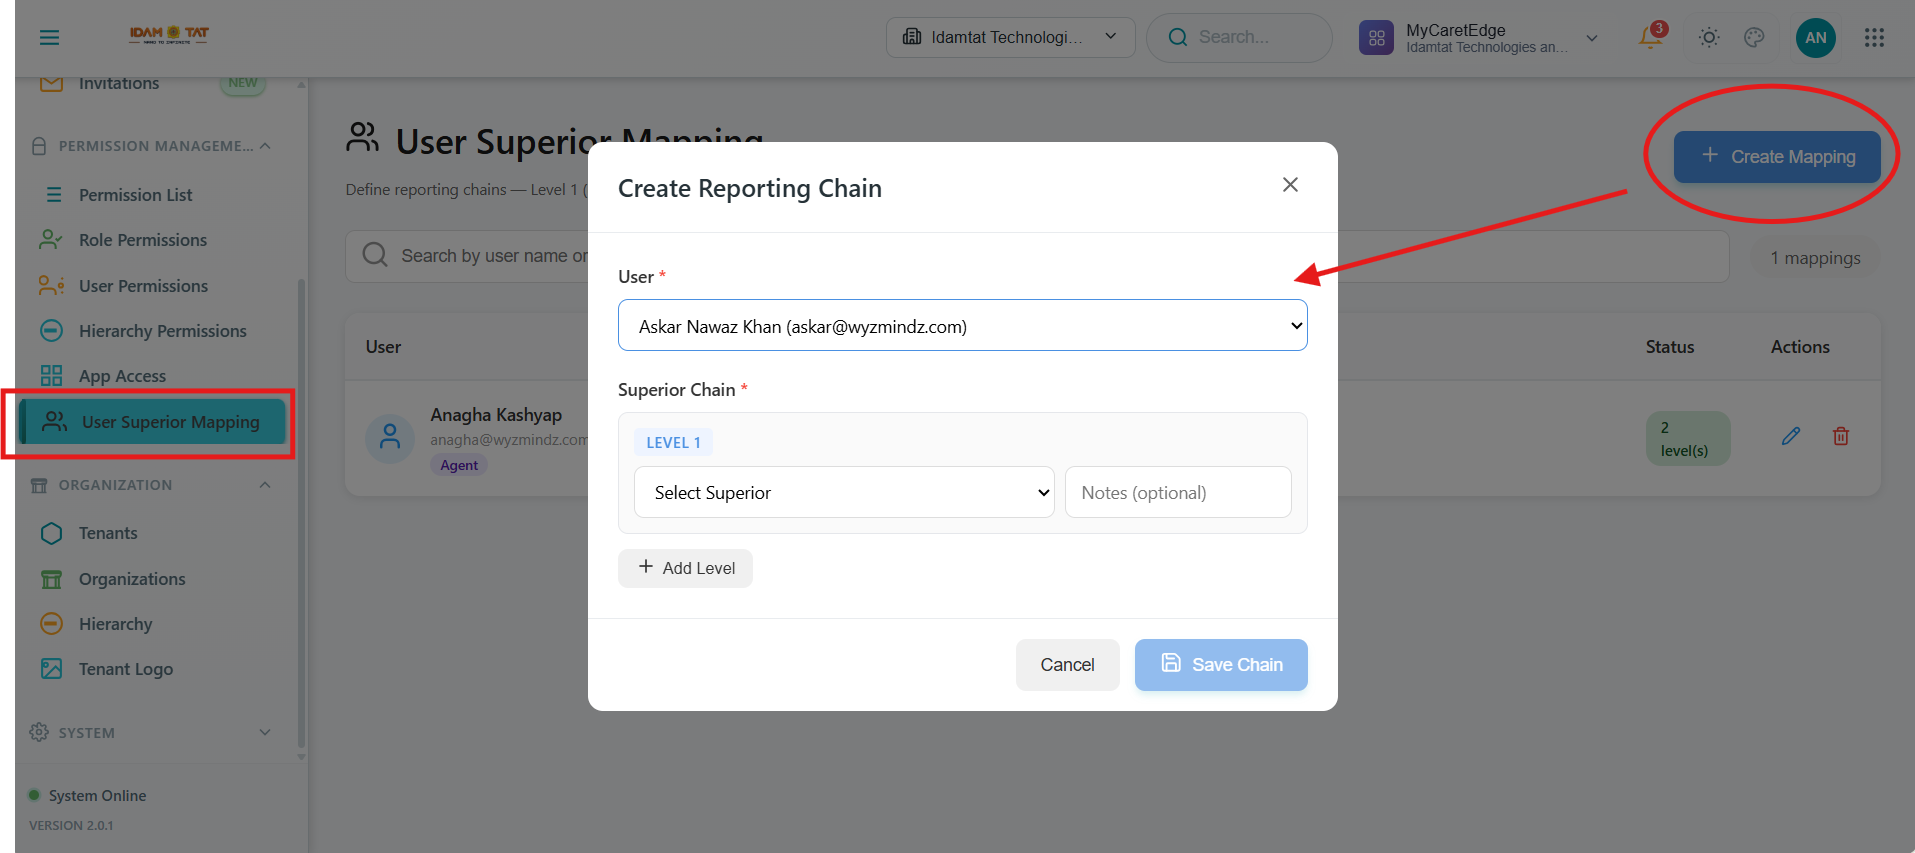
Define reporting relationships (e.g., Employee → Team Lead → Manager).
This mapping establishes the chain of command within the system. It is crucial for workflows that require hierarchical approvals (like leave requests or document reviews) and ensures that data visibility flows correctly up the management chain.
Accessing User Superior Mapping
Permission Management → User Superior Mapping
Steps to Create/Update User Superior Mapping
- Click + Create Mapping.
- Select User.
- Assign Level 1, Level 2 Superiors, etc.
- Click Save Chain.
Permission Management Flow
Security & Compliance Best Practices
- Least Privilege Principle - Grant only the minimum permissions required for a user’s role.
- Audit & Monitoring - All permission changes should be tracked and reviewed regularly.
- Separation of Duties - Role creation and permission approval should be handled by different administrators whenever possible.
- Periodic Reviews - Conduct regular reviews of: Roles, Permissions, Hierarchy assignments, Reporting structures.
Exception Handling
Scenario Recommended Action Temporary elevated access Use time-bound user-level overrides User role change Update role permissions immediately Manager exit Reassign reporting chain before removal Application inaccessible Verify App Access configuration
Frequently Asked Questions (FAQ)
Q 1. How do user-level permission overrides interact with inherited role-level permissions?
A: User-level permissions always override role-level permissions. If a permission is toggled (either enabled or disabled) directly at the user level, it will take precedence over any permissions inherited from the user's assigned role.
Q 2. What is the purpose of App Access, and when do changes to it take effect?
A: App Access acts as a high-level gatekeeper that controls which applications a role can access. Even if a user has specific module-level permissions, their role must first be granted access to the application itself. Changes to App Access apply during the user's next login session.
Q 3. How do Hierarchy Permissions control data visibility?
A: Hierarchy Permissions define the organizational nodes and data scopes a user can access. They intersect with Role Permissions, ensuring that a user with a "View" permission can only view data within their designated department or branch scope. Note that selecting a parent node automatically grants access to all its child nodes.
Q 4. Why is User Superior Mapping important for workflows?
A: User Superior Mapping defines the reporting structure (e.g., Employee → Team Lead → Manager). It is crucial for workflows that require hierarchical approvals (such as leave requests or document reviews) and ensures data visibility flows correctly up the management chain.
Q 5. What should be done when a manager exits the organization?
A: Before removing the manager from the system, you must reassign their reporting chain in the User Superior Mapping configuration to ensure that approvals and workflows continue to route correctly.
Q 6. What is the standard flow for configuring Permission Management?
A: The configuration flow follows these steps: 1. Create Permission (define permission codes, modules, and actions). 2. Assign Permission to Role (group permissions into roles). 3. Configure App Access (toggle application access for the role). 4. Apply User Overrides (make any user-specific overrides if required). 5. Assign Hierarchy Access (bind users to hierarchy nodes to control data visibility). 6. Configure Reporting Structure (establish reporting chains via User Superior Mapping).