MASTER
Purpose: The Master module acts as a dedicated submissions management hub for all forms tagged as "Master". It allows users to view, search, export, allocate, and manage submissions in a centralized grid, providing robust configuration options for data access, column visibility, and automated record routing.
The Master module is a submissions management hub for forms that have been tagged as "Master" in the Form Builder.
Accessing Master Tab
Navigation: Left Sidebar → Master
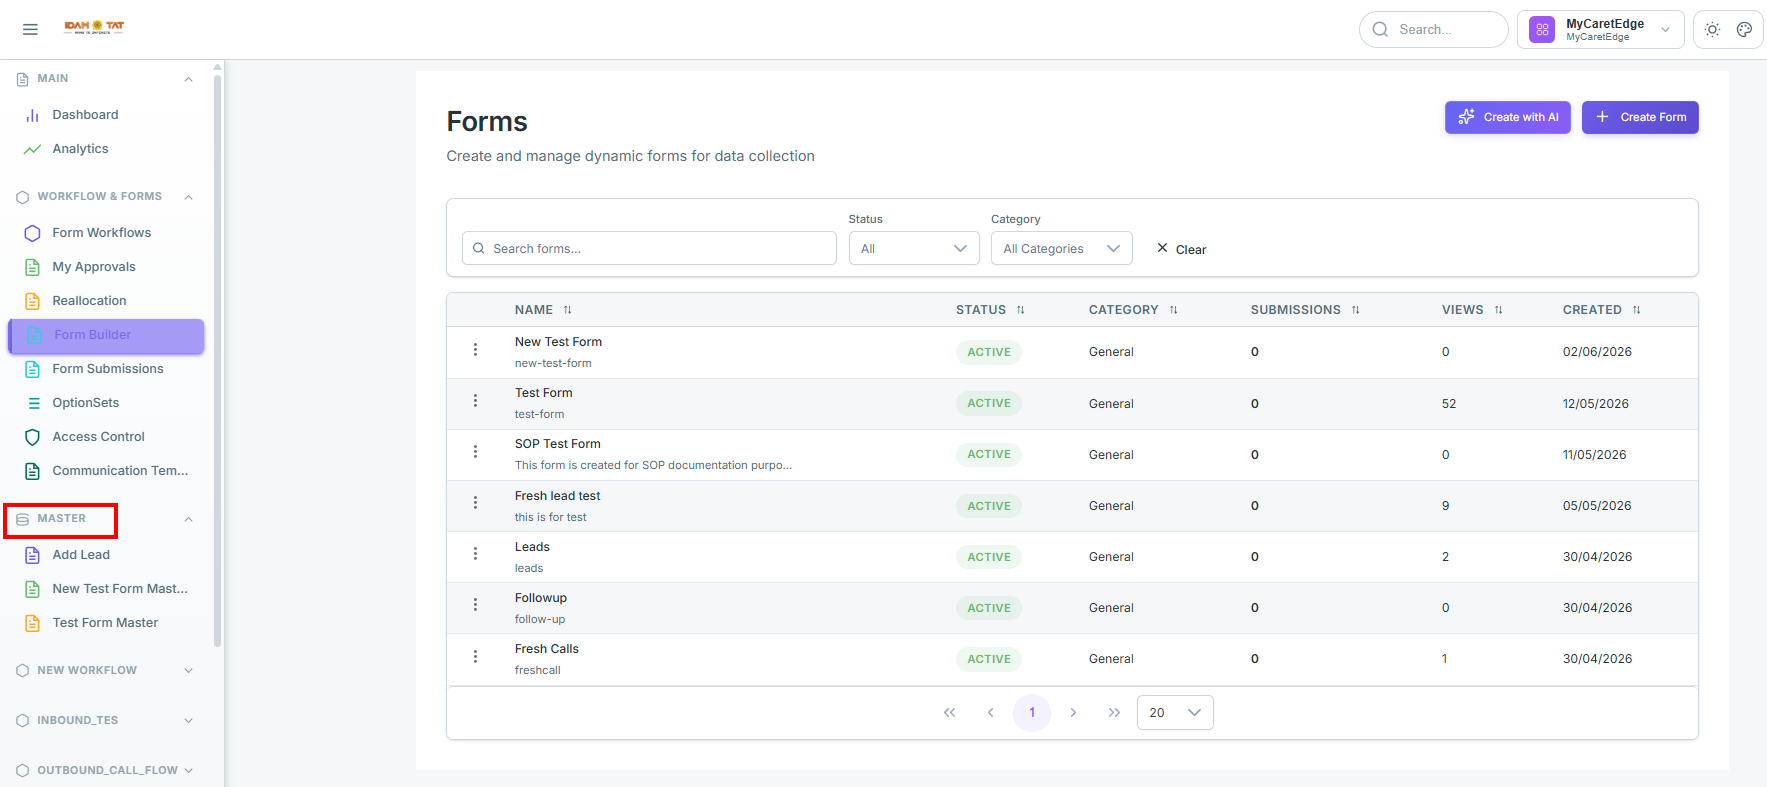
Once a Form Builder is created with all the required configurations the form becomes visible in the left sidebar under the Master tab — provided the following condition is met:
- The form is tagged as Master using the settings in Form Builder.
All the forms which are tagged as Master will be listed under the master Tab
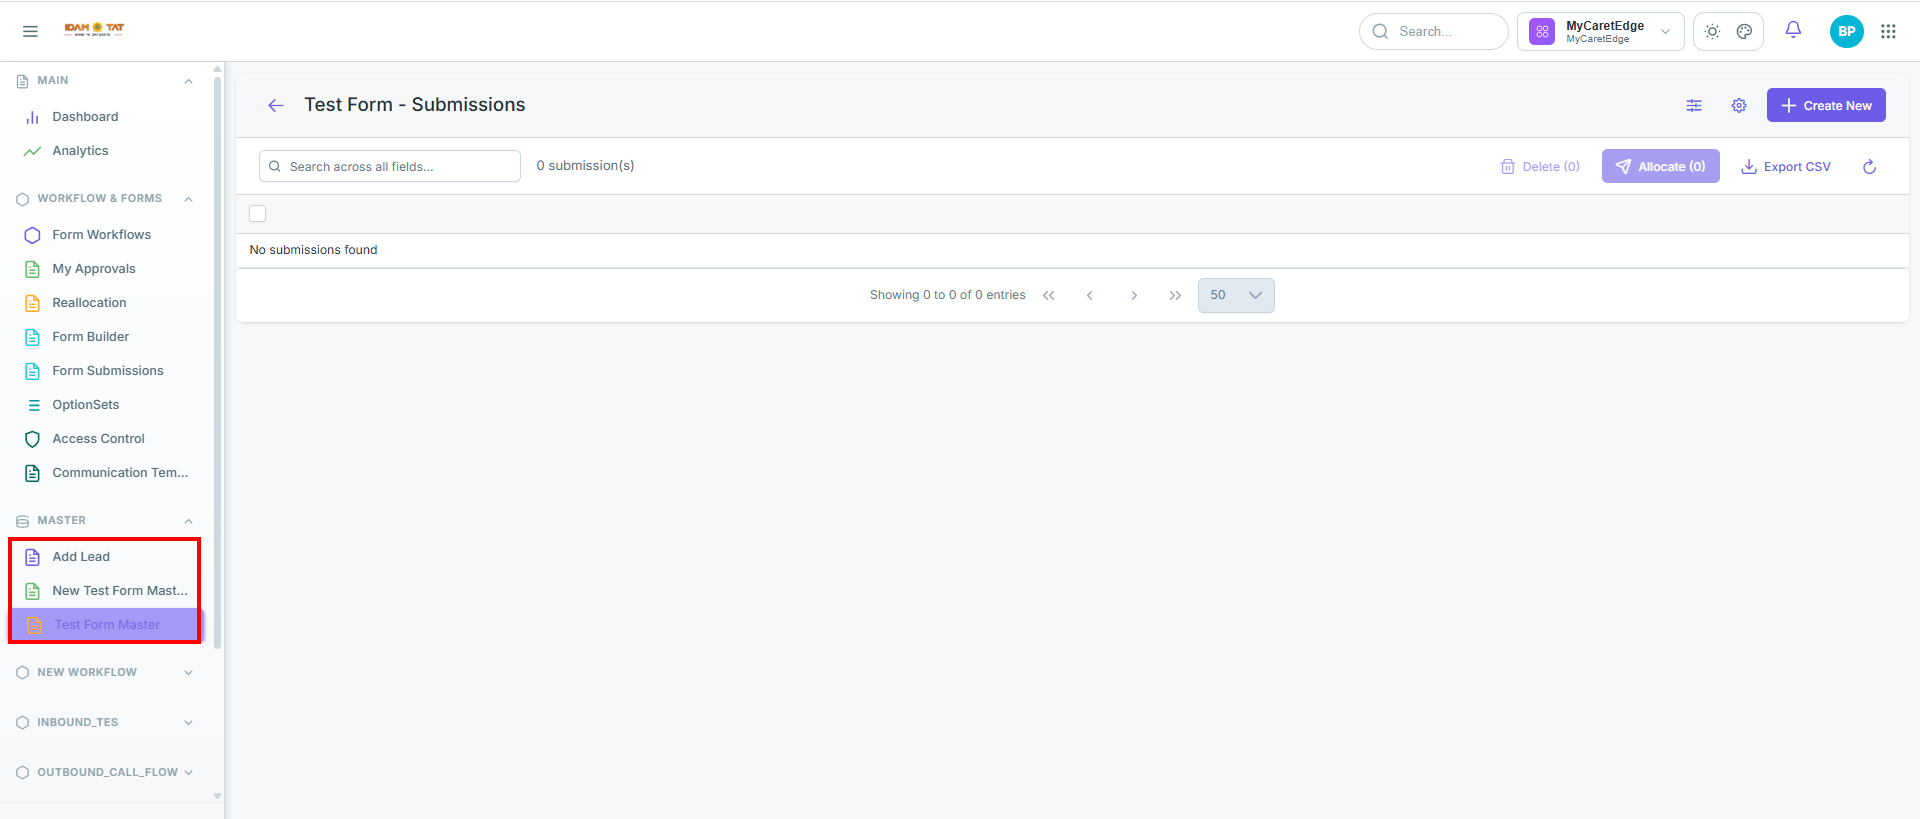
Form Submissions Page
Page Header
- Back Arrow (←) — Navigates back to the previous page/form list
- Title: "[Form Name] - Submissions"
- Dynamically displays the name of the selected form followed by "- Submissions"
- Example: "New Test Form - Submissions"
- Dynamically displays the name of the selected form followed by "- Submissions"
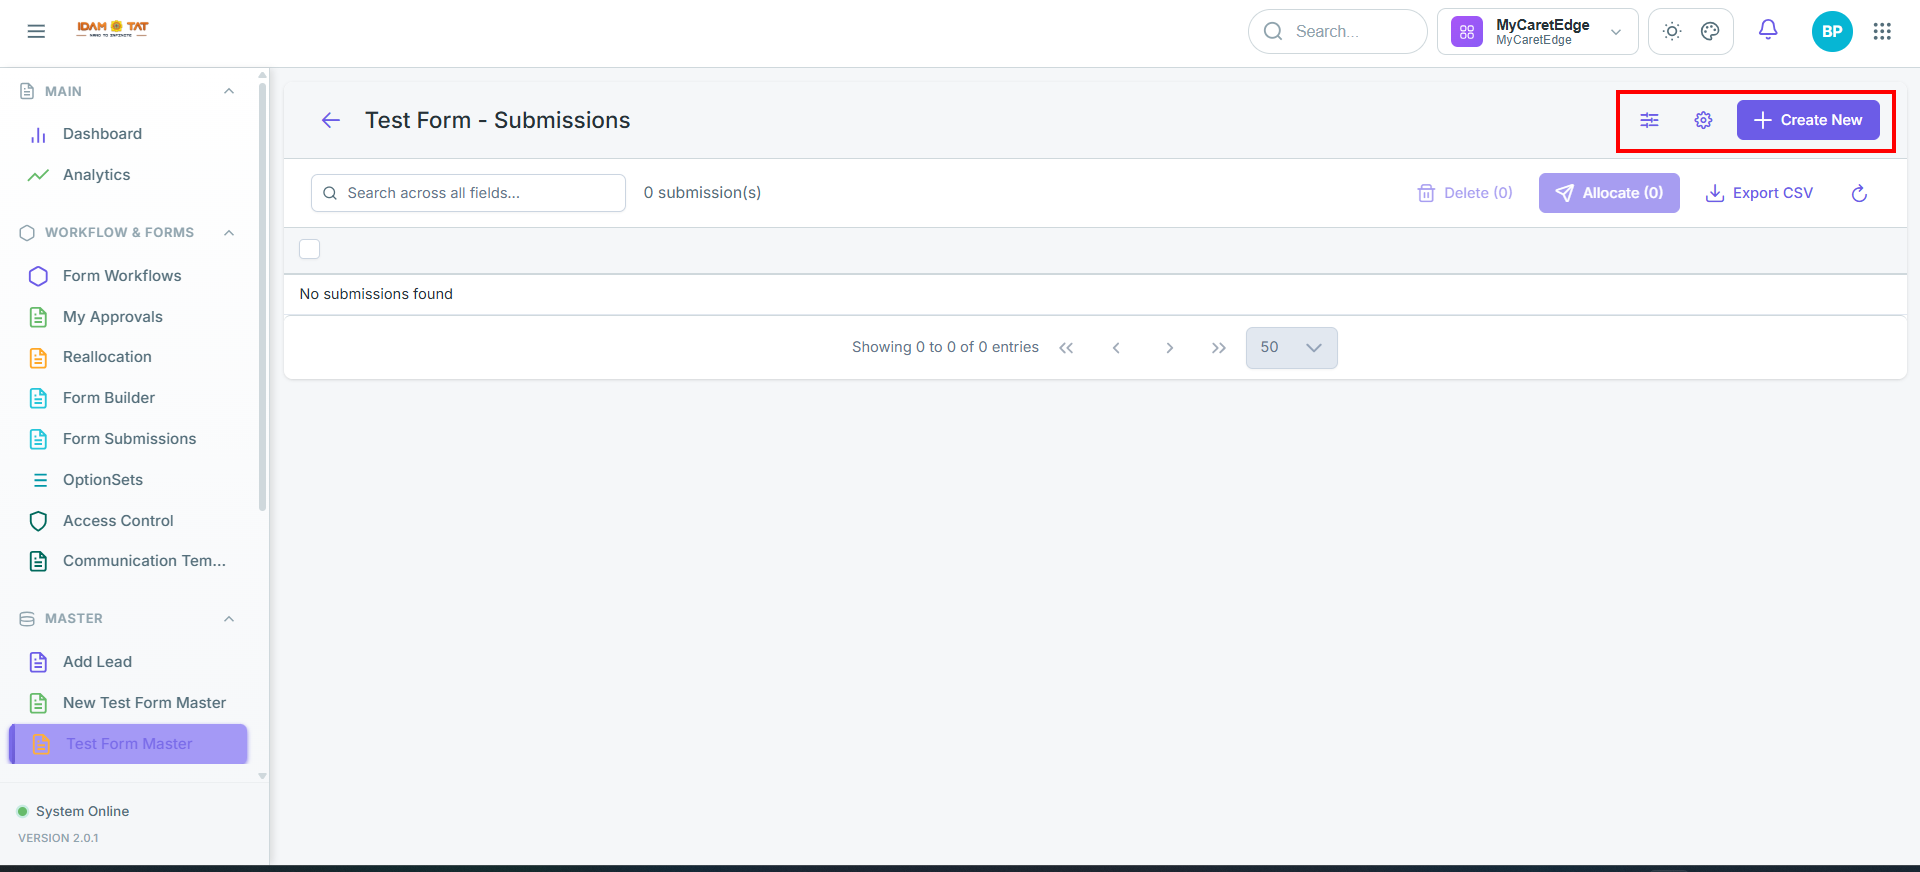
- Top-right Action Buttons:
- Allocation Setup(☰) — Opens column or filter configuration for the submissions grid
- Settings(⚙️) — Opens grid or display settings modal
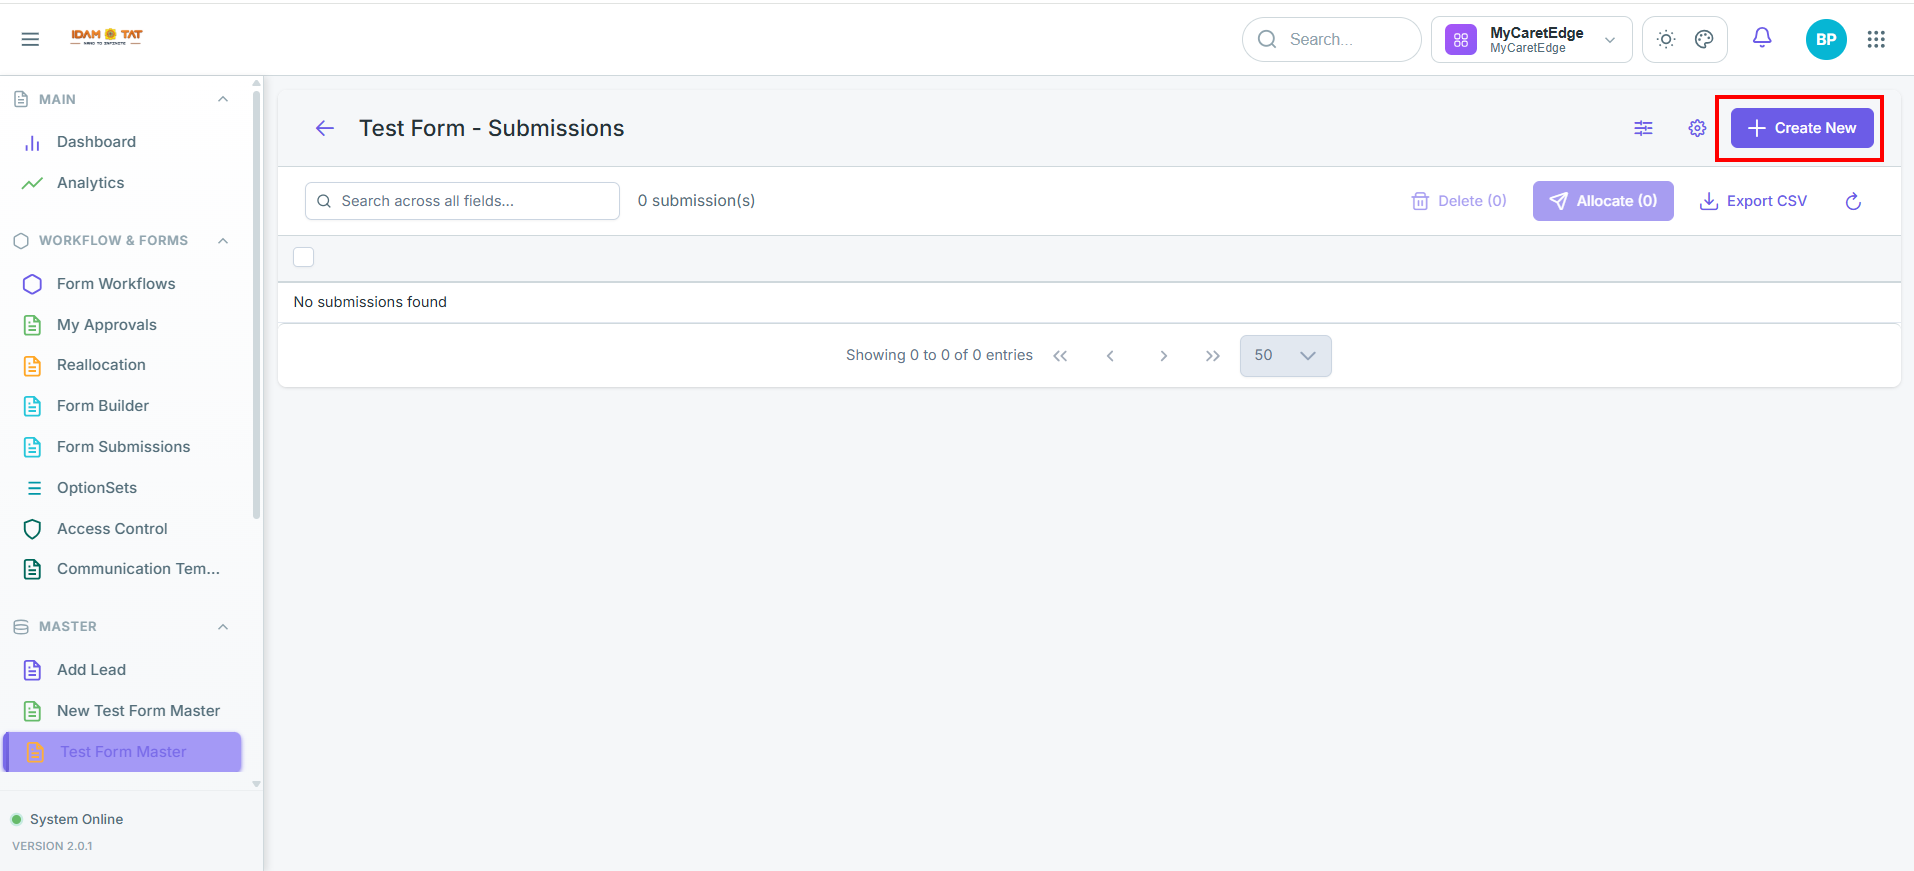
- + Create New(➕) — Manually creates a new submission entry for this form
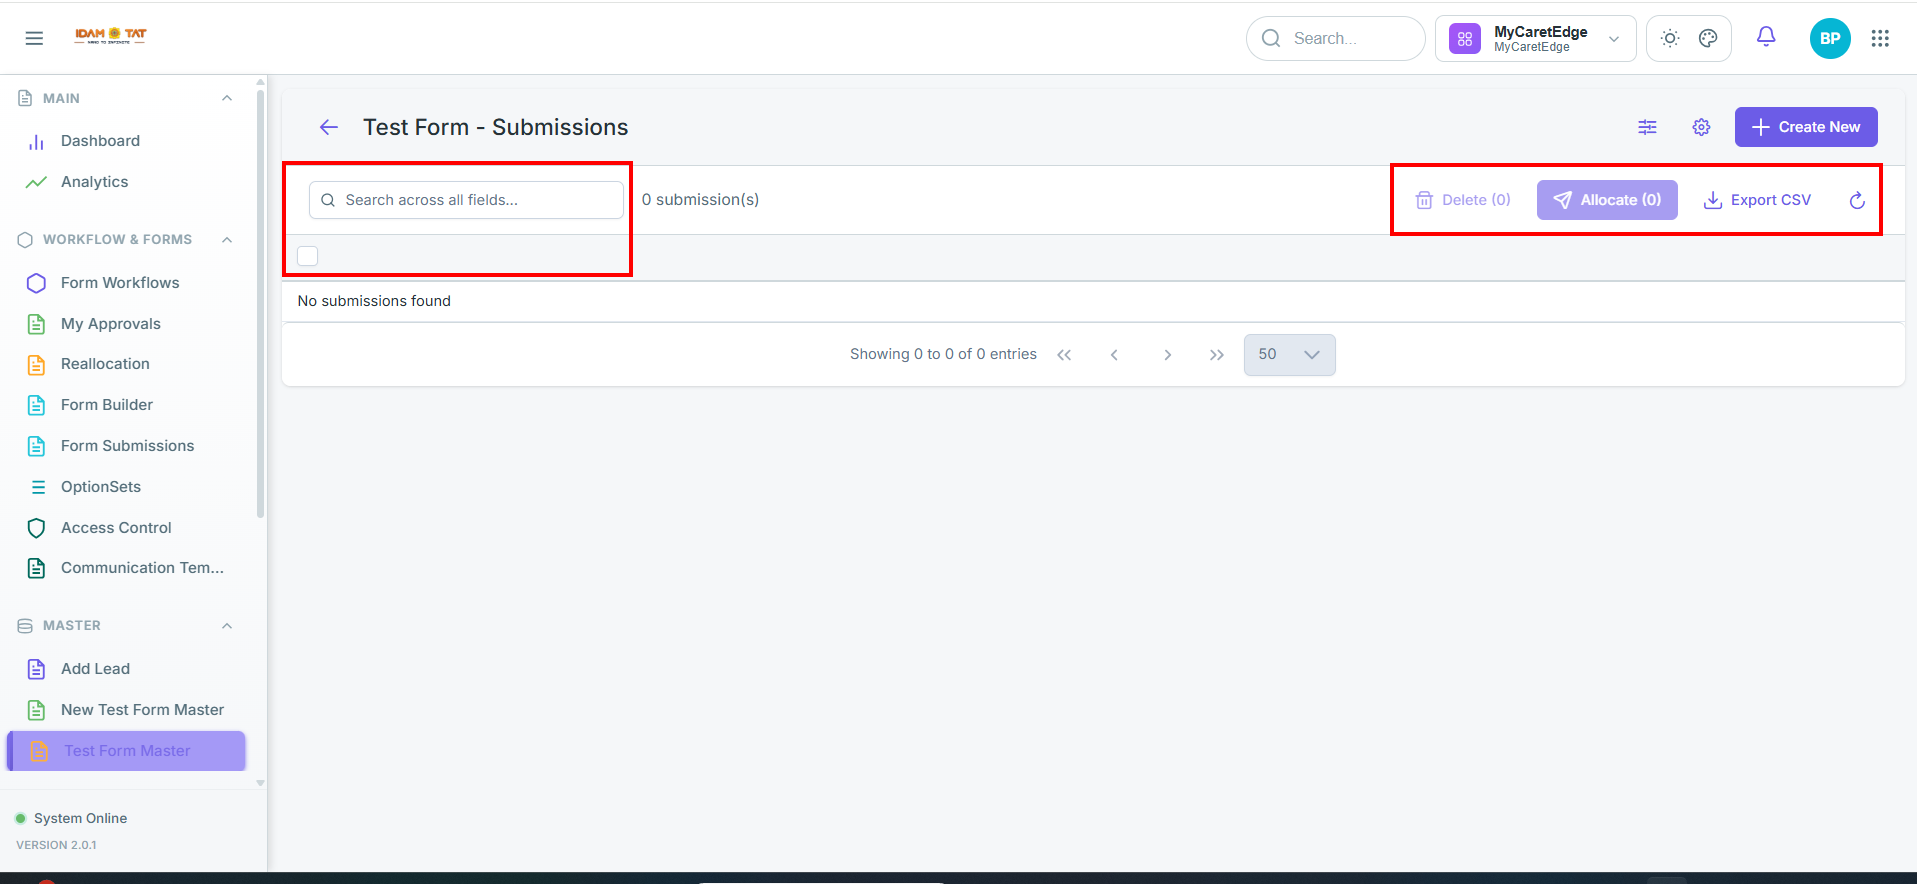
Submissions Toolbar (Below Header)
| Element | Description |
|---|---|
| Search Bar | Full-text search across all submission fields |
| Checkbox Column | Selects individual rows (or all rows via header checkbox) |
| Submission Count | Displays total number of submissions (e.g., "0 submission(s)") |
| Delete(🗑️) | Deletes selected submissions; number in brackets = selected count |
| Allocate(📨) | Triggers allocation flow for selected submissions |
| Export CSV(⬇️) | Exports all or selected submissions as a CSV file |
| Refresh (↺) | Reloads the submissions list to fetch latest data |
Submissions Grid
- Data Rows — Each row represents one form submission
- Empty State — Shows "No submissions found" when no data exists
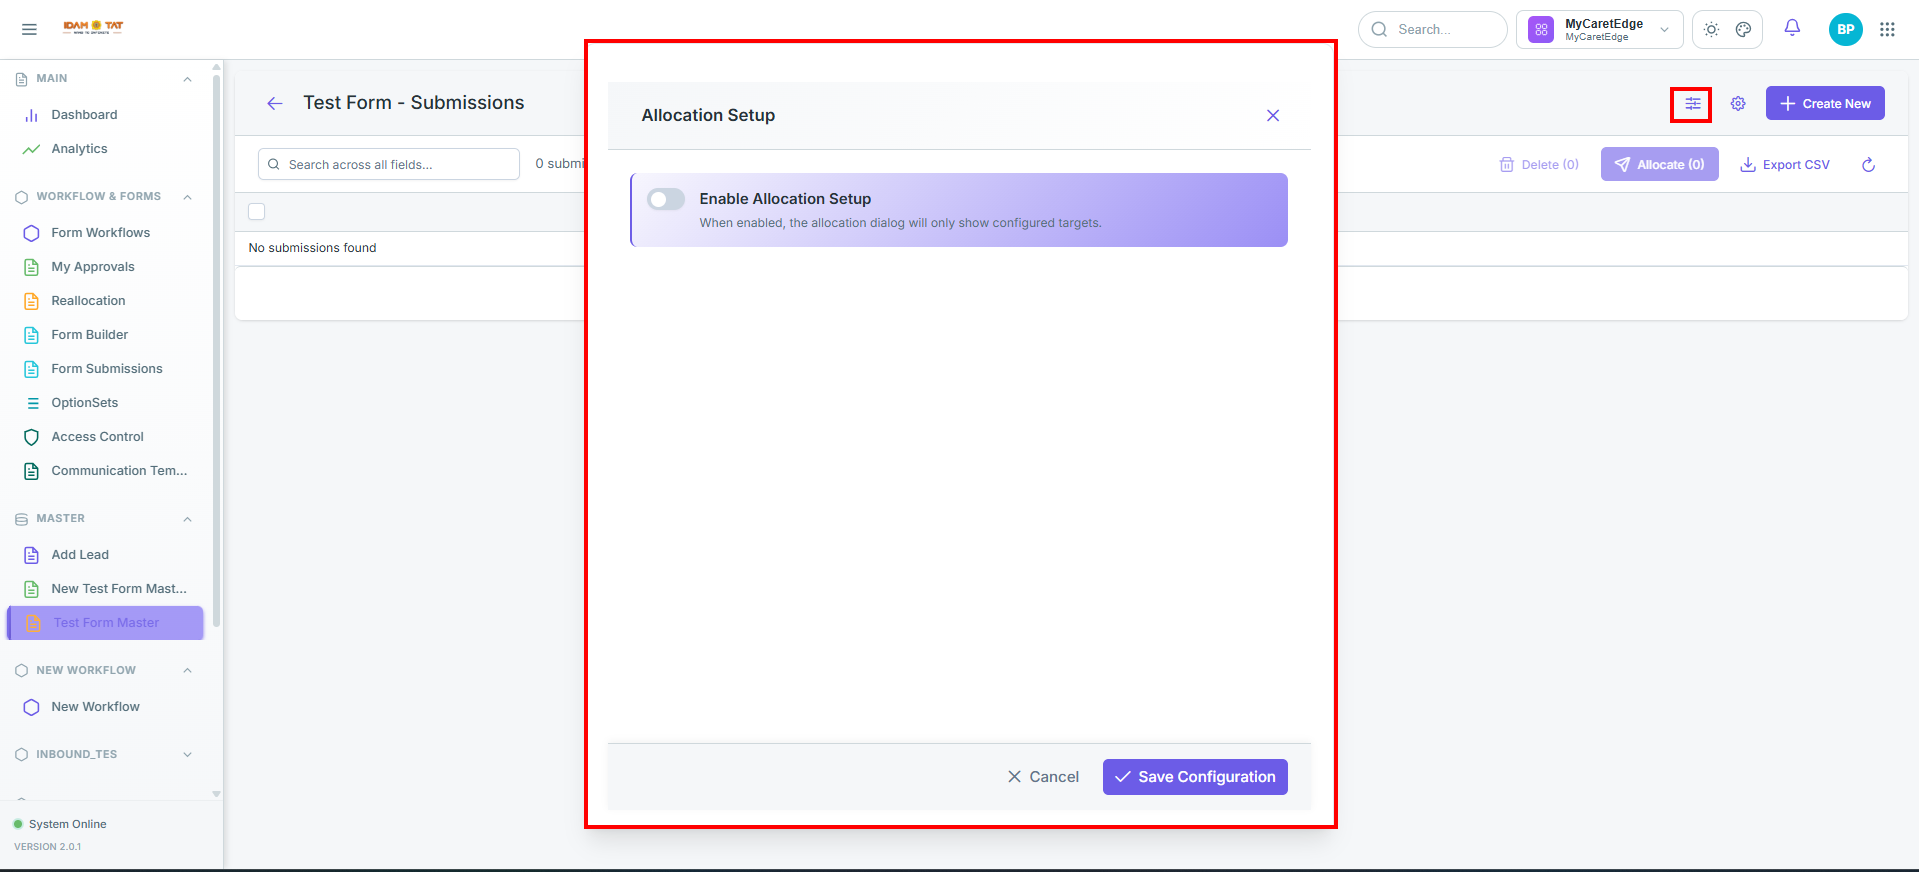
Allocation setup
Navigation: Left Sidebar → Master → [Form Name] → Allocation Setup
a Allocation setup tab will open with following
Enable Allocation Setup
Description: by default it is disabled . When enabled, the allocation dialog will only show configured targets.
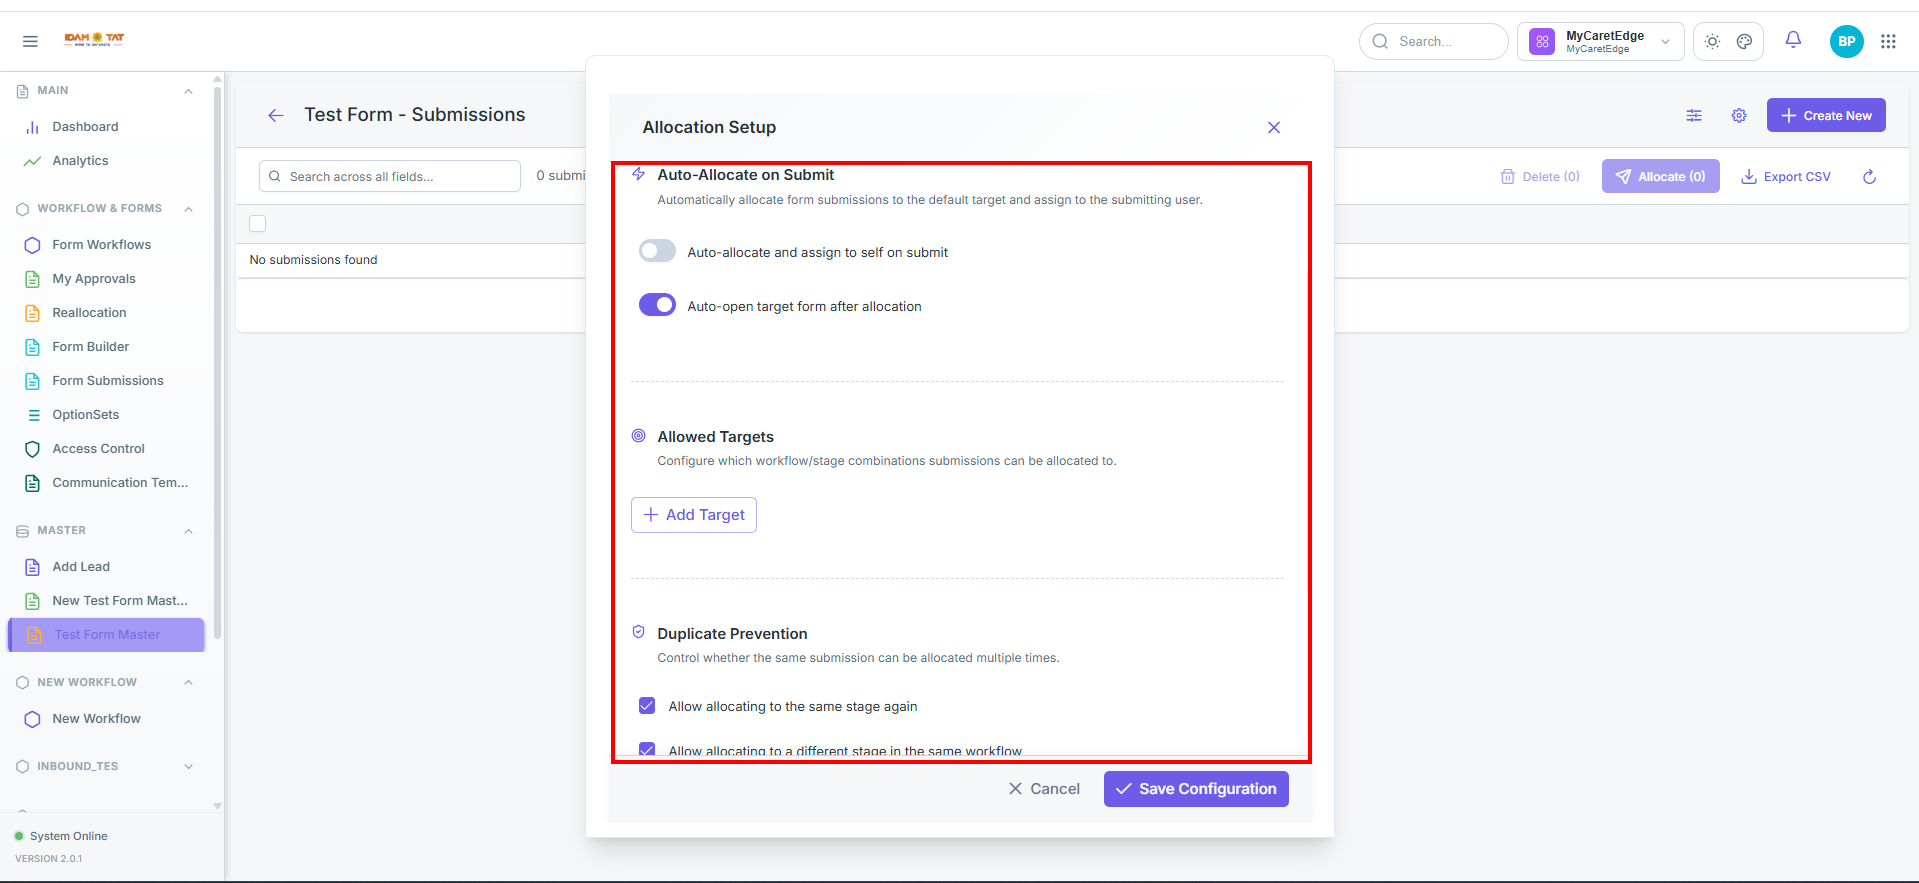
1. Auto-Allocate on Submit
Description: Automatically allocates form submissions to the default target and assigns them to the submitting user.
| Toggle | Icon | Default | Description |
|---|---|---|---|
| Auto-allocate and assign to self on submit | ◐ Toggle switch | OFF (grey) | When enabled, submission is automatically allocated and assigned to the user who submitted it — no manual allocation needed |
| Auto-open target form after allocation | ◐ Toggle switch | ON (purple) | When enabled, automatically opens the target form immediately after allocation is completed |
2. Allowed Targets
Description: Configure which workflow/stage combinations submissions can be allocated to.
| Element | Description |
|---|---|
| + Add Target | Opens a picker to select a workflow and stage as an allowed allocation destination |
When Allocation Setup is enabled, the allocation dialog will only show the targets configured here — restricting users to pre-approved workflow/stage combinations instead of showing all available options. When disabled, all available workflow/stage options are visible.
3. Duplicate Prevention
Description: Controls whether the same submission can be allocated multiple times.
| Checkbox | Icon | Default | Description |
|---|---|---|---|
| Allow allocating to the same stage again | ☑ Checked (purple) | ON | Same submission can be sent to the same stage more than once |
| Allow allocating to a different stage in the same workflow | ☑ Checked (purple) | ON | Submission can move to another stage within the same workflow |
| Allow allocating to a different workflow | ☑ Checked (purple) | ON | Submission can be allocated to a completely different workflow |
| Block if record is still in-progress at the target | ☐ Unchecked | OFF | Prevents allocation if the submission is already active/open at the target stage |
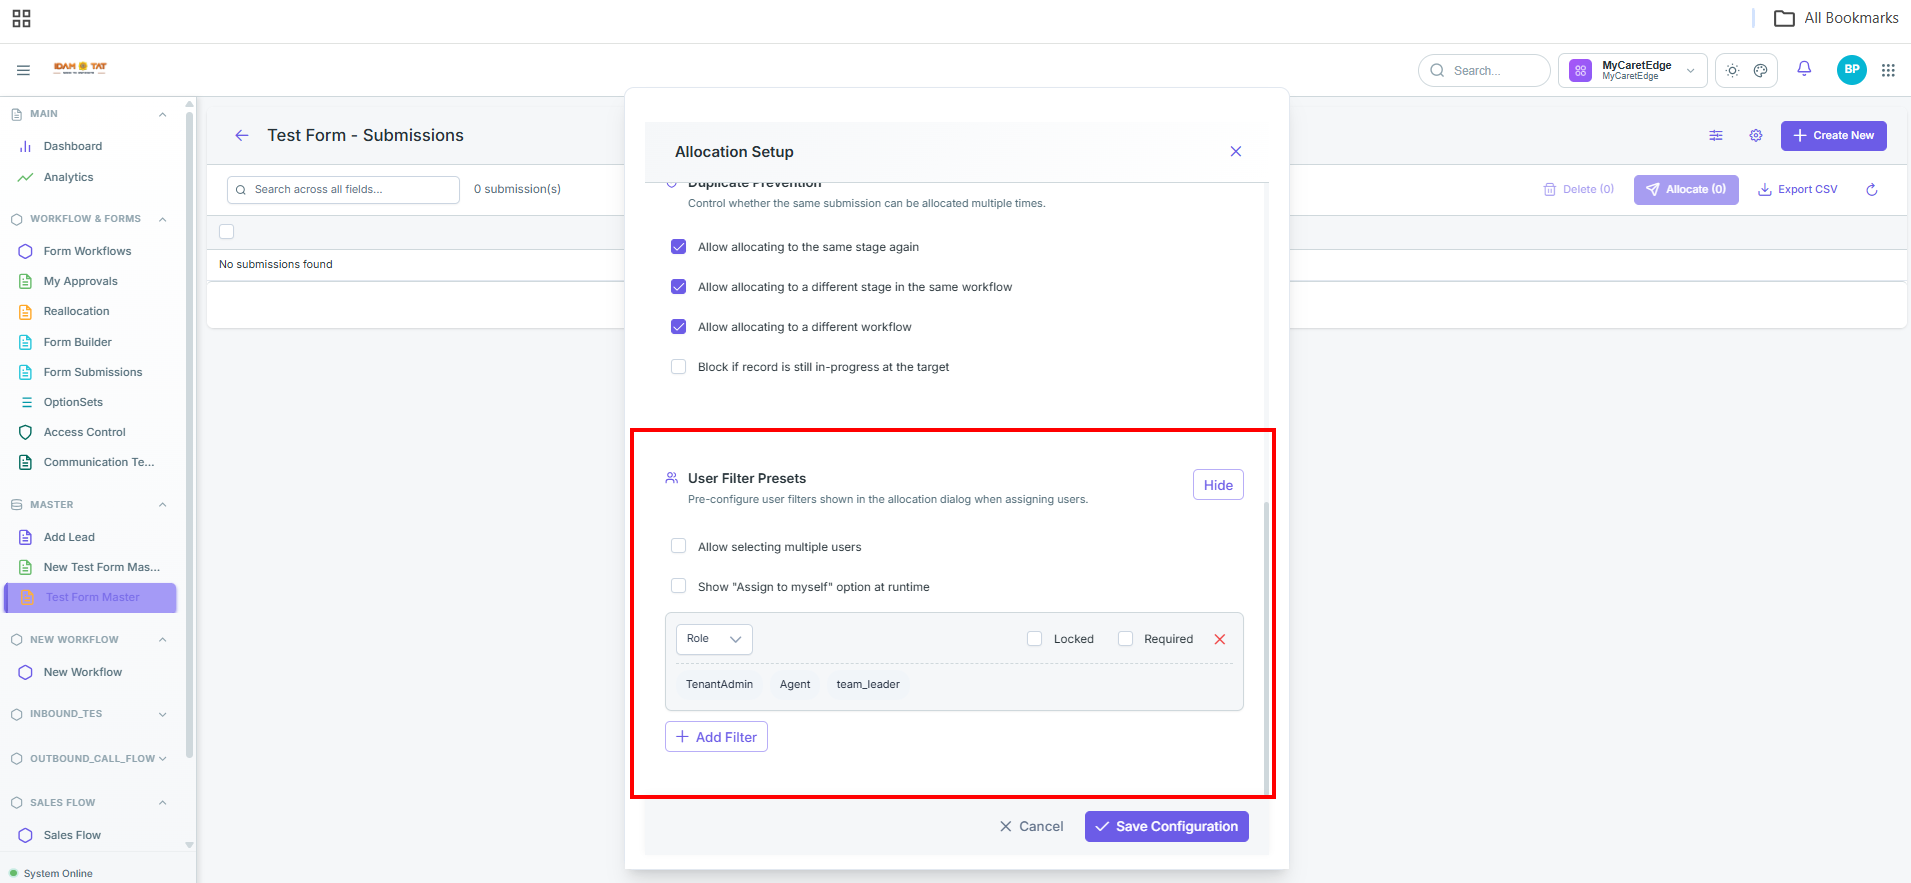
4. User Filter Presets
Description: Pre-configure user filters shown in the allocation dialog when assigning users.
By default, this section is collapsed. Clicking Configure expands it inline (no new modal opens). Clicking Hide collapses it back.
When expanded, the following options are available:
-
Allow selecting multiple users ☐ — Off by default. When enabled, allows assigning a submission to more than one user at once during allocation.
-
Show "Assign to myself" option at runtime ☐ — Off by default. When enabled, a quick shortcut appears in the allocation dialog letting the current user assign the submission to themselves instantly.
-
+ Add Filter — Adds a custom filter to control which users appear in the user list during allocation (e.g. filter by role, Hierarchy Node or system mapping).
Footer Buttons
| Button | Icon | Description |
|---|---|---|
| Cancel | ✕ Cross icon | Closes the modal without saving any changes |
| Save Configuration | ✓ Checkmark icon (purple button) | Saves all allocation settings |
Configuration Grid Settings
Clicking the gear icon (⚙️) in the top-right header. opens the Configuration Grid Settings
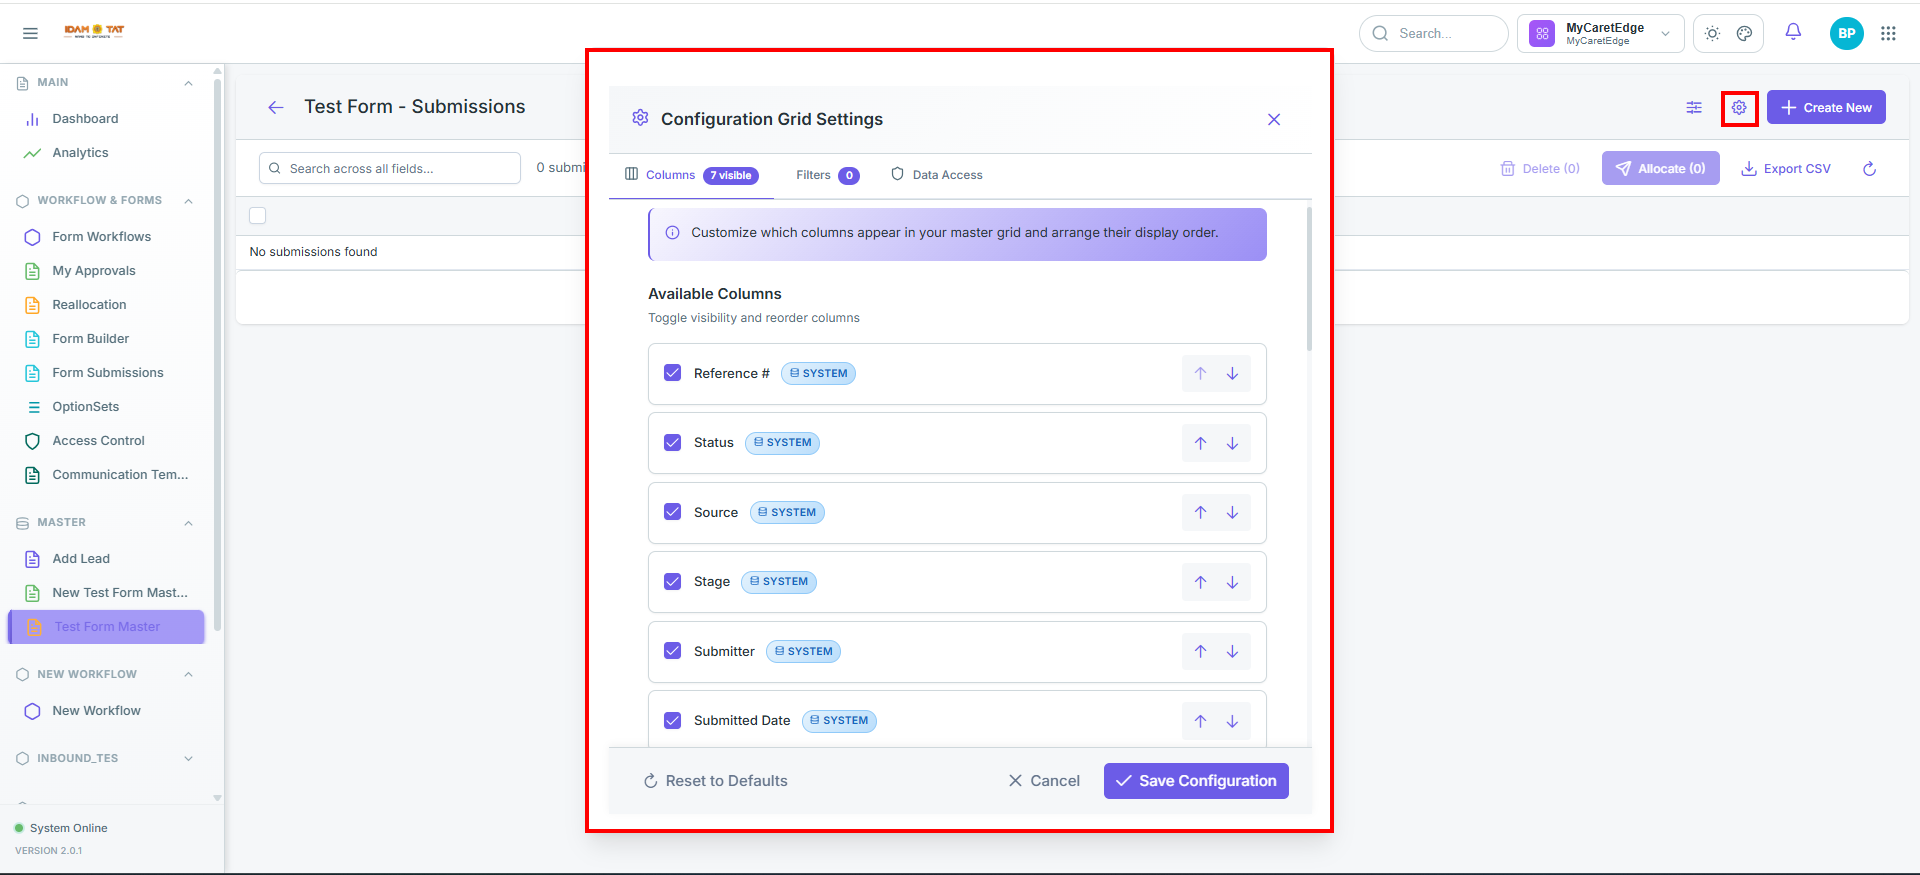
This modal has 3 tabs:
Tabs
| Tab | Badge | Description |
|---|---|---|
| Columns | 7 visible |
Control which columns appear in the submissions grid and their display order |
| Filters | 1 |
Configure filter conditions on the grid |
| Data Access | 🛡 Shield icon | Control data access permissions |
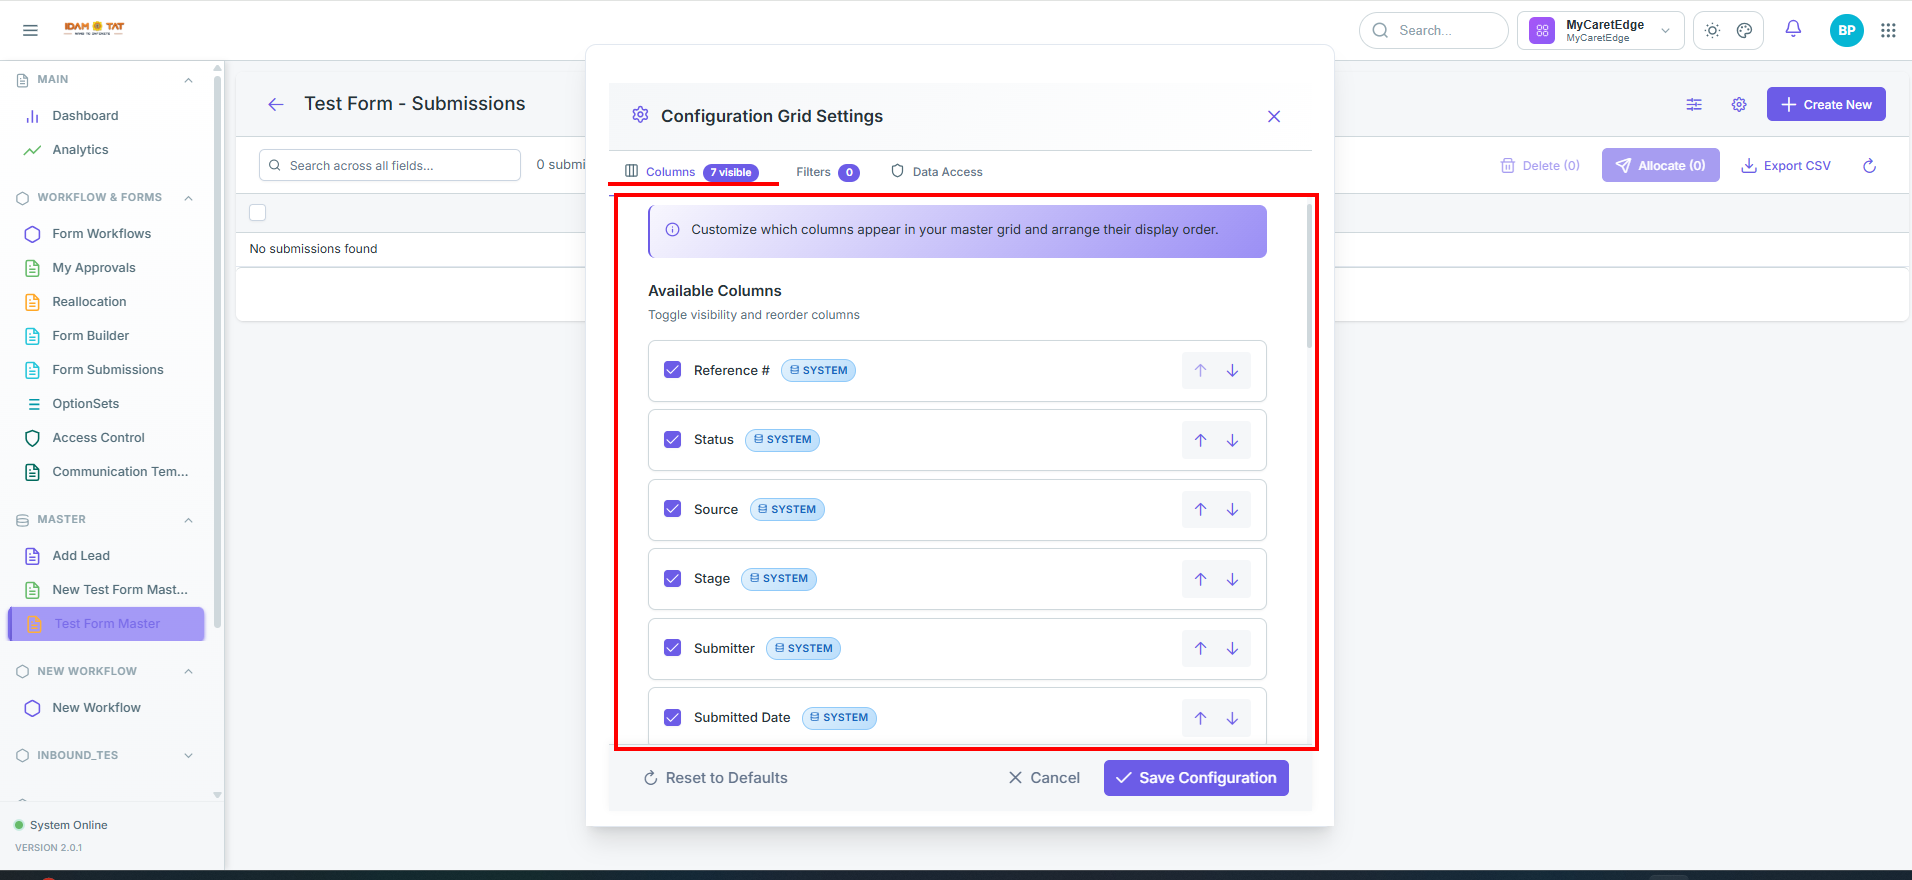
Columns Tab (Default View)
"Customize which columns appear in your master grid and arrange their display order."
Displays a list of Available Columns — each column can be:
- ☑ Toggled on/off — Show or hide that column in the grid
- ↑ ↓ Reordered — Move columns up or down to change their display order
- SYSTEM badge — Indicates the column is a system-defined field (not custom). by default most of the system badge are enabled
- FIELD badge - indicates the column is a custom-defined field. by default all the custom badge are disabled
Filters Tab
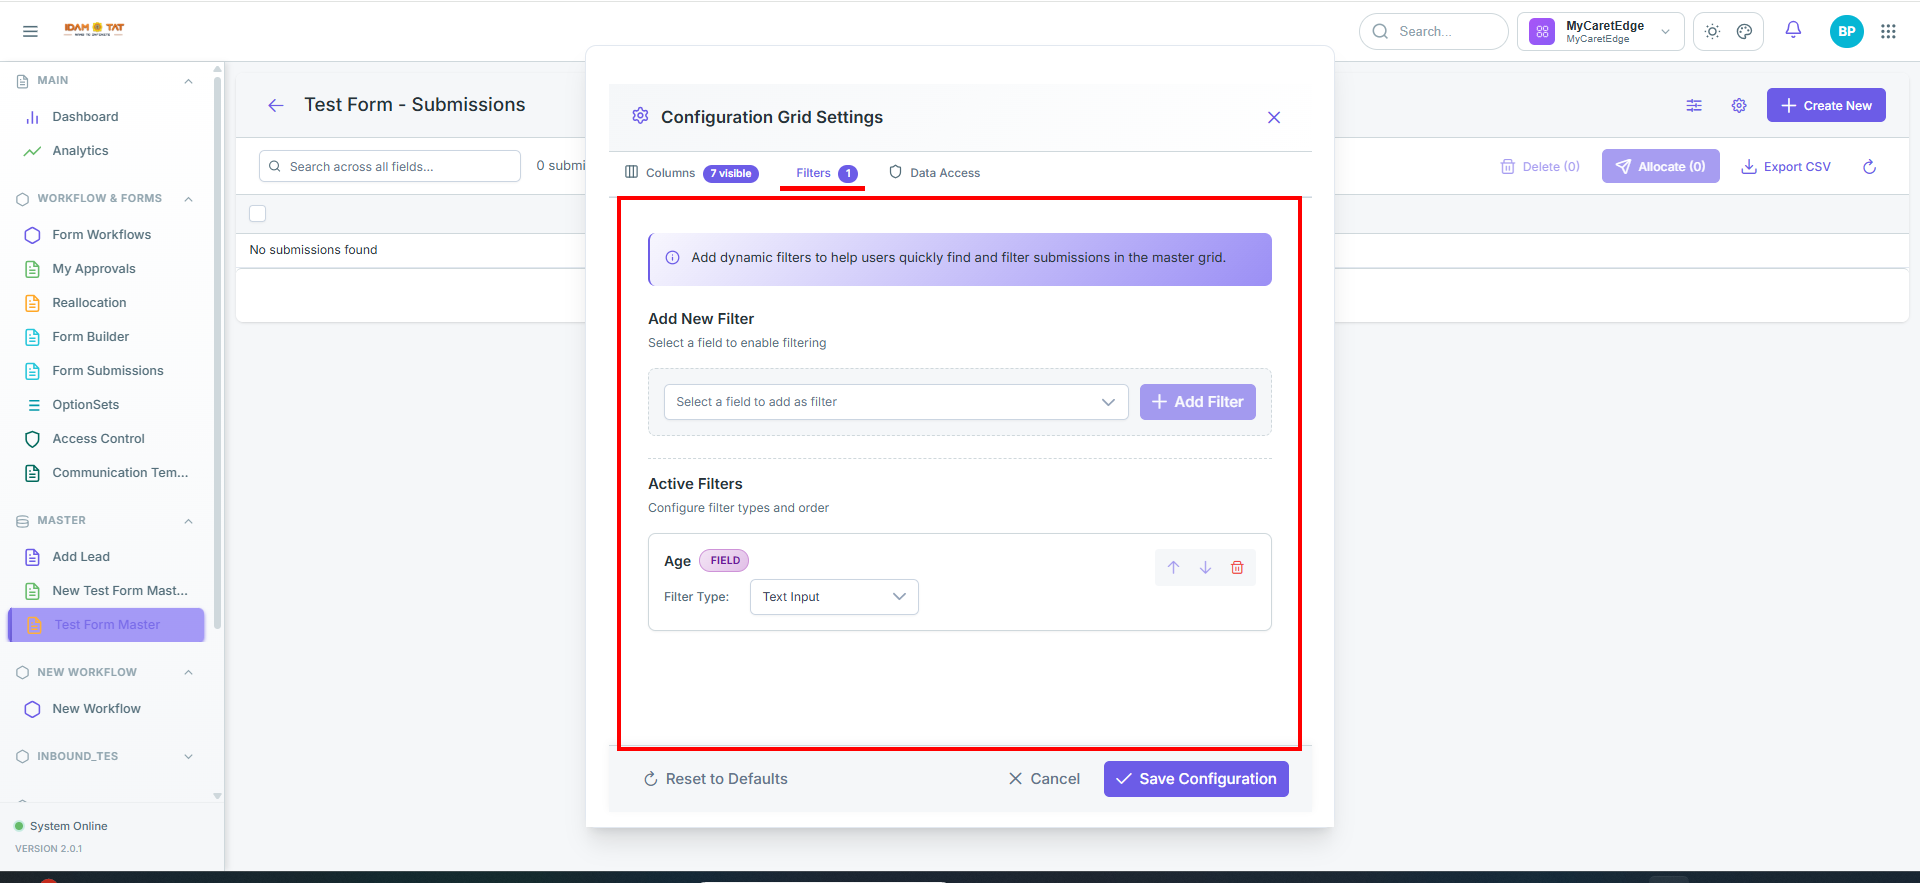
"Add dynamic filters to help users quickly find and filter submissions in the master grid."
The Filters tab badge updates to show the count of active filters (e.g. 1).
Add New Filter
Select a field from the dropdown and click + Add Filter to add it as a searchable filter on the submissions grid.
| Element | Description |
|---|---|
| Select a field dropdown | Lists all available form fields to filter by |
| + Add Filter | Adds the selected field as an active filter |
Active Filters
Displays all currently configured filters with options to:
| Element | Description |
|---|---|
| Field name | Name of the filtered field (e.g. "Address") |
| FIELD badge | Indicates it is a custom form field (vs SYSTEM column) |
| Filter Type dropdown | Sets how the filter behaves (e.g. Text Input, dropdown, date range, etc.) |
| ↑ ↓ | Reorder filters up or down |
| 🗑 Delete (red) | Removes the filter |
Data Access
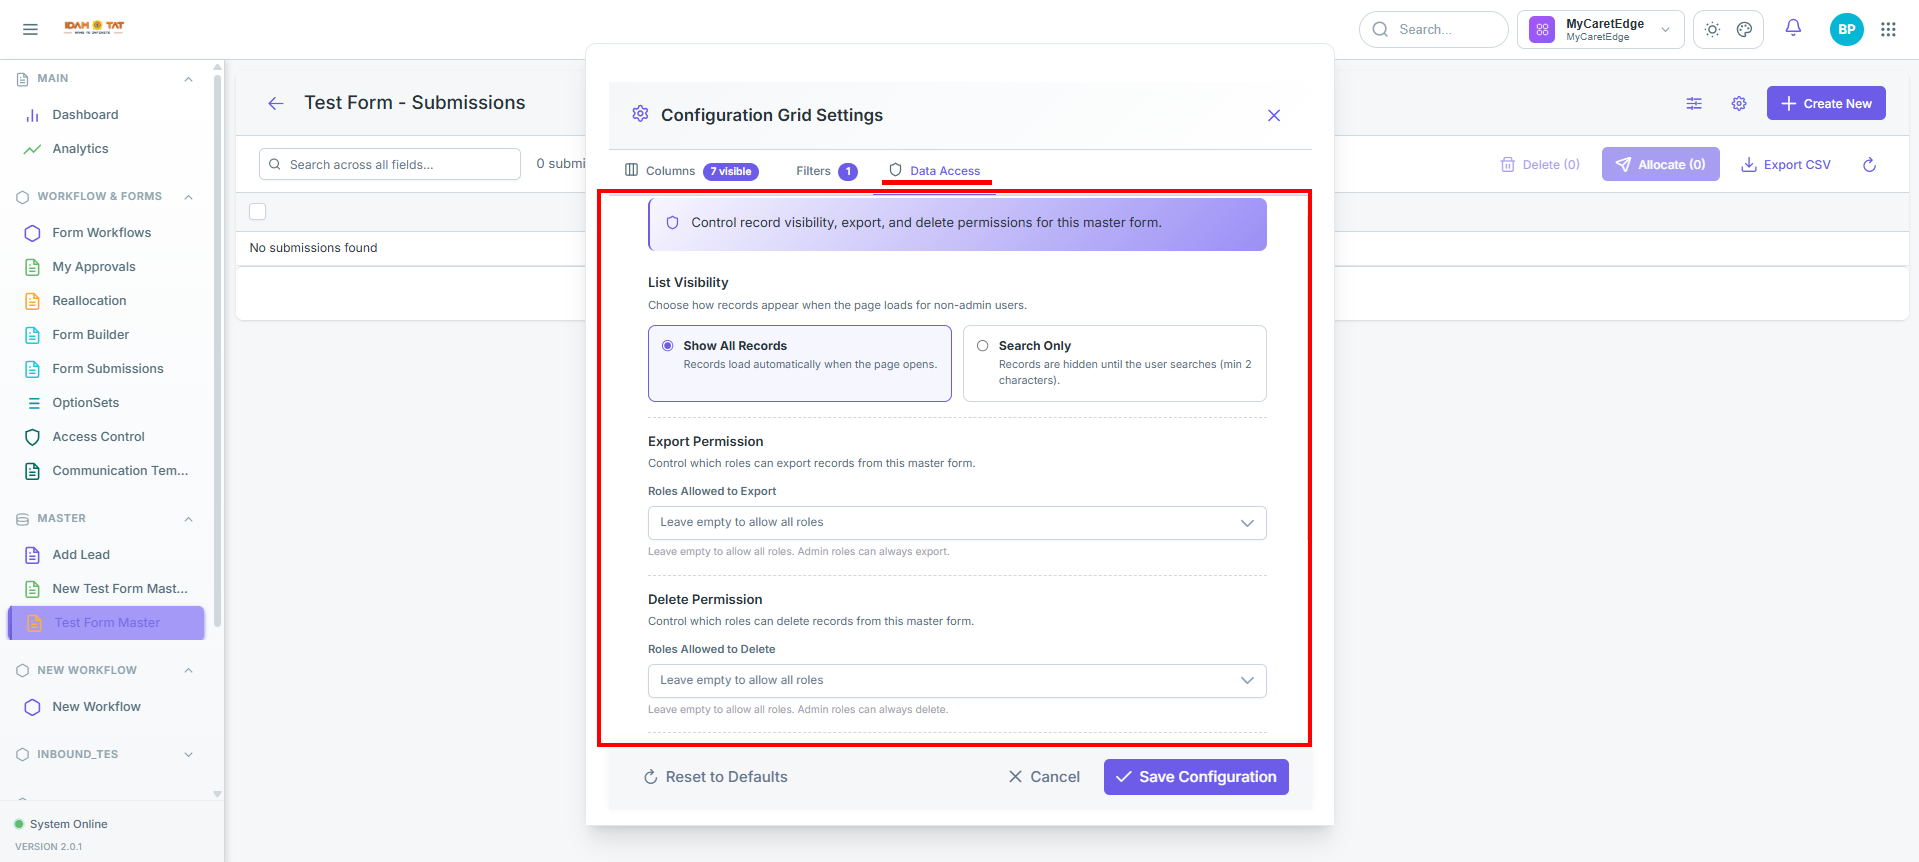
"Control record visibility, export, and delete permissions for this master form."
1. List Visibility
Controls how records appear when the page loads for non-admin users.
| Option | Description |
|---|---|
| Show All Records | Records load automatically when the page opens |
| Search Only | Records are hidden until the user searches (min 2 characters) |
When "Search Only" is selected, an extra field appears:
Bypass Roles — Select roles that always see all records even in Search Only mode. Admin roles (TenantAdmin, SuperAdmin, OrgAdmin) always bypass this restriction regardless.
2. Export Permission
Controls which roles can export records from this master form.
- Roles Allowed to Export — Leave empty to allow all roles.
- Admin roles can always export regardless of this setting.
3. Delete Permission
Controls which roles can delete records from this master form.
- Roles Allowed to Delete — Leave empty to allow all roles.
- Admin roles can always delete regardless of this setting.
4. Allocate Permission
Controls which roles can allocate records to workflows.
- Roles Allowed to Allocate — Leave empty to allow all roles.
- Admin roles can always allocate regardless of this setting.
5. Settings Permission
Controls which roles can access the grid config and allocation setup.
- Roles Allowed to Configure — Leave empty to allow all roles.
- Admin roles can always configure regardless of this setting.
Footer Buttons
| Button | Icon | Description |
|---|---|---|
| Reset to Defaults | ↺ Circular arrow | Resets all column settings back to default |
| Cancel | ✕ Cross | Closes modal without saving |
| Save Configuration | ✓ Checkmark (purple) | Saves and applies the column settings |
Create New
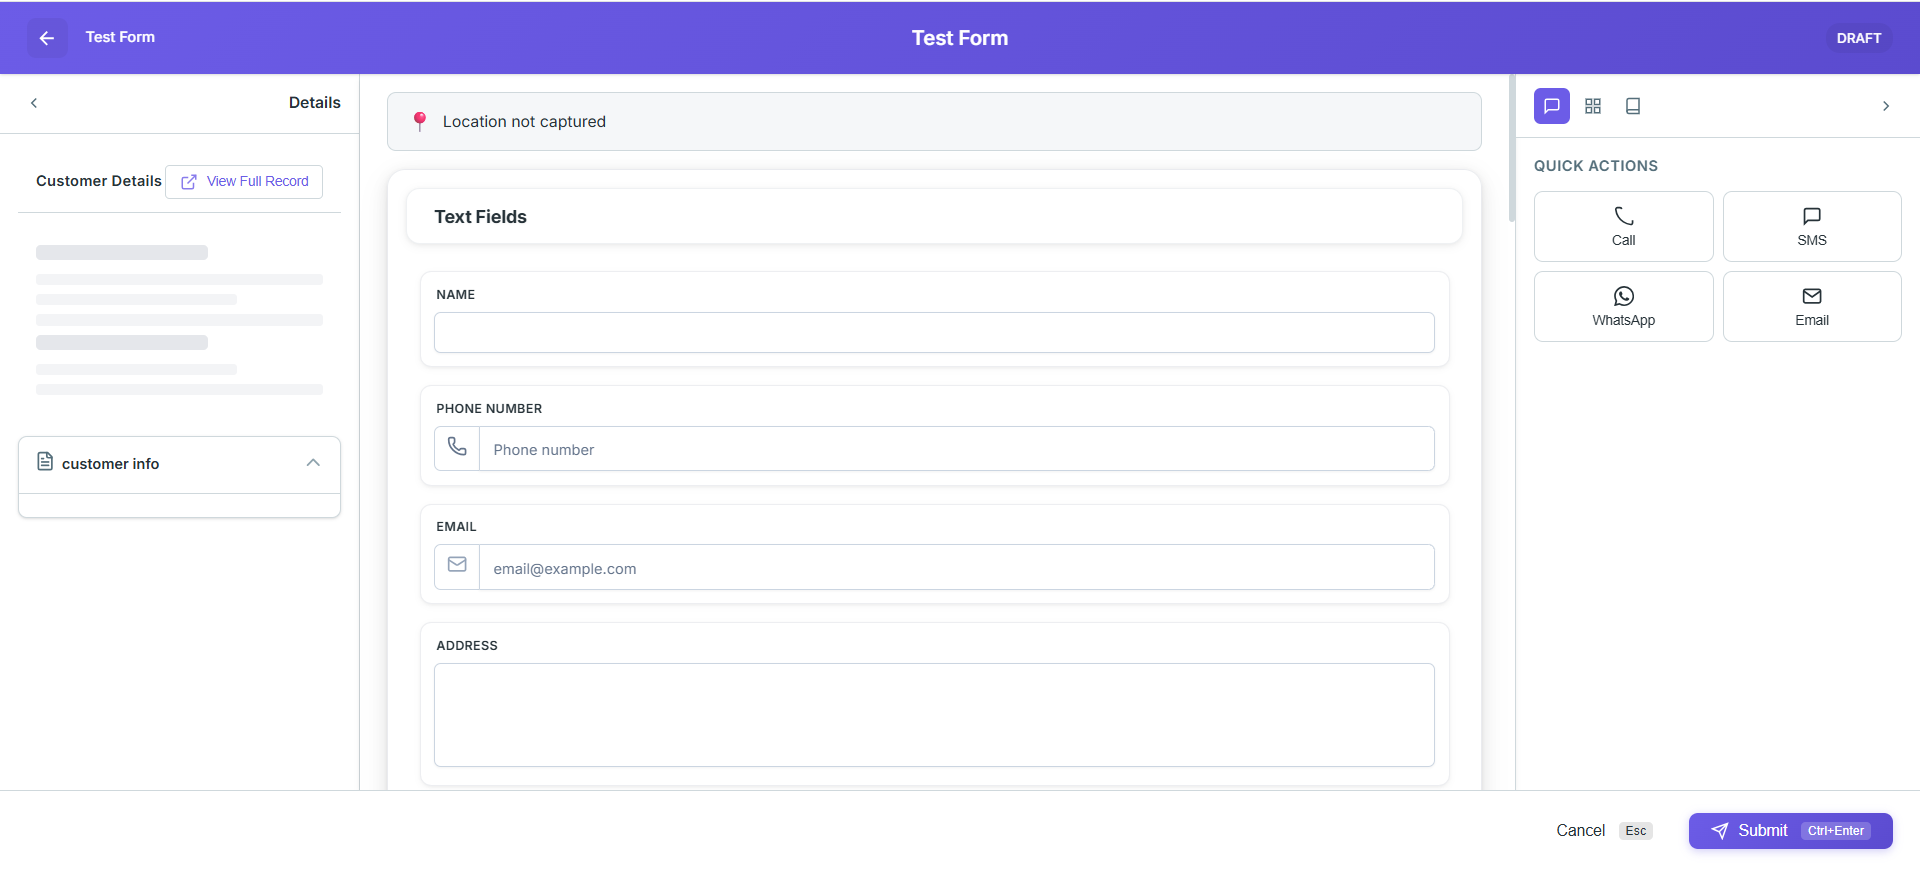
Clicking + Create New opens the form linked to this master form in a layout.
Layout: 3 Panel View
Left Panel — Details
- Shows the record's Customer Details with a View Full Record shortcut link
- Used to reference existing record information while filling the x
Center Panel — Form
- Displays the actual form to be filled
Right Panel — Quick Actions
>collapse/expand toggle for the panel- Contains Quick Actions for the record:
| Action | Icon | Description |
|---|---|---|
| Call | 📞 Phone icon | Initiate a call |
| SMS | 💬 Message icon | Send an SMS |
| WhatsApp icon | Send a WhatsApp message | |
| ✉ Envelope icon | Send an email |
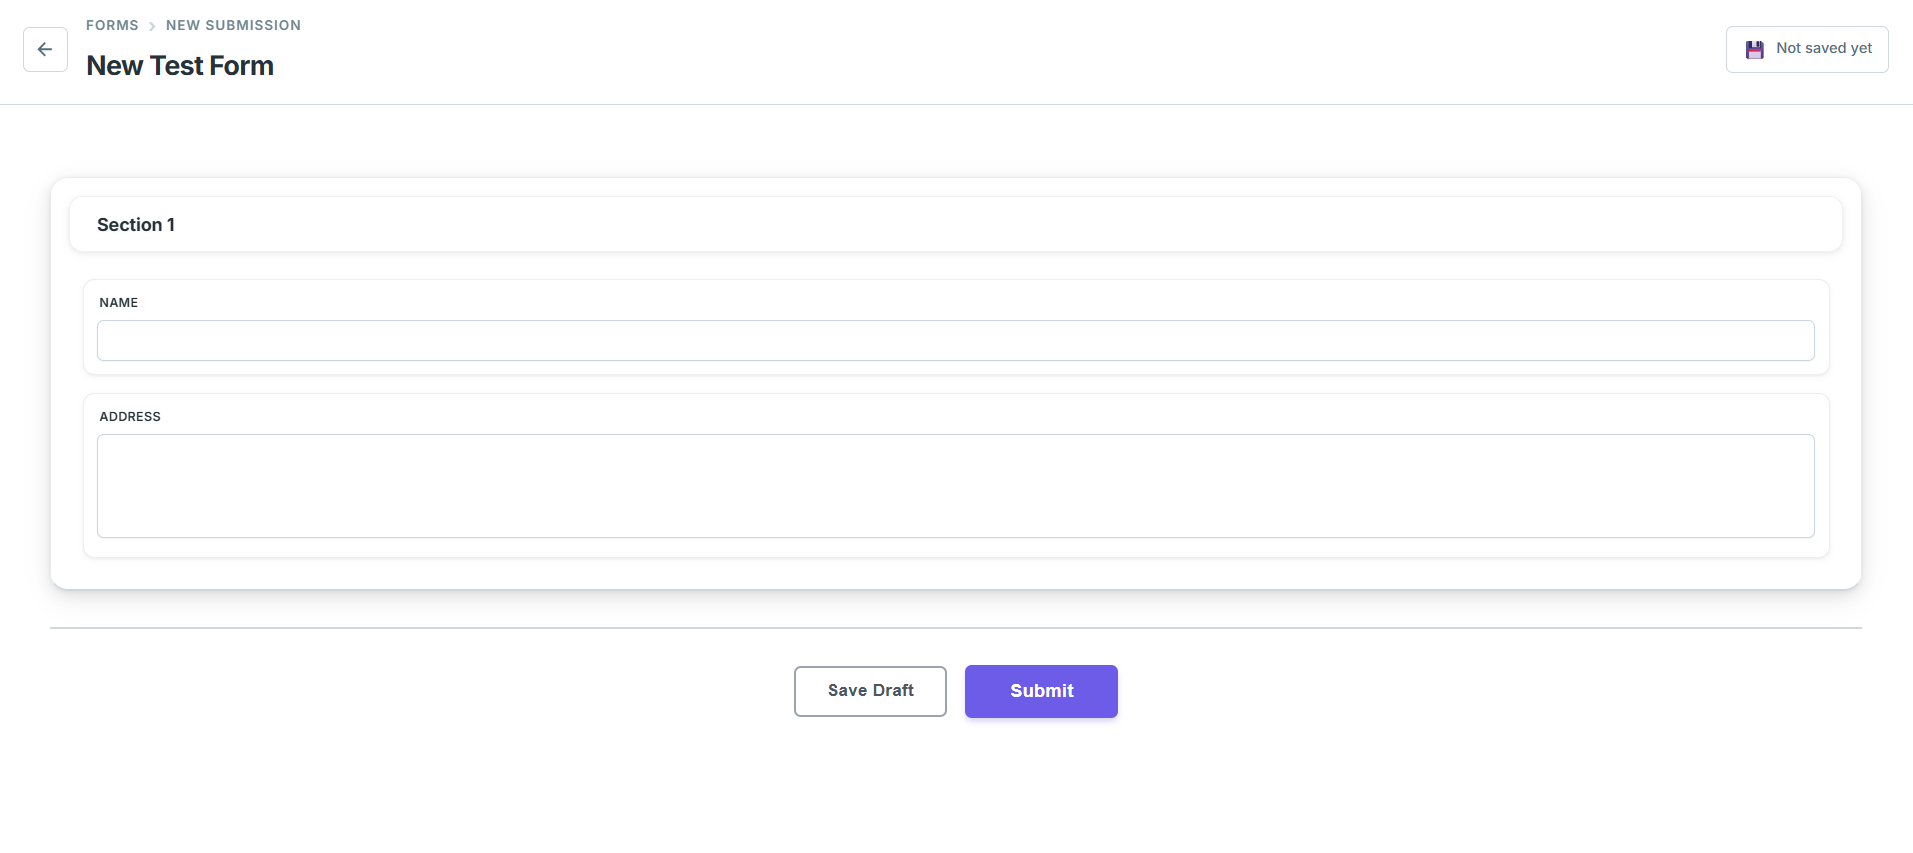
Layout: Simple View
It has only one panel
Panel — Form
- Displays the actual form to be filled
Form Submission
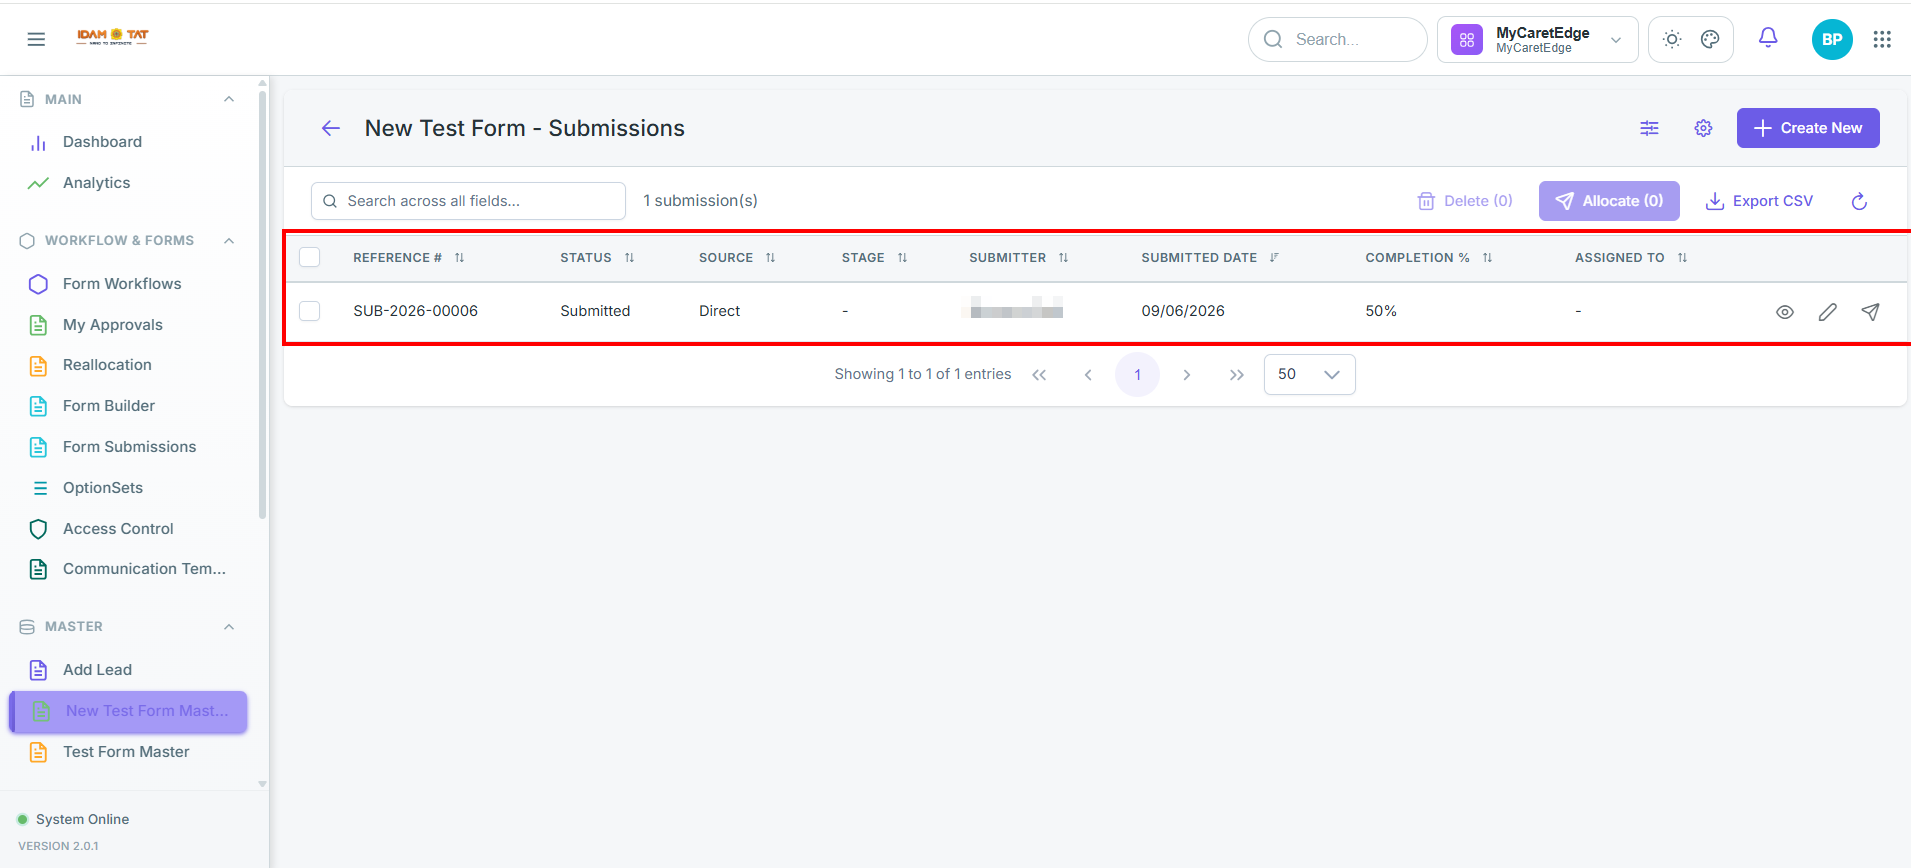
Once a form is filled and submitted, the submission is displayed as a new row on the main page — but only the fields you had selected in the Configure Grid settings will appear as columns.
Action Buttons
| Action | Icon | Description |
|---|---|---|
| View | 👁 Eye icon | View the record |
| Edit | ✏ Pencil icon | Edit the record |
| Allocate | Paper Plane Icon | Allocate the record to a workflow |
Steps To Allocate
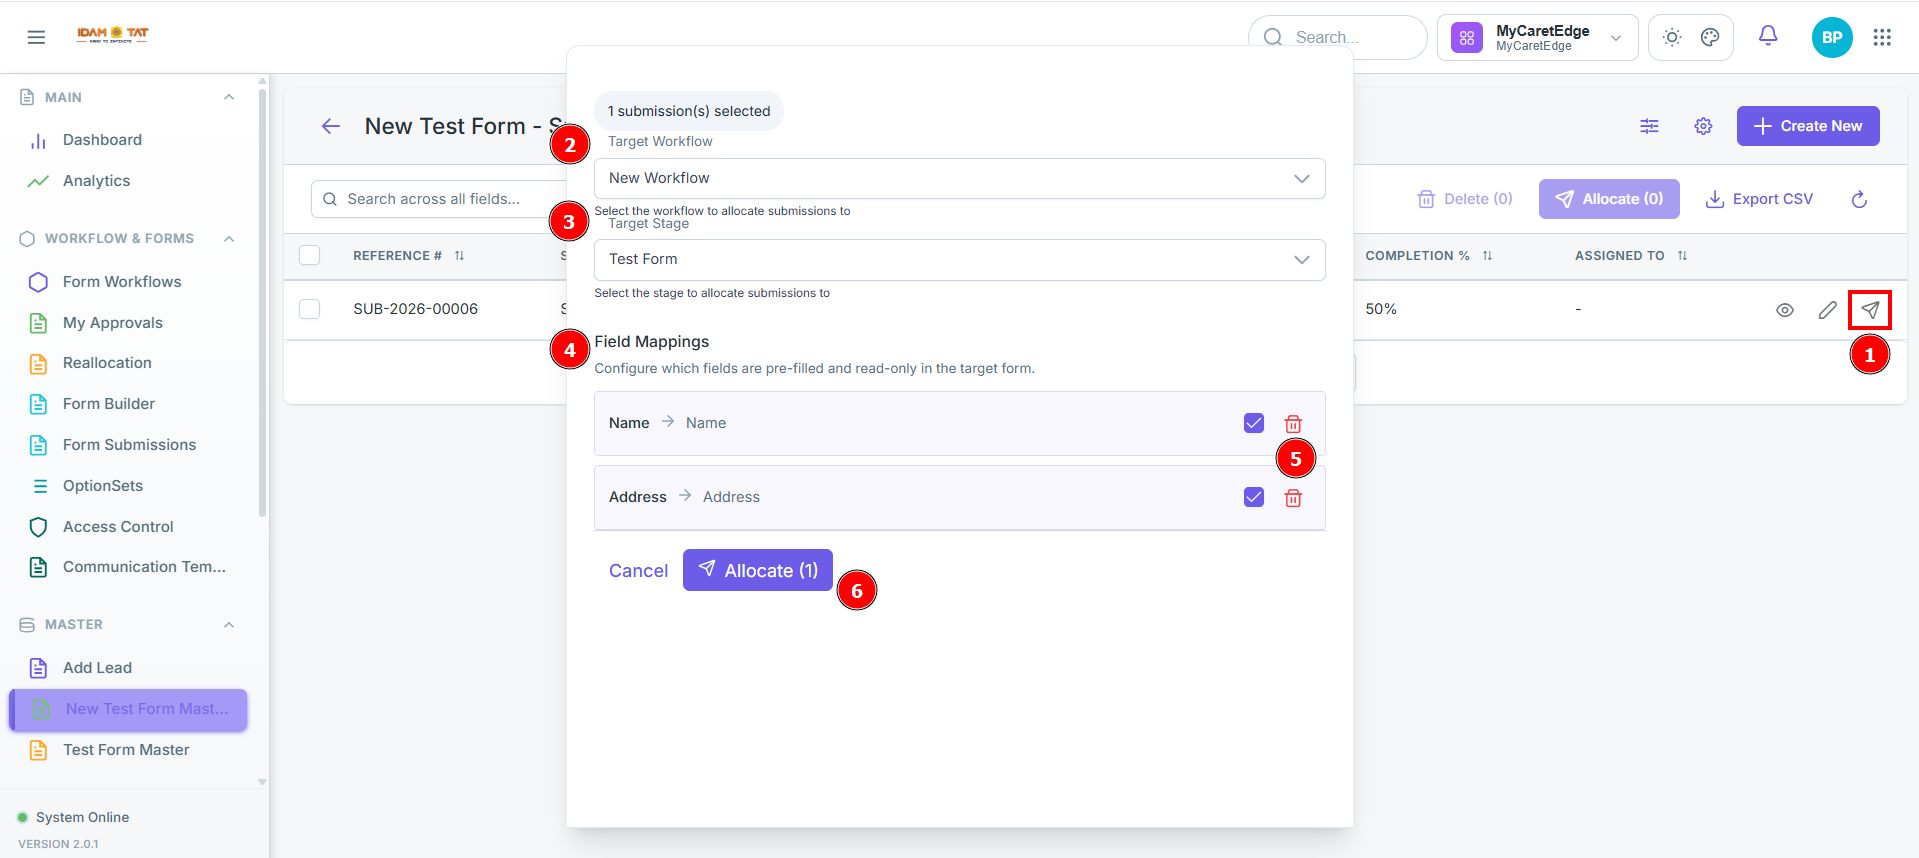
Step 1: Click on the allocate button(Paper Plane Icon).
Step 2: A modal will appear with the following fields Select target workflow A dropdown labeled "Target Workflow" lets the user choose which workflow to allocate to (e.g. "New Workflow"). Helper text below reads: "Select the workflow to allocate submissions to."
Step 3 — Select target stage Once the workflow is chosen, a second dropdown labeled "Target Stage" appears (e.g. "Test Form"). Helper text: "Select the stage to allocate submissions to."
Step 4 — Field mappings load automatically The "Field Mappings" section appears below with the subtitle: "Configure which fields are pre-filled and read-only in the target form." Fields from the current form map to their counterparts in the target form — e.g. Name → Name, Address → Address.
Step 5 — Configure each field mapping Each field row has two controls: - ✅ Checkbox — toggles whether the field is pre-filled in the target form - 🗑️ Delete icon — removes that field mapping entirely if it's not needed
Step 6 — Click Allocate The "Allocate (1)" button at the bottom confirms the number of submissions being allocated. Clicking it completes the allocation. Cancel exits without saving.
Platform Walkthrough Video
Frequently Asked Questions (FAQs)
Q1. How do I access the Master tab?
A: Navigate to the left sidebar and click on Master. Any form tagged as "Master" in the Form Builder will appear in this list.
Q2. What does the "+ Create New" button do?
A: It opens the form linked to the master form so you can manually create a new submission entry. Depending on the form setup, it may open in a 3-panel view (with customer details, form, and quick actions) or a simple single-panel view.
Q3. How do I export submissions?
A: Use the Export CSV (⬇️) button in the submissions toolbar. You can export all submissions or just the ones you've selected using the checkboxes.
Q4. How do I search for a specific submission?
A: Use the Search Bar in the submissions toolbar — it performs a full-text search across all submission fields.
Q5. What does the Refresh button do?
A: The Refresh (↺) button reloads the submissions list to pull in the latest data from the server.
Q6. How do I view or edit a submission?
A: Each submission row has action buttons — the eye icon (👁) to view the record and the pencil icon (✏) to edit it.
Q7. What happens when Allocation Setup is enabled vs disabled?
A: When enabled, the allocation dialog only shows the specific workflow/stage targets you've configured under Allowed Targets — restricting users to pre-approved destinations. When disabled, all available workflow/stage options are visible to the user during allocation.
Q8. How does "Auto-Allocate on Submit" work, and what does "Auto-open target form" do?
A: When "Auto-allocate and assign to self on submit" is on, the submission is automatically allocated and assigned to the submitting user with no manual step needed. "Auto-open target form after allocation" (on by default) then immediately opens the target form as soon as that allocation completes.
Q9. What is the difference between SYSTEM and FIELD badges in the Columns tab?
A: SYSTEM badge columns are predefined system fields — most are enabled by default. FIELD badge columns are custom-defined fields from your form — these are disabled by default and must be manually toggled on if you want them visible in the submissions grid.
Q10. How does "Search Only" list visibility work, and who can bypass it?
A: In Search Only mode, records are hidden when the page loads and only appear after a user types at least 2 characters in the search bar. Roles added to the Bypass Roles list always see all records. Admin roles (TenantAdmin, SuperAdmin, OrgAdmin) always bypass this restriction regardless of configuration.
Q11. What are the Duplicate Prevention options in Allocation Setup, and when would you use "Block if in-progress"?
A: The three checkboxes control whether a submission can be re-allocated to the same stage, a different stage in the same workflow, or a different workflow entirely — all are ON by default. "Block if record is still in-progress at the target" (OFF by default) is useful when you want to prevent duplicate active records at a stage — it stops allocation if the submission is already open there.
Q12. During allocation, what are Field Mappings and how do they work?
A: Field Mappings appear automatically after you select a target workflow and stage. They define which fields from the source form are pre-filled into the target form. Each mapped field has a checkbox to toggle pre-filling on/off and a delete icon to remove the mapping entirely. For example, Name → Name and Address → Address would carry those values into the target form.